Photobucket Photobucket Photobucket Photobucket Photobucket Photobucket

Wednesday, April 24, 2013

Be Yourself

Hello again eP blog friends! Starla here with my last (sniff, sniff) project for my stint as April's guest DT.  I have so enjoyed having this opportunity to get my creative gears turning again!!  Thanks so much to Kim and the eP Team for making my visit such a fun one!!

Today's project was created totally on the fly!! I usually have a couple of ideas floating in the ol' noggin', but this week, time was not my friend!! Tuesday (yesterday!) morning I found myself rummaging through all my craft "goodies" looking for some type of inspiration. I kept having visions of the journal pages that Micki  has created and the wonderful journal page that Broni created for the eTeam Picks Flower Challenge and decided that I would do another journal page but try to go outside my usual box and play around with adding more layers of interest.

Welllll.......I ended up staying true to my more CAS (clean and simple) style, but baby steps, lol!!

 I started out with a journal page and ended up doing a canvas instead! LOL! That is sooo me!! I start out with an idea, then as I keep playing, I deviate to a new path!


Let me just say that I am amused beyond words that I titled this board "Be Yourself" and I used PINK!!! BWHAHAA!! I am so NOT a pink type of gal but when I went to get my colors, pink just called out me!

The canvas board was first "primed" with water.  I pulled out an "old" idea-ology  mask (remember those?! They were the "hot" ticket before stencils became the "hot" new thing!!)  Flourish and placed it on my canvas. Distress Stains  in Peeled Paint, Spun Sugar and Victorian Velvet were then randomly applied and spread out with a wet water color brush. 


As I was drying the canvas with my heat gun, I splattered water droplets on the canvas to create more texture.  I then used Distress Inks (same colors as the stains) to fill in some of the gaps on the original flourish and to add very faint hints along the rest of the canvas. 

I could not find a flower in my dies or stamps that appealed to me so I drew my own onto a piece of Clearly for Art modeling film and traced it again, to give me two layers.


I combined Claudine Hellmuth's acrylic paints in Dash of Red and Blank Canvas to paint one layer of my flower. 


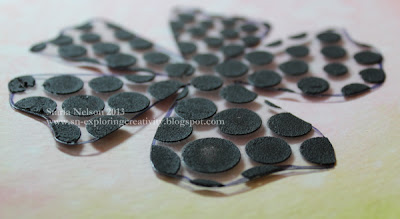
Next I did a little bit of experimenting with Wendy Vecchi's black embossing paste on the Clearly for Art modeling film.  Using TCW Mini Circle Explosion  stencil I applied the embossing paste to the second flower.  


A helpful hint:  After a couple of different attempts at applying the paste, the easiest way I found to apply the paste without smudges was to leave the flower uncut from the film and tape down the stencil securely with removable tape.  After the embossing paste was applied, I slowly and carefully lifted the stencil.  Set aside the piece to dry while you go clean your stencil and palate knife.  I left the embossed flower to dry longer yet while I worked on other areas of the board.  Before I cut out the flower, I carefully heated the paste just a little bit to make sure the paste was dry.  The embossing paste holds well, BUT, you can scrape it off with a sharp object.  It's fine to the touch, and really, if someone goes to scrape off the paste they deserve their hands smacked! 

The flower layers were heated and shaped and adhered together with an idea-ology curio knob.  


The stem of the flower is an Art Part.  The leaves are Clearly for Art Whiteout that were hand drawn, covered in tissue tape and inked with Distress stains Peeled Paint, Forrest Moss and Distress Ink Peeled Paint.  

The butterfly was cut and embossed using a Spellbinder's die from TenSecond Studio's Kiss Me Pink and Rock Star Black metal.  The pink metal blended in too well with the canvas background so I used more of the Dash of Red paint and a VERY little paint brush to paint along the outside of the embossed center. The words are some Alpha Parts  that I have had in my stash for a while. 


I drew some squiggle lines to ground everything and called 'er done!!


Once again, I so appreciated my visit "home" to the eP blog/team and all your comments on my projects this past month!! 

Thank you Kim and eTeam for the fun creative month!!


Tuesday, April 23, 2013

Dreamer of dreams

 Hi everyone! Tracy here today with a little project I popped together using the new
 along with
they are a dream to work with!
{You will find a list of other materials used at the bottom of this post.}
When I started my project I had no idea what I was going to create!!!
Looking at the back of the packaging on the She Art Rub ons is the most beautiful
 She Art done by Christy Tomlinson.
A touch of inspiration and madness descended upon me...please keep in mind that this is my first attempt at drawing  my very own She Art... no lessons, nothing.
So a quick slather of white acrylic paint and then the scarey part . . . drawing!
I started with Tim Holtz Distress Stain in Peeled Paint  for the hair because I love the color,lol.
 Followed by a little Walnut Stain and Black Soot. Once I was happy with the hair, I used a fine black pen to add a little detail.
Do you see those gorrrgeous Border Rub ons . . .I looove them and they make me so happy.
At this point I knew it need a little something more . . . but what I wasn`t sure.
 More Distress Stains in Fired Brick to add a little color to her cheeks, little ribbon ties for her hair, a few rub ons dotted around and a little clear embossing to finish.
Hmmm now what to do with it, well I scratched my head, raked around, hummed and hawed until I found some corrugated card leftover from another project, some buttons, a little raffia, another rub on, bulldog clips,old book pages, a stapler and some wax.
Another little journal filled with old book book pages just waiting to be filled with my attempts at drawing.
Oh, what`s that peeking out the side?
Another first here, not perfect - Neck is of kilter, top half too broad . . . but I really do like the skirt,phew something,lol.
 Lots of rub ons {squeal}, Coffee filter sheets,  pretty patterned papers and scribbles with a fine pen . . . heaven!
Imagine Possibility
Having never tried this before who knows what will happen on page 2, 3, 4, 5, 6. . . . . .
Well that`s all from me today.
Thank you for taking the time to look.
Till next  time

Products from the eP Store - Just click to find them in the store.

Monday, April 22, 2013

A Stitch in Time.

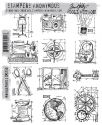
Hi there it's Toni here ready to share a project I made with my new goodies from the lovely eP shop. I ordered the new Tim Holtz Mini Blue Print Set 3 and the Mini Pocket Watch die,there were other things in my order but I'll share those at a later date. Boy I'll never be rich! The project I've made is a 'tag book sewing kit' and this is how I put it together. I started out by printing off some vintage sewing clipart from a Tim Holtz Distressables Elements CD I've had for ages.I also used some clip art I already had on my computer.
I glued my chosen pictures to a piece of paper from the Authentique Renew collection. I almost hate using these gorgeous papers as I have to decide which side to use and I always love  both sides! I then cut out the images and gave them a bit of Vintage Photo Distress Ink around the edges. Once dry, I added some sewing notions to each card, thread, needles, press studs and some vintage pearl buttons. I then turned my attention to making the tag backgrounds. I used some tags I already had in my stash, they measure 5" x 2 1/2". I splodged a variety of Distress Stains onto my craft mat and smooshed the tags through, first one side and then the other.
Once dry, I inked over them with Antique Linen Distress before  stamping over with the Mini Blue Print Stamps on both sides,using Gathered Twigs Distress ink and more Vintage photo around the edges.
I really like the way these stamps can be used to create a background pattern. I also used a tape measure stamp I had in my collection for one of the tags. my initial idea was to fold and sew the bottom of the tags to create a pocket to put the cards in, but it didn't show enough of the cards. So I had a rethink and decided to use some sticky backed Velcro spots.
These, I think, work really well. As you can see the whole of the card plus some of the tag background and the cards are quite securely attached but easy to remove.
I really like the way the sewing cards look like they're straight out of a vintage sewing basket. On the last tag which became the front cover, I used my new die to create a mini pocket watch. I die cut two shapes and punched out the centre of one of them with a 1 1/2" punch. I added Treasure Gold paste to the frame and stuck a piece of acetate on the back.  I then stamped the watch face onto a piece of manila card, cut it out and mounted onto the die cut shape I then glued the frame on top. I finished off by adding a computer print out of the age old saying " a stitch in time saves nine" wise words indeed.x

These are some of the lovely goodies I've used on this project which are available from the eclectic Paperie Shop.

Saturday, April 20, 2013

Decorate a gift bag!

Greetings!
Today I have a gift bag to share with you.
I purchased a few items from my local garden center to give as a gift and they came in this bag:

 Rather than purchasing a gift bag to give the items in, I decided to decorate this plain bag myself!
I started with a layer of Studio Gesso, randomly stamped the Unity Co. She Script Stamp using Ranger Archival ink in Olive and added Tim Holtz "forest moss" Distress Paint applied with bubble wrap.
Using the Wendy Vecchi Lovely Leaves stencil, I created the flowers with Tim Holtz "seedless preserves" Distress Paint and Tim Holtz Distress Markers in dusty concord, aged mahogany, and forest moss.
The magic happens with the addition of Inkssentials Glossy Accents to the main flower petals - so pretty!
Across the top of the bag I added solid color cardstock from my stash and patterned paper by Fancy Pants Designs from the Lilac House collection punched with a Fiskars scallop border punch. A fussy bow created with BBP Monochromatic ribbons, American Crafts Twine, Twinery Honeydew Twine and raffia from my stash finishes the look! I linked up all the products I used from the awesome eclectic Paperie shop so you can easily click over and add them to your cart!
Thanks for stopping by today!
I appreciate your comments!

Friday, April 19, 2013

Best Friends

Hi there, It's Mary-Ann here to share a layout with you all.  I found s sketch on line that I was inspired by, so here is what I was able to create for you.  Where ever my son is, my dog assumes she is welcome there too.  If the kid is on the bed, so is she.  If he is in the bathroom, so is she.  If he is outside, so is she, on the couch....you get the point!  I just loved this photo, and like I have said before, its not often that I get to work with pinks and pastels in an almost all boy household!  I tried my hand at a mask again for this layout, you will see that in one of the closeups further down the post.  It is a very subtle "Polka  Dotty" pattern in the background.  Studio 490 Stencils by Wendy Vecchi are laser-cut, heavy plastic stencils designed for use with all wet media.  I used Tattered Angels, Chalkboard Glimmer mist - French Vanilla along with an older Key Lime Pie that I had on hand.  I then cut my polaroid frame from the white word print paper from Simple Stories - Vintage Bliss 6x6 Paper Pad.  I raised this frame with Scotch Mount foam tape.   Then, I scattered Maya Roads - You've Been Framed Wood Embellishments backed with random patterns of Vintage Bliss paper.  I did not want the detail that was imprinted on these frames so I flipped them over and got a cleaner, less detailed look.  Maya Road - Vintage Butterfly Pins added just the right detail to my layout.  I pulled the butterfly off of one of the pins, and placed it near center of my page.  A few enamel dots to accentuate my frames, starburst circle punches, various chipboard letters, a tag and twine complete the look.  Of course, all of these beautiful items can be purchased here!


Hope you have an amazing day.  Thanks for looking.


Thursday, April 18, 2013

Get Altered Challenge Winner

Wow!  How has it been two weeks since the altered clock challenge?  My poor clock is still sitting on my dining room hutch...just as cute as ever but completely un-altered!  Here's hoping that today's winner inspires me (along with all of our amazing eTeam creations...did you check them out?  Fabulous!) to spend some time fixing up my own clock.  Wasn't this the greatest challenge?  I loved all of the stunning projects!!  Today our winner is...

Colleen

Colleen, you're the winner of a $15.00 gift certificate to use at your next eclectic Paperie shopping expedition!  Please contact me at kim@eclecticpaperie.com to claim your prize!

And enjoy Colleen's clock...isn't it darling?  I love the shabby chic design, the addition of the flowers and bling, and the way the frame is aged.  Beautiful work, Colleen!

eTeam Picks Challenge–Flowers


eteampicks

Welcome to eclectic Paperie's April eTeam Picks Challenge! 

The eTeam Picks Challenge is held on the third Thursday of each month and each challenge is an opportunity for you to be inspired by one of our eTeam’s creations, to share your work, and to be entered into our challenge prize drawing.   Sherry Cheever here as your host and I've chosen the theme of flowers

SCheeverBloomCanvas

The base of the project is a 6x6 canvas that was painted with Bundled Sage, Broken China and Picket Fence Distress Paints.  Using Studio 490 3 Fresh Flowers Stencil, White Embossing Paste was applied to the canvas.  The petals of the flowers were painted with Victorian Velvet and highlighted with Seedless Preserves Distress Paints.  The stems were painted with Peeled Paint Distress Paint.  To add more highlights, Forest Moss Distress Ink was rubbed over the stems and Dusty Concord over the petals.

BloomCanvasBeforeStamping

For more texture and dimension, over stamping with various background stamps was done.   To finish gold leafing splatters were added with a gold leafing pen and canned air.

SCheeverBloomCanvas CloseUP

Love the texture and dimension that the Embossing Paste creates!

SCheeverBloomCanvas2

The eTeam Picks Challenge is all about inspiration and having fun! During each challenge one of the eTeam members will share a topic, word, technique, sketch, or product that will become the foundation for your creation. This challenge is all about mixing it up and just enjoying the creative process... anything goes! We want to see your work and hear about your inspiration. All of those who play along with our challenge will be entered into a prize drawing for a $15.00 gift certificate to the eclectic Paperie store.
We can't wait to see your flowers!  Here are a few things to keep in mind for this challenge…
  • You do not have to use products sold in the eP store…but we do love it when you do.
  • Share a direct link to your creation, not just your blog, using the Linky Tools feature at the end of this post.  If, for any reason, the Linky Tools doesn’t cooperate, please add a link in the Comments section of the blog.
  • When uploading to any online galleries, please use any of the following keywords; eP, eclectic Paperie or eTeam Pick Challenge.  Link your creations to the eP blog.
  • If you’d like to be considered as one of our featured projects and be entered into our prize drawing, please be sure to add your link no later than midnight EST on Wednesday, May 1, 2013. 
Thanks for joining me today!
SHERRY SIGNATURE

Project Supplies: