Photobucket Photobucket Photobucket Photobucket Photobucket Photobucket
Showing posts with label art anthology. Show all posts

Tuesday, October 28, 2014

Thanks for the memories, Steph Ackerman

Hi everyone, Steph Ackerman here today.  By now you know that eclectic Paperie is closing it's doors.  That also means the end of the blog and the design team.

We have had a fabulous run as members of the eclectic Paperie Design Team and wish to thank you all for your interest and support over the years. With the eP blog coming to a close at the end of the month, we all wanted to do something special to celebrate the fabulous friendships, tons of inspiration from other team members, from Kim, and from all those who participated in our challenges. Each of the current DT members is taking a day to post some of her favorite makes from her time on the eclectic Paperie team. We hope you enjoy the look back.

While I've only been on the team a short while,  I have really enjoyed working with this team and have loved the wide variety of products available in the store.

This was the very first project I created for eP and I had so much fun creating it - the stencils, the stamps and assorted Art Anthology paints were so much fun to work with.


This canvas uses a large Prima stencil, some molding paste and Art Anthology paints.


And a fun use of the same stamp to create tags for all seasons with Gelatos.


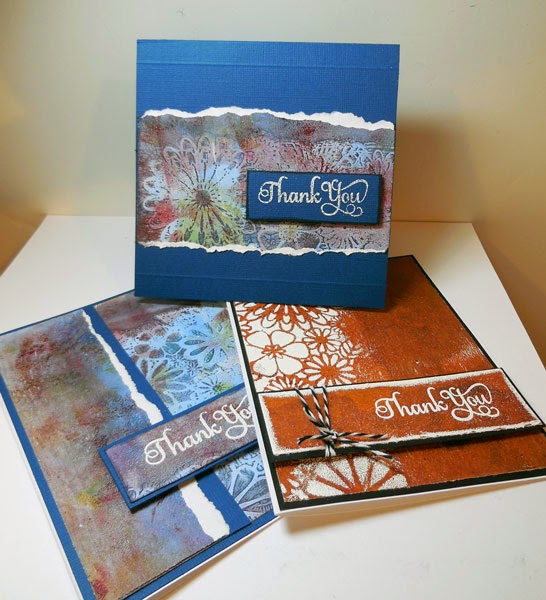
I loved creating these cards with Art Anthology paints, a Gelli Plate and The Crafter's Workshop stencils. 


And I just wanted to shout out a big thank you to Kim for giving me the opportunity to work with her and this amazing design team.
 
Steph
 

Thursday, October 9, 2014

Up on the Rooftop

Ok, you are probably thinking.... What?????? Christmas already?????  What is she thinking??

Steph Ackerman here to let you know that Christmas is only  76 days away.  I can hardly believe it myself!!!
 
But I will confess, this project did not start out with a Christmas theme.  Actually, it started because I wanted to use The Crafter's Workshop Brick Stencil.


I placed the stencil on a canvas panel and added  Art Anthology's Brick Stone Effects paint.  When I removed the stencil, I found I had created a chimney.  So my project morphed from there.


I spritzed Art Anthology's Colorations in Lark around the canvas to give a hint of the night sky.

 
Using The Crafter's Workshop Mini North Star stencil with Art Anthology's Sorbet Dazzle paint, I added stars to the canvas.  When dry, I spritzed the canvas again with Art Anthology's Glorious Colorations for a dazzling night sky look.

 
I painted green cardstock with Art Anthology's Velvet Paint in Basil.   Once dry (either wait till it's dry or heat set it), die cut with Spellbinders Holly Wreath die twice. 


Assemble 2 layers of the die cut and embossed wreaths, adding a red bow to the top.  Add to the chimney with foam adhesives for dimension.  Using Art Anthology Dimensional Crystals in Red Corvette, create the berries on the wreath.


Die cut letters using Cricut Expression from red and black cardstock (or use stickers).  Die cut Santa and his reindeer using the Stamp Doctor die with red and brown cardstock, adding them to the canvas with foam adhesives for dimension.  Using the Inkssentials Blending Tool with  Ranger's Vintage Photo Distress Ink, I added just a touch of color around the edges of the canvas.


So, have I put you in the Christmas mood  yet?

Thanks for stopping by today.

Steph


Monday, September 22, 2014

We're all mad here!


Hi everyone. It's Bonnie here today with a fun mixed media piece I created to help me blow off a little frustration. I don't know about you but, for me, this works every time...have a little play, get a little messy, make myself smile, and feel a lot better! I began with a mop up page covered with Dylusions sprays in Postbox Red and Pure Sunshine. I keep a pad of  6x8 inch mixed media paper beside my work space and when I have leftover ink or paint on my craft sheet, I use a piece to mop up the extra. Then I'm not wasting and it provides a jump off point for another project.


I loved the mix of the colours and the bits of white peeking through but there was a large uncoloured chunk at the bottom so I tore off a piece of Authentique's dotty Classique Elegant 12 paper and added it to the bottom. The piece that I trimmed off of that became the strip I added to the top edge. Using Wendy Vecchi's Red Geranium Archival ink and a mini ink blender, I stencilled TCW's Art Is pattern here and there. I also pounced black gesso through TCW's Mini Texturized stencil. More black gesso was used to create the bottle top rings as well.


In order to add some sparkle and shine that would catch the light without detracting from the background, I scraped Art Anthology Frost Sorbet Dimensional paint through TCW's Netting stencil, First time I used it and it is gorgeous and will likely live on my desk, an honour reserved for only my favourite products that I use all the time. It picked up a little of the Dylusions ink and was a dream to spread giving me crisp stencilling.


The rabbit and clock images, purchased on Etsy, were fussy cut and then edged with Black Big Brush pen. Both were adhered to the background with Gel Medium. Once dry, the hoop and stick were outlined with silver metallic gel pen. Two Idea-ology pen nibs were adhered to the clock face with Glossy Accents. Two other embellies, Wendy Vecchi's Blossom Bucket Stars, were added to the top left corner to give a little more visual weight there.


The sentiment was computer generated, printed on white cardstock, and matted in black. The word MAD was coloured with Prismacolor pencils. All words were popped up on foam tape for dimension and to create shadow. To finish off the piece, Black Soot Distress ink and Black Big Brush pen were used around the outside edges.

Thanks for joining Ms. March Hare and me today. We do appreciate your fine company and hope that you gained a little inspiration to get messy!

Bonnie


Friday, September 19, 2014

Boo to You

Good morning all, Steph Ackerman here with a quick and easy spooky canvas that the kids (both young and old) can create as they get ready for the spookiest day of the year. 

If you are having a Halloween party, why not have the kids create a project.  All you need is a small canvas, some Art Anthology paints, assorted stencils and die cuts or stickers.


On the canvas I placed The Crafter's Workshop Mini North Star Stencil, then spritzed some  Art Anthology Timeless Colorations across the stencil.  I wasn't careful because I did not want a "clean" look.  After all, this is Halloween right?


Using the same stencil, I added a touch of Art Anthology's Mayan Gold Velvet Dimensional Paint  and a few spritzes of Waimea Bay Colorations.  The black webbing effect was created with an Art Anthology stencil and Ash Velvet Dimensional Paint.


The ghost and letters were die cut using my Cricut Expression.  I added some dazzle to the ghost by painting him with Art Anthology's Sorbet Dimensional Paint in Dazzle.  A Crafter's Workshop Stencil - Beaded Curtain - was used on the letters with Art Anthology's Velvet Paint in Ash.   Once dry, I inked the letters and ghost with Ranger Tea Dye Distress Ink using the Ranger Mini Blending Tool.   When matted, I used Art Anthology's Dimensional Crystal Glaze in Red Corvette for the dripping blood.
 
 
I wanted a nice shadow for the ghost so I die cut the shadow layer larger and placed the ghost on top with foam adhesives for dimension.  Isn't the ghost dazzling????
 
Thanks for stopping by today.
 
Steph


Monday, September 1, 2014

Graphic45 Family Clipboard

Hi everyone, Steph Ackerman here today.

I found a 12" x 12" wood clipboard some time ago and I picked it up knowing that I'd figure out what to do with it at some point!  When I saw these awesome Graphic 45 papers, I knew exactly what I wanted to do with the clipboard.

I started by inking the clipboard in ColorBox Wisteria Chalk Ink.  Then I added  Art Anthology's Velvet paint in Orchid on top to get a nice mix of color.


I chose several patterned papers from the Graphic 45 Sweet Sentiments collection.  This paper is double sided so I was able to use both sides for some nice contract.  I know it's a lot of flowers, but follow along and see what I was able to create.


I added cardstock between the flowers layers for some dimension and contrast.   Because the paper is so busy, I added several cardstock mats in coordinating colors on top for the photos.  Since I'm giving this as a gift, I've left room for the recipient to add the photos.


The title was cut with my Cricut and I added Petaloo flowers to the "i" in Family as well as  around the large photo mat. 


I think the Petaloo flowers provide a nice pop and 3-d effect.  What do you think?
 
Thanks for stopping by today.
 
Steph
 

Saturday, August 30, 2014

Embossing with Dimensional Paint

Happy Place

To say I was inspired by one of our entries to the eP embossing challenges would be an understatement!! 

When i saw Judith's adorable card I was inspired to try a new technique with some of the Art Anthology dimensional paint. 
I wondered what would it look like if I painted the background and then used the paint through a Prima stencil?


The paint is a little more loose than embossing paste so you don't develop a super crisp image but I love the subtle embossed image again the background. 


I also loved the way the mist puddled on the dried paint and created highlights in the indentations.


I used an old TA mist for the subtle yellow and Dylusions sprays in Calypso Teal and Dirty Martini for the splatters and green accents.  I used some Petaloo color me crazy flowers and Prima Cartographer flowers. The Key hole and resin pieces are Prima as well. 

Loved this fun pic of aubrey Sue for this super fun bright layout. Hope you enjoyed my take on embossing!

{{hugs}}
Andiepants

Tuesday, August 26, 2014

Altered Frame - Prima Decor II!

Good morning!  Sherry here today and I have an altered frame to share with you.  Sadly, I got so into the creation of the frame that I failed to take photos of each step.  It’s very simple though and I’m sure I can walk you through.

PrimaAlteredFrame

I started with one of those dollar wood frames from Michaels and applied Wendy Vecchi Studio 490 White Embossing Paste to the front using Prima Stencil - Decor II.  (all links can be found at the bottom of this post).

PrimaAlteredFrameCloseUP

All in all, this was a 3-step process, allowing dry time between each step.  The frame was painted black and then highlighted with thin coats of Art Anthology Bronze Metal Effects.  Can I just say, that this is the first time I’ve used the Metal Effects . . . and I LOVE them!!

PrimaAlteredFrameCloseUPCenter

The embellishments in the center were assembled from different stash pieces.

PrimaAlteredFrameLeft

Thanks for stopping by and joining me today!!

SHERRY SIGNATURE


Project Supplies: