



Photobucket Photobucket Photobucket Photobucket Photobucket Photobucket
Showing posts with label Shabby chic. Show all posts

Saturday, February 22, 2014

Altered bag with Andiepants


Andiepants in the house! 
I figured I would give you more inspiration for Toni's "Do something with a bag". Well...I did something.

Altering a bag? hmmmmmm....I've done this before. Didn't turn out so well, so here was my chance for redemption.

First, I dug out this Master Cam bag that my hubby brought home from a machinist trade show about a decade ago. 


I decided I didn't want 2 handles so I started by using my seam ripper to remove the handles that were sewn on.


To color the handles I soaked them with water first. This allows the mist to spread more evenly over the fabric. Next I sprayed my Dylusions mist in Vibrant Turquoise generously over the handles so they were well covered. You may want to use gloves. I did not :(

In order to cover that gawd awful picture I decided I would cover the thing in gesso. Remember when working with fabric to place a piece of cardboard in between your layers to avoid bleeding and soak through. Here I just used an insert from a 12x12 Prima mask.


Cover generously with gesso. If you feel you need more coats make sure you dry thoroughly in between coats. Honestly I remove the handles and covered in gesso before dying the handles in order to give my bag some additional air-dry time.


Once covered to my liking I then used Distress paint in Broken China to color the background. after that was dry I sprayed some Vibrant Turqoise in order to allow some congruency to the piece. I did this to both sides of the bag.


You will want to do the handle next since you need to reattach it to the bag. Make sure your sewing needle is a large enough gauge to handle the material of the bag. I sewed my to pieces together to make one long handle, sewed a piece of trim down the middle, and then sewed each end to the seams in the bag.


You can see here where I attached it on the inside.

The rest is just like scrapbooking! For the front I adhered a piece of burlap using gloss gel medium in various areas. I adhered the large lace at the top using the same method and allowed that to dry. Arrange your clusters and take photos so that you know where to put them when you're ready.


Next I used Wendy Vecchi embossing paste in black through a Martha Stewart silk screen to attain the large black shape (Above) and the smaller one coming out of the bottom of my cluster. I then adhered the flowers with fabric glue in my hot glue gun and I sewed the small blue Prima baubles  on by hand in the bottom cluster, top cluster and across the lace.


For the back side, I gave a good coating of water and then added more Dylusions in Calypso Teal and Dirty Martini. 
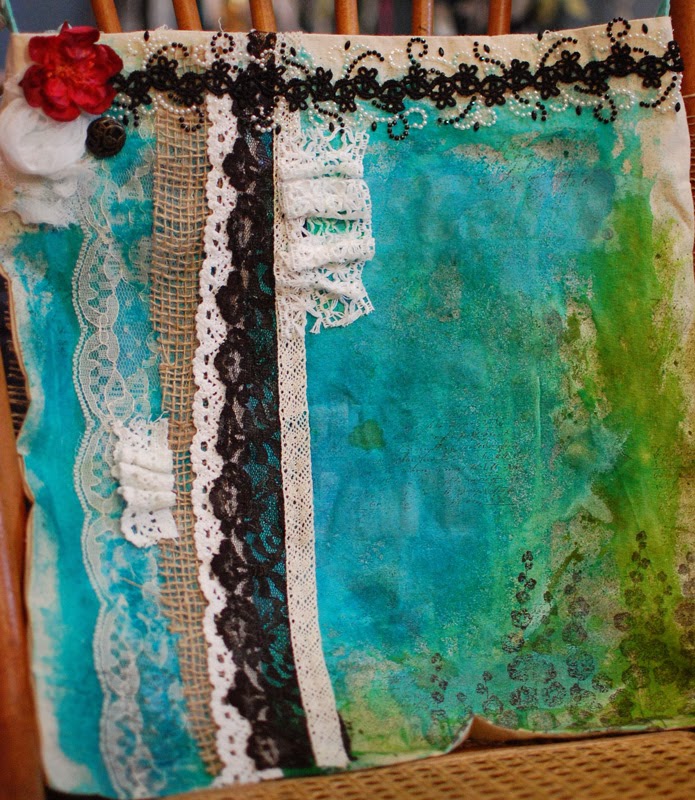

I first added all the lace piece using the gloss gel medium and let them dry. You can add dimension with your lace as I have and the gel medium will allow it to dry stiff and hold it's shape. Next I used the Hollyhocks stamp with Stazon jet black ink


and added a script stamp in Stazon Timber Brown. Notice that I even stamped on the lace. It's subtle but a nice touch.


I used a leftover scrap of cheese cloth to make a rosette with a slight tail, added an altered flower that was leftover on my desk, a random button that was sitting there, and finally added the Prima border. Again I used gloss gel to adhere the Prima border so that it was sure to stay.


I definitely think I've redeemed my prior shame of altering a bag. I quite like this one.

I hope you play along for a chance to win!!

{{hugs}}
Andiepants

Friday, October 18, 2013

Get altered...tissue box cozy

Ok...so when I hear the word cozy...I get a little gaggy. Isn't that something that your grandmother crocheted for every kitchen appliance she had? Don't forget the crocheted flowers too ;)

So when I saw a cozy and the words "that's a great idea" came out of my mouth...I felt like perhaps I had been possessed. (this is the part where my head spins around)

Wait...let me explain. I love pinterest (don't we all) and I was just sitting there when this cozy came across my feed. This lady had created the cutest (but a little plain) tissue box cozy that looked like a nice neat stack of books. What a great present for my twins' teacher!

Now I KNOW that I could do something like that Andiepants style so I found another image of altered stacked boxes/drawers that looked like random stacked books with lots of shabby and lots of chic. 

BAM! 
Inspiration

I was going to make a tissue box cozy that looked like random stacked books. I was going to take the main idea from each and combine them to make...an altered box!!!!

VOILA!!!


*pausing for applause*

OK...so how did I make this adorably shabby piece of art?!

First I started with poster board. Cut a strip that is about 7" tall x 21.5" long. Starting at one end score at every 5.25" inches. This should leave a 1/2" strip at the end. *Crafty Andie's hot tip: Instead of 7" tall you can make it a tad shorter which will allow you to cover the box using one piece of 12x12 cut in half. Just measure your tissue box.

1. Along each score line measure 1/2" down from the top. Use a ruler/yard stick to connect the bottoms fo these 1/2" lines and then score along this line.  Cut down on each 1/2" line. These you will fold in to make the top of the box.

2. Fold your box together and apply glue to the 1/2" flap. Fold each one of the small 1/2" flaps and glue them to one another. You should now have a box that will cover a tissue box.

3. Decide what sizes you would like your "books". I chose 7"x5.75", 7"x8", and 8x8.5" *Crafty Andie's hot tip! Don't make the top book too small. I ended up with a very small edge to work with which made it very difficult. Next time I would make it a little larger.

4.Once you have figured your sizes, go ahead and cut 2 pieces of posterboard for each size. One piece for the top and one piece for the bottom. You can use a thicker chipboard for this step if you wish your "books" to be a tad sturdier.

5. Organize your "books" starting with the largest on the bottom. figure how you would like them skewed (or lined up straight). Place your tissue box on top to make sure that 1. the "books" will fit around the tissue box and 2. nothing is hanging off the edge. Use a pencil and trace the tissue box on the top book, trace the top book onto the center, and trace the center book onto the last book. *hot tip: because the posterboard bowed outward on the box, I used the box to mark my corners then used a ruler, measured the actual length of the box, and use my ruler and measurements to draw out the shape on the top "book".


6. Use reposition-able adhesive and adhere your book tops to the bottoms. (so when you cut out the square they won't wiggle)

7. Use an exacto knife and cut out the hole for each book set.

8. Now it's time to cover your books. I only had 1 piece of each paper so I had to try to cover both sides of my book. GET 2 SHEETS OF EACH PAPER!!! Trust me on this one.


10. Once all the pieces of your books have been covered, edge them with ink for a semi-distresssed look.


11. Use Mod Podge or Matte medium to wrap your tissue box.


12. Cut the pieces for your book bindings. I did 3 inches for the large one and 2" each for the smaller. Make sure you add an inch overlay for each cover. Therefore...my binding for my big book would be 8.5" long by 5" wide. Punch the corners for a decorative look.


13. Adhere the bindings with the 1" overlap. If the binding pieces overlap into the hole for the box, use and exacto knife to cut them out. 

14. Slide your finished books onto your box and adhere them bottom to top. Then them to the edges of the tissue box. Use a bullet level to make sure they are straight.


15. Adhere your top 


16. Embellish with gorgeous eP embellishments and you're done!!!


Papers are by Jillibean soup. You can get some adorable Jillibean embellies from the eP store!


I hope you enjoyed this little tutorial and I hope you decide to try one for yourself.

{{hugs}}
Andiepants