Photobucket Photobucket Photobucket Photobucket Photobucket Photobucket
Showing posts with label clearly for art modeling film. Show all posts

Wednesday, May 6, 2015

Post Box Red Flowers for May

Hi, Ruby Craft here. I’m so excited that Kim has invited me to be guest designer for May. She asked me to share a little bit about myself. A little over 10 years ago I had taken early retirement but had a little too much time on my hands. I decided I needed a hobby so I started Scrapbooking. Then I took a part time job at a local scrapbook store and a co-worker showed me Tim Holtz and Alcohol Inks. When Tim started his blog with a tour of his workroom and then began posting 12 Tags of Christmas I was hooked on inky fingers and multi media. I began blogging so I could post my tags for Tim’s challenges. I still scrapbook from time to time but enjoy challenges, making tags, cards and the occasional 3 dimensional project. I'll be here every Wednesday this month with something new for you to see.

For my first project I looked through my stash and found a naked spiral book I had bought a while back. I used 3 different stencils along with paints, so I worked on a non-stick craft sheet. It made clean up easy and also made a great pallet. The first thing I did was to carefully open the spiral and take out the covers. I then laid them face up on my work surface and placed the first stencil, Weaving for Prima Finnabair Elementals, on the front cover. I used Prima's Color Bloom Spray Mist in Gold Foil. This was the first time I used it and I loved working with it. It has a trigger sprayer which allows you to get quick solid coverage but also allows you to get a spatter effect if you want. I sprayed through the stencil onto the cover front. Instead of wiping off the beautiful mist that had beaded up on the stencil, I flipped it over and placed it on the back cover. This gave me the same beautiful shimmery gold but a negative of the pattern on the front.

I used a fun stamp from Catherine Scanlon Designs called Catherine's Alphabet. This is a large one piece stamp that has open letters that would be perfect for water coloring. I thought it would make a terrific illustration for my cover. I used a brayer to "inked it up" with some Post Box Red Paint from Dylusions and stamped the front cover. I didn't get a perfect impression but it was perfect for the look I was going for.

I decided I wanted to add a Flower border along the sides and bottom of the front cover and along the bottom of the back one.  Tim Holtz Wildflower Stencil was perfect for this and the second stencil I used. I used a couple of mini blending tools to apply the Post Box Red Paint to the stencil flowers and then Cracked Pistachio Distress Paint for the stems and foliage. Distress Paints have a dauber top but the paint is very fluid and would run under the stencil if you tried to apply it directly from the bottle. The mini blending tool works great with the stencils and paints. The thin stems can be a little tricky with the blending tool. Once I removed the stencil I used a fine detail water brush to pick up some Cracked Pistachio from my craft sheet to touch up the stems. The water brush allow me to keep the color soft.

I also used the water brush to paint the inside of the  letters with Post Box Red at the top and Abandoned Coral Distress Paint from the bottom of the letters fading the color out before reaching the middle of the letters. This allows the Gold Foil Spray to peek through. Another thing I liked that the Gold Foil Spray as a background is that once it was dry it was not disturbed by the water or paint.

Along the very top and bottom of the front cover I used the third stencil, the hearts from the Love set of BoBunny Stickable Stencils. Again using the blending tool and Dylusion's Post Box Red. Once I finished the hearts I felt they needed something else. BoBunny Glitter Paste in Sugar! I used a palette knife and the stencil to apply it. These stencils are sticky and reposition-able making them easy to use. I finished off the edges using the blending tool and some Vintage Photo Distress Ink.


I decided I wanted to make a band to hold the book closed. I painted a piece of white elastic with Cracked Pistachio Distress Paint. Using the dauber top made it easy. Distress Paint does not effect the elasticity or stiffen the elastic. Once dry I attached the strip to the back cover with eyelets.

I die cut a flower from Wendy Vecchi's Clearly for Art Modeling Film from Tim Holtz's Tattered Floral die. Clearly for Art Modeling Film is NOT shrink film. When you heat it you can bend it to what ever shape you want and when it cools it will hold the shape. It comes in clear, white or black. Before you mold it you can paint it, stamp on it, or glue paper to it and then stamp on the paper if you like. If you don't like the shape you can reheat it flatten it and start all over again. I used clear and painted one side red by simple spreading the Post Box Red paint on with my fingertips. Once dry I flipped the flower over and used the spatter stamp from Wendy's Faux Graniteware starter kit and some Jet Black Archival ink to stamp the black spots. After the ink dried I attached the flower to the elastic band with a black eyelet. Then I was able to heat the flower with my heat tool and shape it. I just wanted the flower to have some subtle modeling since it was on the cover of the journal. I slipped a pencil under some spots while heating to get a little lift and did the rest of the modeling with my fingers.  You don't have to heat the whole flower, just a small section at a time. Once I had my flower shaped the way I wanted it, my cover was finished and I put everything back together.

I want to thank Kim for inviting me to be the May Guest Designer. She generously sent me quite a few fun products to use and she is wonderful to work with. She has designers for June, July and August, but if you are interested in being a guest designer in the future send her an email. I included a little information about myself and a few links to projects on my blog that I thought she might like and she got right back to me.

Here are a few quick links to some of the products I used from eclectic Paperie.
Dylusion Paint, Distress Paints, Stencils, BoBunny Glitter PastePrima Color Bloom Spray MistTim Holtz ProductsWendy Vecchi, Catherine Scanlon Designs 

I Hope you enjoyed seeing how I created my first project as guest designer and that you'll be back next Wednesday.

Monday, July 21, 2014

Altered Water Bottle - ePlay Challenge

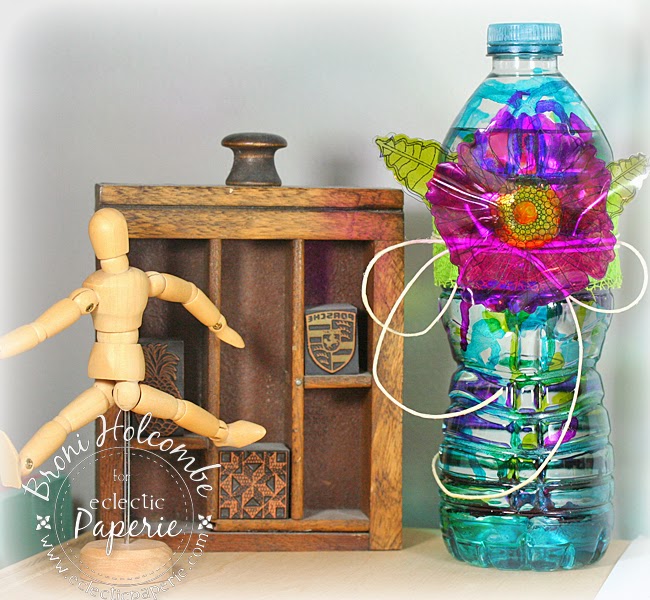
Hello, everyone!  It's Broni here with you today and I'm going to show you what I created for this month's ePlay challenge - Altered Bottles.  It's an altered water bottle.

 When I alter items, I like for them to be useful as well as pleasing to look at!  The first "bottle" that came to mind for this project was a water bottle because….well, I was holding one in my hand at the time!! 

That made me think about how I use water a lot in my crafting: water coloring, filling my mini-mister bottles, wetting my chamois cloth that I use to clean ink from my stamps.  And usually when I need more water I get up and go to the kitchen for it.  But if I just kept an extra bottle of water on my craft table, I wouldn't have to!

Obviously a water bottle is plastic, so that narrowed down my choices of inks to use and I decided on my Adirondack alcohol inks.

To start I dripped ink onto the bottle, letting it dry completely between colors so the colors wouldn't become muddy-looking.  I used Stream, Lettuce and Wild Plum.


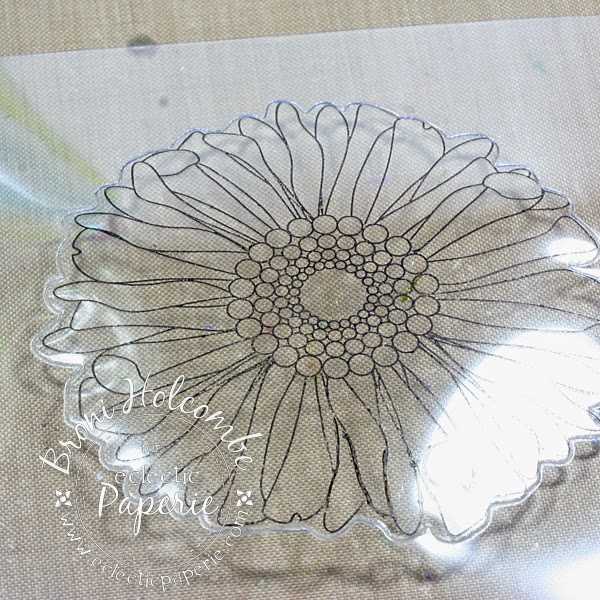
 Next I cut a flower and leaves (from Friends Til the End by Papertrey Ink) from a sheet of Studio 490 Clearly For Art, but didn't "punch" them from the sheet.  I left them attached in order to have better control over my stamping and coloring.  I stamped the images in Archival Jet Black ink.

 I used a paintbrush to apply some alcohol blending solution, which is clear, to the opposite side of the Clearly For Art sheet from the stamped image.  Then I dripped on some Lettuce ink.  The blending solution helps the ink flow on the sheet.

I did the same with the Wild Plum on the flower, only this time I only painted the blending solution on the flower petals so that the ink would not flow into the flower center.


I used my Copic markers to color the flower center after the Wild Plum ink was dry.


Next I popped the flower and leaves from the Clearly For Art sheet.


I wrapped the bottle with a strip of lime green felt.

BONUS TIP:  To evenly cut the felt, I laid it onto my Scor-Buddy and used my Tonic scissors to cut along one of the score grooves.

I adhered the felt, some textured ribbon and some hemp twine using 1" wide Scor-Tape.

Then I pulled out my Heat tool to warm the Clearly For Art flower and leaves until they were pliable, shaping them with my hands, then adhering them with Scor-Tape as well.

It was pretty hard to get photos of a clear bottle filled with water and the shiny and clear flower, but here it is again, along with a close-up and a photo of it sitting on the shelf above my desk.


That's it for me today.  Thanks so much for stopping by to check out my Altered Bottle.  Will you play along in our challenge?


Friday, June 6, 2014

Eclectic Elements Fabric Flower - the ePlay Challenge

Hi eclectic Paperie fans!  Julia here sharing a project I made for Andie's June ePlay challenge that premiered yesterday - Altered Fabric.
I made a flower using TH Eclectic Elements Fabric - Crafting Pack that I layered to Art Parts Clearly for Art Modeling Film.   Here are some photos of my process.  In order to make the fabric flower sturdy I adhered it to the Modeling Film using Glue n Seal.
 I layered the fabric over the modeling film and let it dry.  Then I die cut the pieces with the Alterations Tattered Florals die.  
 And by attaching the fabric to the modeling film - I was able to curve the petals by heating them with my heat tool.
So here is my layered Tattered Flower adhered to the top of an ATB -  Artist Trading Box - that I made using Little Sizzles 6"x13" black matboard and the Blocks/Cube - die both from Sizzix.  Here it is looking down on the top.
And here are views of the 4 sides -  I used tags from Nature Walk 12"x12"  Panel by 7 Dots Studio for my panels -  I cut the tags down to 2 3/8" x 2 3/8" squares - I just love the images and the colors matched the fabric perfectly!  I sponged the edges with Ranger Distress Pumice Stone ink and adhered them to the sides of the ATB.   I rubbed Adirondack Metallic Gold Acrylic Paint Dabber with my finger randomly over the panels  On this front panel I added a Word Band that I rubbed more of the Gold Acrylic Paint over to highlight the word.  I wove a piece of Linen Ribbon through the loops in the band and pulled apart the ends - I love this ribbon - it gives such great texture and dimension!  I also added Chit Chat Stickers on each panel.
On the next side I added a Sprocket Gear rubbed with Gold Acrylic Paint.  I also slipped a little piece of Linen Ribbon through the hole in the gear and spread the ends.
On the next side - I adhered an Adornments/Arrow that I inked with the Gold Acrylic Paint.  I adhered a little piece of Linen Ribbon here - it matched the grass on the tag panel perfectly!
And on the 4th side I added another Sprocket Gear that I threaded a piece of Linen Ribbon through and inked with gold.
I was going to add some die cut leaves to the flower -  but decided to continue with the Linen Ribbon - that I just looped and spread the ends adhereing them to the bottom of the flower - did I say I REALLY love this ribbon?!
I used thick foam dots to adhere the layers of the flower to each other so there was space between each layer - accept for the two smallest pieces which I just adhered with Glue N Seal and added the Gold Berry Flower Center from Blossom Bucket.  I also rubbed the Gold Acrylic paint on the petals with my finger just to grunge it up a bit and add some shimmer!
So - I'm very happy with my little Altered Fabric flower on top of my cute little 2 1/2" x 2 1/2" box (and I didn't seal the flap on the top piece so it actually opens and could be used to give a little gift!)
How will you alter some fabric??   We'd love to see your project linked up at the ePlay challenge found here!  You have the month of June to enter.  As always - Kim is offering a gift certificate to a random winner!

Paper:  Little Sizzles 6" x 13" matboard - Sizzix, 12x12 Nature Walk Tags Panel - 7 Dots Studio
Ink:  Ranger Distress Pumice Stone
Accessories:  Eclectic Elements Fabric - Tim Holtz, Idea-ology - Chit Chat Stickers, Word Bands/Observations, Adornments/Arrows, Sprocket Gears and Linen Ribbon,  thick foam dots,  Flower Center -Studio 490 Blossom Bucket, Adirondack Metallic Acrylic Paint Dabber Gold, Glue N Seal - Ranger, Tattered Floral Die - Alterations, Art Parts Clearly for Art Modeling Film.

Thursday, April 10, 2014

Art Parts Stencil Book

Hi everyone!  Julia here with my first post as the newbie DT member for eclectic Paperie!  Today I have an Art Parts Stencil Book I made to hold all of my brandy new Wendy Vecchi Stencils!    I recently attended Wendy's Mixed Media Tag Art Journal workshop held at the brick and mortar eclectic Paperie in Exeter, NH. She showed us one of these books that she had made and I thought it was a great way to keep all of my stencils in one place and easily accessible. I have lots of pictures to show how I made my version of the Stencil Book so grab a cuppa and settle back in your chair!
Here's my front cover
 And  my back cover
First I spread Black Embossing Paste over the covers, not quite covering it all.  After it dried, I spread Crackled Texture Paste over the black areas and let that dry.
Next, I sponged over both covers with Peacock Feathers and Mustard Seed Distress Inks
I stenciled the Checkmake stencil with Archival Watering Can Ink on both covers.
Then I focused on the front cover - I sponged with Walnut Stain Distress Ink to tone down the colors - then I stenciled  the Bar Codes Stencil with Black Embossing Paste
I die cut the Tim Holtz mini Flourish out of Clearly for Art Blackout Modeling film.  I spread Metalic Gold and Metalic Silver Embossing paste over it with my finger to give it the look of wrought iron, let it dry and adhered it to the front cover.
I inked an Ideology Key Hole and Ideology Border with Archival Cornflower and Orange Blossom.  I added an Ideology die cut key, a label made with my P-Touch Label maker and drew a square frame with a black Stabilo Pencil
I stamped around the edges with the plaid square of Wendy Vecchi's Large Collage stamp (I cut it into small squares so I could use each one separately). 
I kept the inside covers clean and simple so nothing would catch on the stencils.  I stamped Ornate Dots (I absolutely LOVE this stamp!) on the inside front cover with Archival Watering Can ink and sponged with Mustard Seed, Peacock Feathers and Walnut Stain Distress inks.
For the inside of the back cover - I stamped Wendy Vecchi's From A-Z background stamp and sponged with the same Distress inks as the inside of the front cover (above)
To finish the back cover - I stenciled using Bar Codes, Create a Wreath and Dots and Stripes using Archival Black ink.  I left this cover with the brighter colors and didn't sponge it with Walnut Stain Distress Ink
I added a die cut bird (Tim Holtz Alterations Mini Bird and Cage die), cut out of Clearly for Art Blackout Modeling film and made a label with my name with my P-Touch Label Maker. (so no one could say 'Hey - who's book is this??!)
And here's a look at the stencils stored inside!
I hope I have inspired you with my little stencil book -  isn't it nice to keep our supplies in artsy little books rather than just in their store packaging?!!  Thanks so much for stopping by the eclectic Paperie blog today!

Stamps:  Ornate Dots, Large Collage Stamp, From A-Z Background - Studio 490 Wendy Vecchi
Inks:  Ranger Distress Peacock Feathers, Mustard Seed and Walnut Stain, Archival Watering Can, Cornflower  and Orange Blossom
Accessories: Art Parts Stencil BinderBlack Embossing Paste, Metalic Gold Embossing Paste, Metalic Silver Embossing Paste, Crackled Texture Paste, Clearly for Art Blackout Modeling Film, Mini Lock and Key, Mini Flourish, Mini Bird and Cage - Tim Holtz Alterations Repositionable Magnetic Dies, Brothers P-Touch Label Maker - Staples, Stabilo Black Pencil, Ranger Ideology Borders, Glue N Seal - Ranger,  Wendy Vecchi Stencils - Create a Wreath, Bar Codes, Dots and Stripes, Checkmake.