Photobucket Photobucket Photobucket Photobucket Photobucket Photobucket
Showing posts with label Get Altered Challenge. Show all posts

Thursday, January 2, 2014

HEARTS ~ January Get Altered Challenge!

Hi everyone. Happy New Year! It's Sue Lelli here and I am hosting the January Get Altered Challenge at eclectic Paperie. The eP Get Altered challenge begins the first Thursday of each month and is an opportunity to explore your creative journey, step outside your comfort zone, and experiment with new products and techniques. It's all about having fun while creating altered and mixed media art with a chance of winning a $15 gift certificate to the eclectic Paperie  shop.


I chose to use a Wendy Vecchi - Studio 490 - Art Parts Hearts Love & Stars kit shown at the end of my post to make my heart wall hanging.
I am going to show you heart by heart details and then some of my process at the end. (LOTS of photos!)
This is the largest heart, star, and LOVE word. I used Tim Holtz distress paints, a Prima Donna Downey Damask Stencil, and Wendy Vecchi White embossing paste to make this heart. The pink ribbon is from a Victoria's Secret bag!

Here's a close up photo so you can see the embossing paste better ~ LOVE!


Here are the center stars and beads and gems.


Another close up. The text is a Christmas Tim Holt stamp set. I LOVE the font and it doesn't matter that it's Christmas because you can't read it! LOL!


On my last heart I used Wendy Vecchi's Studio 490 translucent embossing paste. LOVE how it adds texture but you can see the paint colors through it! I also added A Wendy Vecchi Blossom Bucket natural heart that I painted white.

Some Process Photos:

I gessoed the hearts and stars so they would hold the paint.

I applied Tim Holtz Distress Paints to my small craft sheet.

Here they are after I dragged them through the paint ~ LOVE the marbeling effect!

Here is a page in a journal where I wiped my left over paint for a future project ~ NEVER waste this FAB paint!

I stamped text randomly.

and Wendy Vecchi Studio 490 translucent embossing past to my smaller heart. It looks white when first applied but dries clear as I showed you in a previous photo. LOVE!
Here is what the kit looks like when you purchase it with an example of what you could make.

Here is what my desk looked like as I was putting my wall hanging together. You are only limited by your imagination plus I have enough pieces left over to make a couple more things! This kit is FUN and I love how easy it is to make holes in it with the Crop a dile. Cuts like butter!


Now go get out your hearts and alter something! Then link it to the eclectic Paperie's Get Altered Challenge and be entered to win a $15 gift certificate to the EP Shop!

Thursday, October 10, 2013

October Get Altered Challenge


Hi everyone, Micki here with a new Get Altered with eclectic Paperie challenge and my challenge to you is to Alter a Box!  Easy - peasy and with the holidays right around the corner, this fun challenge could be your springboard for your homemade Christmas presents.  Before I share my altered project, here are the details:
The Get Altered Challenge is about exploring your creative journey, about stepping outside of your comfort zone, experimenting with new products, and creating altered and mixed media art. We want to see your work and hear about your inspiration!  
All of those who play along with our challenge will be entered into a prize drawing for a $15.00 gift certificate to the eclectic Paperie store.
So grab your supplies and play along!  Here are a few things to keep in mind for this challenge…
  • You do not have to use products sold in the eP store…but we do love it when you do!
  • Share a direct link to your creation, not just your blog, using the Linky Tools feature at the end of this post.  If, for any reason, the Linky Tools doesn’t cooperate, please add a link in the Comments section of the blog.
  • When uploading to any online galleries, please use any of the following keywords; eP, eclectic Paperie or Get Altered Challenge. Link your creations to the eP blog.
  • If you’d like to be considered as one of our featured projects and be entered into our prize drawing, please be sure to add your link before Midnight, Wednesday, October 23rd!
The winner will be announced right before the eTeam Picks Challenge. Now to my project.

My project started out with one of those wooden art kits from Michaels:
The inside of the box had pull out trays, which were really kind of flimsy.
I had my husband take it apart and decided to use the inner box tray for my project.  First order of business....gesso.


Well, then I changed my mind (imagine that) about using the outside of the box.  Instead I opted to use the inside of the box because I wanted to try creating a piece using all kinds of ephemera like Anna Dabrowska (aka Finnabair).  I love her steampunk-grunge style and love how she uses anything and everything. So why not just go for it, right?  Which led to second order of business - more gesso, this time I used Claudine Hellmuth Studio Black Gesso and covered the inside of the box.
You can see that I wasn't too worried about getting the glue string off, instead just painting right over it.


While that was drying I got out all my ephemera, embellishments, left over die-cut flowers and also rummaged through hubby's garage to get my box of Vagabond parts.  My first Vagabond broke so I had hubby take it apart and saved all the little parts.
After the gesso was dry, I glued my first layer of papers. Corrugated paper, torn book paper, doilies - basically anything that was in my "left-over-from-previous-projects" box.  I used Matte Inkssentials Glue N Seal to adhere all my flat objects. Then I started getting out all those dimensional objects I had gathered; hardware like nuts, bolts and wire, dominos, beads, Maya Road wooden embellishments as well as Idea-ology findings, etc.  I used Beacon 3-In-1 Advanced Craft Glue to glue these items down.

And yes, those Vagabond parts were the first industrial parts I glued down.  
I had so much fun, I kept adding more and more stuff.  Not that this is wrong, but (can you guess where I'm going with this?) after I had glued about as much one could into the tray, it dawned on me that I left no room for a picture.  Nor did the ensemble of "parts" follow a cohesive "flow".  


Well, "Seize the Day" I said to myself.  Just own it and don't stop now. First I gave the whole thing a coat of Dylusions White Linen Spray Ink, dabs of Picket Fence Distress Paint and mists of water:  

Next I grabbed the gesso and brush and gave everything a good coat:


I also need to add that I would use my finger to add paint between mists of water. To help mop up some of the (by now) excess moisture, I used a paper towel lightly dabbing it across the piece.  But you know what really helped, was sprinkling Clear Rock Candy Distress Stickles Dry Glitter (which you can't really see in the picture below - but it adds a wonderful little dazzle.)  At this point I honestly thought about doing another project because my husband came in, looked at it and asked "What is it?"

Not letting hubby deter me, I added several layers of Ranger Perfect Pearl Mists, adding several layers randomly.  I wanted a little pop of color, so I would alternate spritzes of water with my Mini Mister and Splash of Color Silks Acrylic Glazes, which were applied with a very wet brush.  Next I would dab a bit of the Silk Glaze onto my Non-Stick Craft Sheet, misting it with water to get a very watered down version which I picked up with my brush and flicked randomly over the box to give me those loveable splatters.


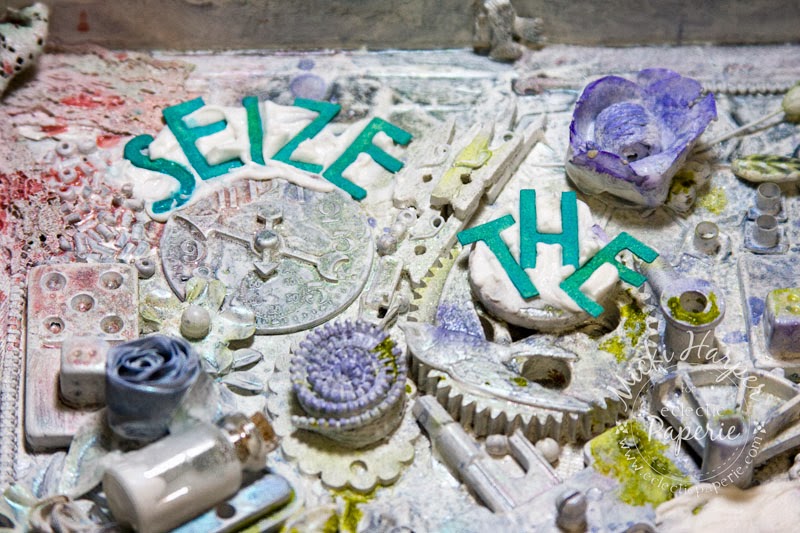
Now I had to face my earlier problem of what or how to add a sentiment.  I wanted to use the Fancy Pants Quote/Adventure 3x8 stencil set, in particular the "Seize The Day" phrase because every time I looked at this project, that phrase kept popping into my head. After much deliberation, I came up with the idea to use Studio 490 Embossing Paste and encase the die cut letters into it. 
With my palette knife I added the embossing paste and pushed the ink covered die cut letters into it using the Tonic's retractable craft pick (this tool is a must, lo):

Next step after the embossing paste was dry was to use my blending tool and Walnut Stain Distress Ink, to add a little definition and age things a bit by running the tool over the objects.  I also used Tsukineko Fantastix Brush which gets into the little crevices nicely.  After a final coat of more Ranger Perfect Pearl Mists, which made the letters bleed, I decided that it was time to stop.  I did go back and try to fix the letters by brushing Splash of Color Silks directly onto the letters.  Not sure if I like that but all in all I had a blast and I did what I set out to do...... Seized the Day or in my case the project :).

Oh and I added little eyescrews and a repurposed necklace chain:


All in all, I will definitely do this again, although next time I will give it a little more thought to the end result so that I can leave room for pictures or sentiments.  Now, let's see what you Altered Box you come up with!  I can't wait to see.

Remember - you have until midnight, October 23rd!  Don't forget to check out the rest of the eTeam's projects!


Supplies Used: