Photobucket Photobucket Photobucket Photobucket Photobucket Photobucket
Showing posts with label 7 Gypsies paper. Show all posts

Friday, January 31, 2014

Save the date . . .

Hello eP friends, Tracy here today and it`s so good to be back and sharing a little of my art with you all!

In my design team package, I had the most adoreable little rulers from Maya Road { swooooon } thank you Kim!
Cute, cute, cute!
What was I to do with them, hmmmmmm?
A layout, bindings for mini books, cards . . . the list went on and on I can tell you, but inspiration came from another project I had created involving cakes . . . mmmmmm!
A little project on wood using Gesso, Scrap paper and Pan Pastels.
. . .loving the cakes, lol . . . so what if I used the little rulers as a frame and an old book page for the background.
I backed them onto cardboard packaging to add some strength.
 Time to mix up a little Yellow Ochre Pan Pastel with Gesso. I smooched it on with my fingers, making sure to let the words and parts of the design on the rulers show through.
 Now I have to apologise, I got so wrapped up creating the cake that I forgot to snap any more pictures.
But here is a close up of the finished confection . . .
Layers of pretty paper
A sprinkling of roses { Distress Stain }
A frosting of Distress Clear Rock Candy 
{ I wish you could see how much this sparkles }
A little doodle doodle doo`s
and
 letters snipped from old book pages to finish.
 I went on to add a little Permanent Red Pan Pastel onto the background with my finger, before applying more Yellow Ochre, Titanium White and Black Pan Pastels around the frame.
How cute this would be made into special cards for an engagement , or as an embellishment to mark a special occasion . . . or . . . or . . . giggling here because my brain has just exploded with about another dozen ideas . . . watch this space,lol!
Be sure and leave us a link if you do in the comments, we would all love to see your creations.
I hope you enjoyed my post today and maybe you will be inspired to grab a few supplies and get creating yourself.
Till next time
Big hugs
XOXOXOX

Materials and links to the eP Store -
Maya Road- Measure Once, Cut Twice Wood Embellishments

Thursday, August 8, 2013

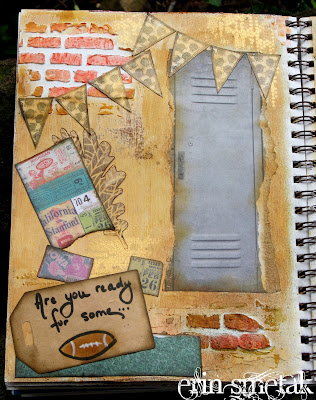
Are you ready for some.....FOOTBALL?!

Hello there!  It's Erin here with you today to show you how I incorporated scrapbooking into my mixed media journal!

Let's get started!  First I pulled out my Vintage Varsity Paper Pack by 7 Gypsies, which has been untouched!  A crime in my craft room!  Although, I do like to hoard my paper!  ;D  I bought the Vintage Varsity pack because the papers are so great to work with when you have sports pages to do!  My son and daughter both play basketball and baseball/softball, so I knew this pack would come in handy!  Little did I know that it would be used for something entirely different!  Fun!  I love when that happens!

Ok, so, I flipped through the pack trying to get an idea of what I imagined the final product would look like.  I decided to focus on football.  It's August, football practices have started.  The Steelers are in training camp!  YAY!  So, why not jump start on the upcoming fall football season?!

To fast forward, here's the finished journal pages.  I'll go through and explain the features!


To create this side, I prepped both pages with white Claudine Hellmuth gesso to give my layers a nice foundation.  I used a brick stencil and w/ some molding paste, created brick wall segments.  Then, I colored the bricks with Gelatos.  I scribbled Red Cherry & Blood Orange Gelatos on my artist palette, which is plastic, then sprayed with water, and using a paint brush, painted the bricks.

I sprayed the pages with Melted Chocolate Dylusions Spray in different places to add contrast.

Then I sponged Wild Honey, Spiced Marmalade, Rusty Hinge, & Brushed Corduroy Ranger Distressed Inks in that order all over the page to create a background.  I wanted the bricks to stand out, so I left them bare.

I stamped an older Dylusions Bags of Bunting banner stamp several times in Walnut Stain Distress Ink on vanilla cardstock.  With the tip of my finger, I painted each of them with a gold acrylic glaze.  Then, I painted Ice Acrylic Glaze on top of that.

I cut several items from the Varsity Pack and sponged them w/ Walnut Stain Distress Ink around the edges.
Before I adhered them, I took some Iridescent Gold Acrylic Paint and painted over the Mini Tiny Circles stencil in different places on the pages.  I LOVE the Mini Patterned Leaves stencil!  First I sponged the inside of the leaf w/ one of the stencils, then w/ the outline, I traced it w/ a brown pen.  I will definitely be using this stencil A LOT for fall projects!  The possibilities are endless!  But, that really goes for all of the stencils, and all of the products! 


To create the second page, I did the same thing w/ the brick, the Tiny Circles stencil, Patterned Leaves stencil, as well as sponge coloring the entire page in the same colors mentioned above.
The heading "Football" was hand written on one of the pages w/ a football texture image.  I used my black Big Brush Pen by Faber-Castell to outline the letters.  Once I cut them out, I used my  white Big Brush Pen by Faber-Castell to create the white lines and stitching on some of the letters.  Just trying to make it look more football-ish! 
The trophy was in my stash, and I used the same distress inks mentioned above to make it look more golden.  That's it!


Have a wonderful day!  Thanks for stopping by the eP blog!
~ Erin

Saturday, August 3, 2013

Altered Frame with 7 Gypsies Harmony Paper Collection . . .

 Hi everyone, it`s Tracy here today and I am sooo excited to be sharing my cheap as cheese Altered Frame documenting my wedding day to Alex over 24yrs ago using the drop dead gorrrgeous papers from the
Oh my giddy aunt I can`t begin to tell you what a joy it was to get back to my love of pretty papers!!
I adore vintage and shabby along with papers that tell a story and this collection does it all.
 I actually remembered to take a picture of the frame before I started, if you know me you might know how impatient I am to get started on a project and tend to forget . . . not this time though,yeah!
See how cheap it was . . . oh my did I get a bargain.
 The papers come in an 8x8 paper pad with 48 sheets and are double sided giving you lots of paper to play with.
All the embellishments that you are going to see are made from the papers with a little touch of Distress Ink and Embossing powders. 
See that beautiful vintage car
  ... swoooon moment ... 
You get so many of each design that you can afford to cut out the car a few times to layer it up for more dimension using foam tape cut to size.
 Like wise with the dress form . . . snip, snip, snip . . . I used the square of paper with the original dress form and then snipped it out twice more, snipping of the skirt for the top layer.
You can`t really see the little words on the skirt but they read
Something New
also in the papers.
Ahhhh see the teeny tiny veil . . . off cuts off ribbon found in my stash, they make me happeee!
This one holds a special meaning for me . . . my Auntie Jessie gave me this three pence on my wedding day to pop in my wedding shoe for good luck ... a sweet memory of a much loved Auntie who is no longer with us.
Ever get the feeling that these papers where made for this project, I could hardly believe it when I saw the papers with the advert for the shoe!
Oh my giddy aunt I Sooo do not do fussy cutting normally but the Mr. and Mrs was shouting out to me
cut me...cut me... So I did, lol.
This one has a story to tell and was my 2nd attempt at making it look old . . .
Okay so I`m out in my wee shed and had chopped this one to the size I needed, but I wanted it to look like it had been around for ever soooo what did I do,hmmmm?
Well, I went and found myself a lighter and fired it up, held it under the paper and swoooosh it kinda went on fire...imagine me oooh aaahing, going noooooooo, waggle, waggle..tried to throw it out the door but it was windy and blew right back in landing on the mat..sparks, sparks..arrrghhhhhhhhhhhh....oh my giddy aunt did I panic,I mean my shed is full to bursting with papers...fear not at this point I was jumping up and down when I clapped eyes on a jug of water that I had paintbrushes sitting in..woohooo...splish,splash,splosh and out it went, phew!!
Needless to say it ended up as ashes, the one above was safely done I hasten to add with my trusty heat tool.
Next, cut up some more papers and make a collage around the frame before adding a few extras . . . 
 ...amazing how after a touch of a little Walnut Stain Ink applied with a blending tool, a few Tim Holtz Remnant Rubs and a dusting of Embossing powders makes such a difference to a project!
That`s me and Alex getting ready to go on our honeymoon, I was only 19yr and Alex would be 21yr that week...oh my we thought we knew it all and we were soooo happy!
Thank you so much for taking the time to look and I hope I have inspired you to have a go.
Want the papers, then just click on the links below to go to the eP store -

Tim Holtz Remnant Rubs - Words, Elements