Hi eclectic Paperie friends!
Julia here to share my altered Art Journal. I have been trying to muster the creative energy to make this for ages - I just wasn't confident in my skills to put it together in a pleasing (to me) design (!)
So I decided to bite the bullet and just jump in - and here it is! My Journal that started out life as a plain black -
spiral bound journal - I think I got it at Michaels.....I've had it for
some time - gathering dust in my Craft Room!
I decided to see how
Distress Stains would look on Kraft Glassine Paper. So I stamped the bird and window frame from Tim Holtz Classics #16 stamp set using
Archival Jet Black Ink and let it dry. Then I just dabbed
Tumbled Glass and
Picked Raspberries Distress Stains
over the images - they kind of beaded up on the Glassine paper so I
just kept dabbing and the color did soak in a 'blotchy' kind of way -
and they did keep their bright colors!
I die cut borders using Tim Holtz Vintage Lace Sizzlet die out of a
Foil Tape Sheet that I had adhered to white card stock and then inked it with
Ranger Distress Black Paint. I adhered the strips across the top and bottom of my cover .
I didn't pop out the little circles on the lacey cuts so the black
distress paint would show up better. I also used this technique on the crown and
ink bottle which I'll show close up below.
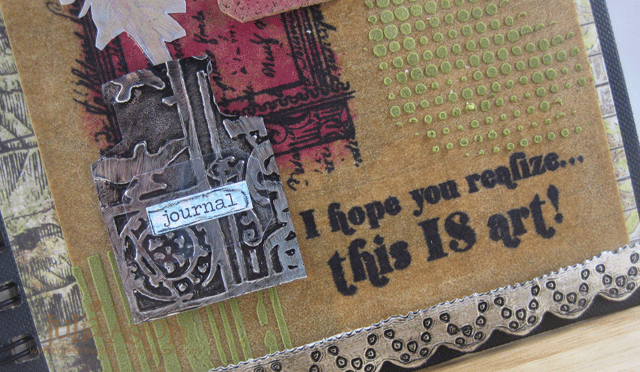
The sentiment stamps are from Destination Art by Wendy Vecchi/Studio 490 Stampers Anonymous. Perfect for my Art Journal I think!
I stamped the feather from Tim Holtz Bird Feather stamp set on vellum using
Frayed Burlap Distress Paint (wash your stamp right after 'inking' it
with paint!) The paint on the vellum is very subtle but can be seen
better IRL! I added some
Life Quotes Remnant Rubs over the feather (note - Remnant Rubs will
NOT stick to the Kraft Glassine but will stick to vellum- how do I know this??!!)
The ink bottle is a die cut
Apothacary Bottle that I cut the bottom off of to look like an ink well - with the feather as the pen.
I die cut another
Apothecary Bottle labels out of
Art Parts Clearly for Art Modeling film, added a
Chit Chat sticker
that I stained with Tumbled Glass Distress Stain and outlined with a
black Stabilo Pencil and layered it over the bottle. I used the clear
film as I didn't want to hide any of the design on
the inkwell! I used the Sizzix Patchwork Embossing folder on this.
You can see the Idea-ology Door Knob
that I screwed into the cover better in this photo - you can actually
open the Journal with the knob - so fun! and when the Journal is open on
the table - the knob actually protects the popped up pieces on the
cover since it keeps the cover from lying flat. I looped a single piece
of
Linen Ribbon through one of the binder rings.
I wanted to keep the back flat - so there is nothing sticking up here. I used several Remnant Rubs here (
Life Quotes and
Botanicals). I used the same papers on the front (under the Kraft Glassine) and the back -
Paper Stash/Wallflowers.
I die cut the
Ornante Frame
from Kraft Glassine and stained it by dabbing Tumbled Glass Distress
Stain over it and framed the gentleman's face on the patterned paper.
I used the same papers on the inside covers - I've just left them as
they are for now - they have such wonderful imagery on them - maybe I'll put some sentiments or stampings on later.....I find I sometimes have to just STOP before I over do it - and go back later to see how I feel about it!
Now I just have to work up the nerve to actually do something on all of
these clean white pages inside my Art Journal!!! One step at a time -
right??!!!
Thanks so much for sticking with me through all of these pics!
Stamps: Stampers Anonymous - Classics #16 and Bird Feather/Tim Holtz, Destination Art/Wendy Vecchi,
Paper:
Kraft Glassine - Idea-ology; Foil Tape Sheet - Ranger, Vellum - Stampin'
Up, Paper Stash Wallflowers - Tim Holtx, cork sheet - Michaels, Art
Parts Clearly for Art Modeling Film - Wendy Vecchi/Studio 490.
Ink: Archival Jet Black
Accessories:
Ranger Distress Stains - Tumbled Glass, Picked Raspberries, Forest
Moss; Ranger Distress Paint - Black Soot, Frayed Burlap; Alterations
Dies - Apothecary Bottles, Heart and Wings, Ornate Frame, Vintage Lace
Sizzlets; white embossing paste - Wendy Vecchi/Studio 490; stencils -
Dot Fade and Stripes - Tim Holtz; Cropadile; Idea-ology Door knobs, Chit
Chat Stickers, Live Quotes and Botanicals Remnant Rubs, Linen Ribbon;
Black Stabilo Pencil.


