Photobucket Photobucket Photobucket Photobucket Photobucket Photobucket
Showing posts with label Altered Frame. Show all posts

Tuesday, August 26, 2014

Altered Frame - Prima Decor II!

Good morning!  Sherry here today and I have an altered frame to share with you.  Sadly, I got so into the creation of the frame that I failed to take photos of each step.  It’s very simple though and I’m sure I can walk you through.

PrimaAlteredFrame

I started with one of those dollar wood frames from Michaels and applied Wendy Vecchi Studio 490 White Embossing Paste to the front using Prima Stencil - Decor II.  (all links can be found at the bottom of this post).

PrimaAlteredFrameCloseUP

All in all, this was a 3-step process, allowing dry time between each step.  The frame was painted black and then highlighted with thin coats of Art Anthology Bronze Metal Effects.  Can I just say, that this is the first time I’ve used the Metal Effects . . . and I LOVE them!!

PrimaAlteredFrameCloseUPCenter

The embellishments in the center were assembled from different stash pieces.

PrimaAlteredFrameLeft

Thanks for stopping by and joining me today!!

SHERRY SIGNATURE


Project Supplies:


Monday, May 5, 2014

Stenciled Frame!

Sherry here today and I’m sharing my version of this month’s ePlay Challenge, Get Stenciled.

SCheeverStencilFrame

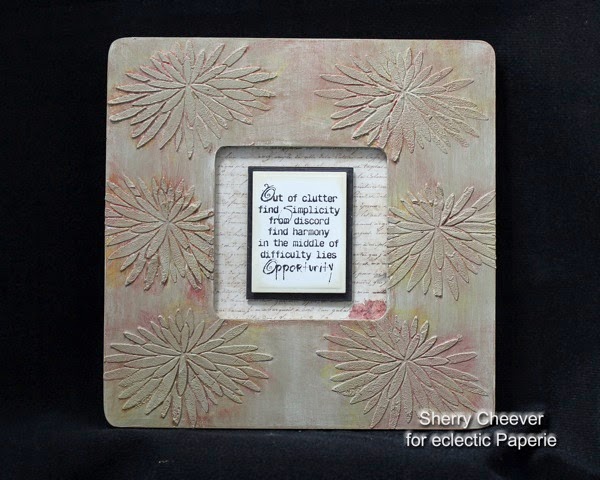
I started with a craft wood frame from Michaels, and using the Studio 490 Stencil for Art From the Garden, white embossing paste was applied randomly to the frame.  Once dry, the frame was painted with a moss green acrylic paint.

SCheeverStencilFrameCloseUP

Antiquing layers were painted on using white, orange, red and brown acrylic paints.  Of course, these were applied one after the other had dried.

The sentiment is from Studio 490 Dressed for Art, which was die cut/embossed with rectangles.  The background layer in the frame is from Prima Stationer’s Desk.

SCheeverStencilFrameAngle

The sentiment layers were mounted in the frame opening with foam mounting tape to give more dimension.

That’s it for me today except  . . . don’t forget that you still have all month long to play along with the ePlay Challenge!

Thanks for joining me today!

SHERRY SIGNATURE


Project Supplies:


Tuesday, April 29, 2014

Best Day Ever - Wooden Frame

Hi eclectic Paperie Fans!  Julia here with my 2nd post for the Design Team!  I have 4 adorable grandnephews and nieces (2 of each! ages newborn to 3 1/2) and so a lot of my artwork lately has to do with photos of them.  

Such is the case today - where I took a $1.00 wooden frame from Michaels - and a photo of my brand new Grandniece, Madelyn Margaret (born 4/10/14) that I printed from my computer onto a Claudine Helmuth canvas sheet ........
And morphed it into this:  I chose my color palette from the colors on her sweet little knit hat that the hospital gave her when she was born!
I've got lots of pictures to show you how I got from plain to fancy.  First I painted the frame with 3 coats of Gesso - letting it dry between coats. (Can I just say - it's SO hard for me to let things dry!! I am a very impatient crafter!)
Then I dabbed and brushed on Ranger Distress paints in Scattered Straw, Weathered Wood and Spun Sugar.  I'm still learning how and where to apply inks - so you can see this is kind of random.  I'm getting the feeling that with Mixed Media -  you don't really plan it all out from the beginning - your finished product just sort of 'happens'!?!  So for this Virgo, list making, planner -  it's a learning process to let go!!
Next up -  I stenciled using Studio 490 Wendy Vecchi stencils Check Mate, Create a Wreath and Dots and Stripes using Studio 490 Wendy Vecchi White Embossing Paste.  I also stamped sentiments from Forever Art and Sentimental Art, and the lovely lace from Forever Art using Garden Gate Archival Ink.  I have to say here - that I originally stamped the sentiments directly on the dried Distress paints - and they bled - so I ended up stamping them on some pink Coredinations Ranger Distress card stock and adhering that over the original stampings.  The lace piece stamped ok directly on the painted wood although the edges are a little bleedy(!)
Here are some close ups of each section.  This wooden sentiment is from Fancy Pants.  I inked over it with Worn Lipstick Distress Ink, sprayed it with Perfect Pearl Mist/Perfect Pearl for a little shimmer, colored the edges with my Black Soot Ranger Distress Marker to define the edges, grunged it up a bit by putting some White Adirondack Snow Cap ink on it with my finger - and when it was dry - I sponged Scattered Straw Distress ink over it all.
I added strips of Tim Holtz Ideology Industrious Borders that I inked with Cornflower Archival Reinker - rubbing the ink over the border pieces with my finger and drying it with my heat gun.  I sponged the whole frame with Scattered Straw Distress Ink to tone down the brightness a bit - and that also colored the stencilings.
I added tone to the petals of the Prima flowers using Worn Lipstick, Tumbled Glass and Scattered Straw Distress Stains. I also added some Adirondack Snow Cap Distress Ink to the petals with my finger.
I sponged the edges of the sentiment stampings with Scattered Straw Distress Ink before adhering them to the frame.
I couldn't size the sweet photo of Madelyn Margaret to fit perfectly into the square opening and it left a white border showing - so I sponged some Worn Lipstick Distress ink around the edges up to the photo - then rubbed some Adirondack Snow Cap Distress Paint on the edges as well.
So there we go -  a Plain Jane Frame - turned into a Lovely Madelyn Margaret Frame!
 And since this is a wooden frame - and there is one day left in the ePlay Challenge to use wood - I'm linking it to that challenge!   Be sure to check out the new challenge that will be posted here on May 1st as well!

Here's what I used:  You'll find most of the supplies at eclectic Paperie where I have linked them

Stamps:  Studio 490 Wendy Vecchi - Forever Art, The Beauty of Art, Sentimental Art.
Paper:  Coredinations Ranger Distress Pink,  Sticky Back Canvas - Claudine Helmuth
Ink:  Archival Garden Gate, Ranger Distress Scattered Straw and Worn Lipstick, Archival Cornflower Reinker. Ranger Distress Stains Worn Lipstick, Tumbled Glass and Scattered straw.
Accessories:  Wooden Frame - Michaels, Prima Flowers Princess, Studio 490 Wendy Vecchi White Embossing Paste, Studio 490 Wendy Vecchi Stencils - Check Mate, Create A Wreath, Dots and StripesRanger Distress Paints Scattered Straw, Spun Sugar, Adirondack Snow Cap Distress Paint, Black Soot Ranger Distress Marker, Perfect Pearl Mist/Perfect Pearl, Fancy Pants Best Day Ever Wooden Phrase, Tim Holtz Ideology Industrious Borders, Gesso Liquitex


Saturday, August 3, 2013

Altered Frame with 7 Gypsies Harmony Paper Collection . . .

 Hi everyone, it`s Tracy here today and I am sooo excited to be sharing my cheap as cheese Altered Frame documenting my wedding day to Alex over 24yrs ago using the drop dead gorrrgeous papers from the
Oh my giddy aunt I can`t begin to tell you what a joy it was to get back to my love of pretty papers!!
I adore vintage and shabby along with papers that tell a story and this collection does it all.
 I actually remembered to take a picture of the frame before I started, if you know me you might know how impatient I am to get started on a project and tend to forget . . . not this time though,yeah!
See how cheap it was . . . oh my did I get a bargain.
 The papers come in an 8x8 paper pad with 48 sheets and are double sided giving you lots of paper to play with.
All the embellishments that you are going to see are made from the papers with a little touch of Distress Ink and Embossing powders. 
See that beautiful vintage car
  ... swoooon moment ... 
You get so many of each design that you can afford to cut out the car a few times to layer it up for more dimension using foam tape cut to size.
 Like wise with the dress form . . . snip, snip, snip . . . I used the square of paper with the original dress form and then snipped it out twice more, snipping of the skirt for the top layer.
You can`t really see the little words on the skirt but they read
Something New
also in the papers.
Ahhhh see the teeny tiny veil . . . off cuts off ribbon found in my stash, they make me happeee!
This one holds a special meaning for me . . . my Auntie Jessie gave me this three pence on my wedding day to pop in my wedding shoe for good luck ... a sweet memory of a much loved Auntie who is no longer with us.
Ever get the feeling that these papers where made for this project, I could hardly believe it when I saw the papers with the advert for the shoe!
Oh my giddy aunt I Sooo do not do fussy cutting normally but the Mr. and Mrs was shouting out to me
cut me...cut me... So I did, lol.
This one has a story to tell and was my 2nd attempt at making it look old . . .
Okay so I`m out in my wee shed and had chopped this one to the size I needed, but I wanted it to look like it had been around for ever soooo what did I do,hmmmm?
Well, I went and found myself a lighter and fired it up, held it under the paper and swoooosh it kinda went on fire...imagine me oooh aaahing, going noooooooo, waggle, waggle..tried to throw it out the door but it was windy and blew right back in landing on the mat..sparks, sparks..arrrghhhhhhhhhhhh....oh my giddy aunt did I panic,I mean my shed is full to bursting with papers...fear not at this point I was jumping up and down when I clapped eyes on a jug of water that I had paintbrushes sitting in..woohooo...splish,splash,splosh and out it went, phew!!
Needless to say it ended up as ashes, the one above was safely done I hasten to add with my trusty heat tool.
Next, cut up some more papers and make a collage around the frame before adding a few extras . . . 
 ...amazing how after a touch of a little Walnut Stain Ink applied with a blending tool, a few Tim Holtz Remnant Rubs and a dusting of Embossing powders makes such a difference to a project!
That`s me and Alex getting ready to go on our honeymoon, I was only 19yr and Alex would be 21yr that week...oh my we thought we knew it all and we were soooo happy!
Thank you so much for taking the time to look and I hope I have inspired you to have a go.
Want the papers, then just click on the links below to go to the eP store -


Tim Holtz Remnant Rubs - Words, Elements