Photobucket Photobucket Photobucket Photobucket Photobucket Photobucket
Showing posts with label Canvas. Show all posts

Thursday, October 9, 2014

Up on the Rooftop

Ok, you are probably thinking.... What?????? Christmas already?????  What is she thinking??

Steph Ackerman here to let you know that Christmas is only  76 days away.  I can hardly believe it myself!!!
 
But I will confess, this project did not start out with a Christmas theme.  Actually, it started because I wanted to use The Crafter's Workshop Brick Stencil.


I placed the stencil on a canvas panel and added  Art Anthology's Brick Stone Effects paint.  When I removed the stencil, I found I had created a chimney.  So my project morphed from there.


I spritzed Art Anthology's Colorations in Lark around the canvas to give a hint of the night sky.

 
Using The Crafter's Workshop Mini North Star stencil with Art Anthology's Sorbet Dazzle paint, I added stars to the canvas.  When dry, I spritzed the canvas again with Art Anthology's Glorious Colorations for a dazzling night sky look.

 
I painted green cardstock with Art Anthology's Velvet Paint in Basil.   Once dry (either wait till it's dry or heat set it), die cut with Spellbinders Holly Wreath die twice. 


Assemble 2 layers of the die cut and embossed wreaths, adding a red bow to the top.  Add to the chimney with foam adhesives for dimension.  Using Art Anthology Dimensional Crystals in Red Corvette, create the berries on the wreath.


Die cut letters using Cricut Expression from red and black cardstock (or use stickers).  Die cut Santa and his reindeer using the Stamp Doctor die with red and brown cardstock, adding them to the canvas with foam adhesives for dimension.  Using the Inkssentials Blending Tool with  Ranger's Vintage Photo Distress Ink, I added just a touch of color around the edges of the canvas.


So, have I put you in the Christmas mood  yet?

Thanks for stopping by today.

Steph


Friday, September 12, 2014

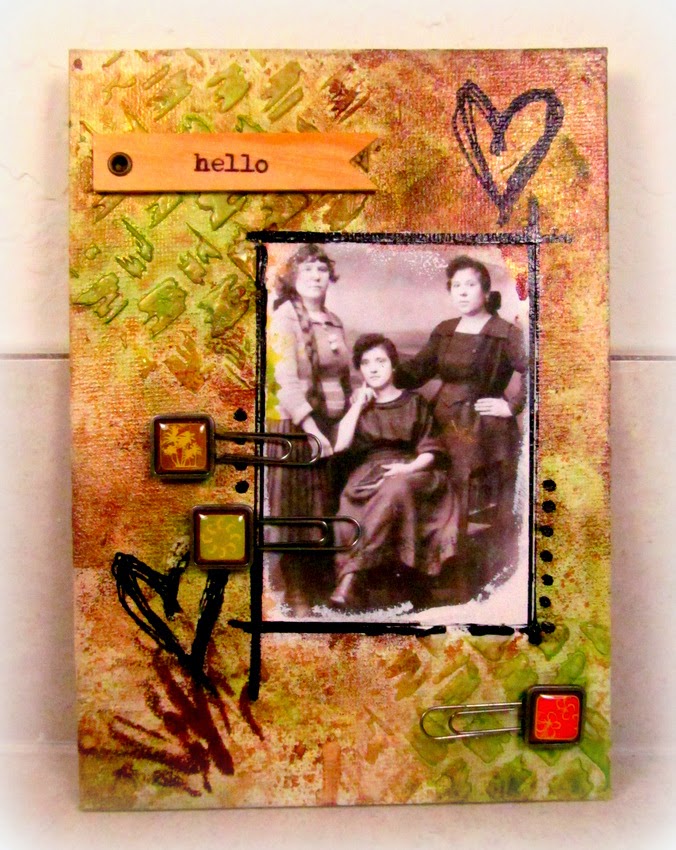
Hello

Hi everyone Monica here today sharing my next Eclectic Paperie project.  I created a mixed media canvas using some images form 7 Dots Studio papers.  I used Tattered Angels glimmer mist, some paint and just anything I felt matched..

I outlines the picture with a black paint pen , stamped some hearts.  Nothing is better than hearts to welcome a big hello from family members

I hope everyone enjoyed my post and thanks for stopping by everyone.


Saturday, September 6, 2014

Who You Are is Completely Up to You

Julia here today to share a canvas I made using lots of Dina Wakley products.  I recently attended 3 workshops Dina taught and subsequently ordered lots of her 'stuff' from eclectic Paperie!
 I have quite a few photos to share showing how I got from plain canvas to done! So far in my 'mixed media' career I've only made a couple of canvases - I'm still in the learning stage! I started by brushing Gesso over the canvas, laying a torn edge sheet of tissue wrap over the Gesso and brushing with Gesso again.  I smoothed out most of the wrinkles - but left the ones that wouldn't smooth out.  I left this to dry overnight.
Then I dry brushed Sky and Lemon Dina Wakley acrylic inks over the canvas.  The great thing about dry brushing is that it dries quickly! (I REALLY hate waiting for things to dry!)
I stenciled the women with Watering Can ink which is a little softer than black.
Love the look of them!
To add some texture to the piece,  I used Wendy's white embossing paste with Dina's Affirmations stencil
I stenciled one sentence in the top left corner
and another in the bottom right corner
I inked a sun stencil from Dina's The Basics with Archival Orange Blossom
I inked little sections of Plastic Canvas around the canvas using Cornflower Blue Ink and stamped some sentiments from Dina's Face in the Crowd stamp set around the sun.  A little hint for stamping on a canvas that only has the wooden frame around the edges with the canvas kind of bouncy in the middle -  I placed an ink pad under the canvas where I wanted to stamp to give me a firm smooth base to stamp on
To finish it off - I sponged around all the edges with Ranger Distress Frayed Burlap and stenciled some Leaves with Fern Green Ink.  I spritzed the canvas with Dylusions White Linen Ink Spray - but it washed it out too much - so I quickly dabbed most of it off with a paper towel!
Dina kept telling us to 'JOURNAL' on our projects in the classes I took -  so I could hear her telling me to do it on my canvas -  but I haven't developed a good scribble journaling technique yet - so I used some of her stamps from Hand Written Notes with Archival Jet Black ink to get it done! (see how much darker it is than the Watering can?!)
As with any mixed media project I attempt -  I always have difficulty knowing when to stop adding things!
I sponged over the stenciled sentiments with Cornflower Blue ink - but that didn't make the words show up enough - so I wrote over each letter with a black Stabilo All pencil.
Then I stopped.
My canvas is 12" x 9" and I think it will look nice on my wall - I just have to figure out which wall!
I hope I've inspired you to try 'painting' a canvas!!???

Here are the supplies I used that you'll find at eclectic Paperie

Dina Wakley Stamps:  Face in the Crowd, Hand Written Notes

Dina Wakley Stencils: Affirmations, Stenciled Women, The Basics, Plastic Canvas, Leaves

Dina Wakley Paints: Lemon, Sky

Dina Wakley Brushes

Accessories: Pallette knifeWendy Vecchi White Embossing paste, Gesso, Stabilo All Black pencil, Dylusions Ink Spray - White Linen,  Archival Inks - Watering Can, Orange Blossom, Fern Green, Jet Black, Cornflower Blue, Ranger Distress Frayed Burlap, Tissue Wrap/Melange, Blending Tool.

Thursday, June 19, 2014

Gelato Canvas and Wendy Vecchi products

Well it is official. Andiepants is becoming a southern bell!!! We will be moving to the lovely state of Louisiana very soon!

With all of our friends and family up here in Michigan it is very difficult to say goodbye, so one of the things that I like to do is to leave a little something with my friends and family as a token of my love. 

My friend from church, Delores, had a bit of spell and is currently in a rehabilitation facility re-learning how to use her arm. She misses her friends and her church very much. She is such an inspiration to me. Back in her hay-day she rode through the entire continental U.S. on the back of a Harley, all except for Alaska. As a hobby she paints these GORGEOUS china pieces and alters children's bouncy horses into carousel horses.

So for Delores I decided to make her a canvas. Something she could hang on her wall


This is actually a canvas I began a long time ago with the background stamping. It was just sitting in my cubby waiting for the right moment. So I doused it with water and used my gelatos, blending with my fingers.


I started with just blues and then decided it made a pretty sky and I wanted a scene of some sort.

Next I covered all the edges with Tea Dye distress ink. I used my finger to smudge in and over the white areas to give it an antique look.


Then I bust out my Wendy Vecchi crackle paste. This stuff ROCKS!!!


I used the crackle to make the "clouds" of my scene.

I forgot to take pictures of the next step. For this part I sprayed some water on my craft mat and added some drops from a Distress Stain re-inker in Antique linen. Then I used this wash to cover the entire canvas. This helped the gelatos to blend better and highlighted the cracks in my crackle clouds while giving the whole thing an antique appearance.


Then I bust out my stamp it stencil it by Wendy Vecchi. I used her archival inks to color it in  and went back over the base of the stem with gelatos to help highlight the grass. I ADORE how this turned out. I went with red in honor of Donna Downey. I love her:)


I then used gesso and water to create a water white paint and flicked the paint onto the bottom of the canvas to mimic flowers growing in the grass. 

Using my Tim Holtz layering stencils, I took a phrase from some Stampers Anonymous stamps and I added my title with a smudge stick and black gelato 


and voila...


My parting gift is complete. I  hope it inspires her as much and she has inspired me.

Til next time...

{{hugs}}

Andiepants


Saturday, May 24, 2014

Serenity on a canvas !

Hello it's Sue C here and today I'm sharing a canvas that I absolutely adore ! It's not often I'm really happy with a project and can look at it and wish I'd done this or added that, but this time is one of those rare occasions !


I received this gorgeous stamp set by Unity Stamps just before we went away on holiday and I've been itching to have a play ! The stamp is quite large so I thought a canvas would do it justice but I also wanted to make sure the image was really sharp so I decided to stamp on to tissue paper first and then transfer the image to the canvas after it had been painted.


This is the reverse of the image after I've done the detail painting. When you paint on tissue you always have to do the colours in reverse, so any shading needs to be done first then the lighter colours second. I then painted over the whole piece with the same colour that I had painted the canvas and lifted the image very carefully into place.


As the image is quite large it was a little tricky getting it onto the canvas without ripping it so I was quite pleased with only the few wrinkles I ended up with ! Doesn't she look gorgeous ! Once she was on the canvas I then painted over the edges of the tissue paper to flatten them down and blend them in.


When I first saw this stamp she gave me the feeling that with her eyes shut she was closing out the world around her so I wanted the surrounding canvas to be quite busy. I made a mask by stamping her a second time onto a piece of paper and cutting her out, then I used the TCW Retroburst stencil and Wendy Vecchi's white Embossing Paste. When the paste was dry I then started to paint using a brush and baby wipe.


I built up the colours layer by layer, keeping the darker colours to the edges and corners. I then used the TCW Onion Skin stencil with white acrylic paint in the areas with no embossing paste. The dotted lines are created using a Catalyst Silicone Wedge Tool that's been dipped into white acrylic paint and then dabbed on to the canvas.


I loved all the sentiments in the stamp set too so used most of them ! The gorgeous canvas flower is by Maya Road and I felt it was enough as I didn't want to detract from this gorgeous image.


To finish here's a close up so you can see the texture from the embossing paste.

I hope you've enjoyed today's project as much as I did making it !

Sue
x

Friday, January 24, 2014

Love Owls!!

Hello EPeeps!!  Have you ever started a project or a layout and not been happy with the finished project? That happened to me this week.  I made a long canvas with 5 owls on it but it didn't work for me and I just wanted to paint over it.  However, when I looked at the canvas there were certain elements that I liked . . . the background and two owls.  So I started over.  I took the pieces that I liked and remade them.   And now I LOVE my little Love Owls!! So I really encourage you, if you are working on something that just isn't going right, pick out what works and keep those elements!  You don't have to get it right the first time!  Keep trying!


I started by randomly stamping directly onto the blank canvas.


I used my gelli plate and white tissue paper to create another part of the background. First, I made a print of chevron and then a second layer of hearts on top. 

I used matte medium to put the tissue paper down onto the stamped canvas.  The transparency of the tissue paper lets you see the stamped layer . . .  favorite technique!

Next I cut out my Love Owls from Fancy Pants, Be. Loved. paper pack. If you get any Valentine's Day papers this year, THIS is the one you need!! The patterns, the colors the shapes . . . perfect!!  I LOVE it! And honestly, this paper could be used all year!! I am tempted to get a second pad of paper, just so I can have extras to use again! 

I laid out my pieces, used matte medium to glue them down. (I really like using matte medium, if you didn't know that by now.  I like that matte medium isn't as sticky or gloopy as glue or decoupage).  After the matte medium dries, I used pens and Pitt Pens to highlight and finish off the canvas!! 


 Thank you all for stopping by today!! Click on the eclectic Paperie link as fast as you can and grab the Fancy Pants Be.Loved. Paper - I just can't tell you how much I love it!!  And I hope you all enjoyed my Love Owls and are inspired to keep trying when a page or a project isn't going as planned!!  
 (In fact, if you want to see the 5 owl canvas, I will bravely put it up on my blog, just to show you ... . ... make me feel better though by leaving me a comment on a project you almost gave up on but loved what happened in the end!)  
Karen