Photobucket Photobucket Photobucket Photobucket Photobucket Photobucket
Showing posts with label Luminarte. Show all posts

Monday, February 10, 2014

A surprising Journey

Hello friends! Giovana here today. I want to start my post with a couple of confessions, nothing bad I promise.
First, I was pretty sure I got scheduled to post on Feb 12th, oh boy, I was wrong!! So yesterday (Sunday) I went to the craft room to work on some other projects and then I checked my calendar and oh surprise. I immediately started working on a card, and I didn't like it. I got so frustrated. I decided to get out of the craft room and continue with my laundry day, while there I saw the blue tape (painters tape) and an idea came to my crazy head.
Second (confession), I took a piece of watercolor paper and the blue tape, I thought of something but then didn't work out, so I started this project without knowing "what I was doing or ending up with"

Ok, after these confessions, I will tell you I LOVE this project very much and I hope you too.

Let's get started!

I started with a piece of Strathmore Mixed Media paper, cut the paper 9" x 9", then taped it to my mat with Blue Tape (painter's tape), the sides are 1" and the top/bottom are .75"

 
 Added a couple of coats of White Acrylic Gesso
 
 
 Then I started painted this piece with Luminarte Twinkling H2O African Jade, just one coat is enough.


 Then I added paint strokes of Luminarte Twinkling H2O Rich Cobalt


and finally some of Twinkling H2O Olive Vine. 
 
 
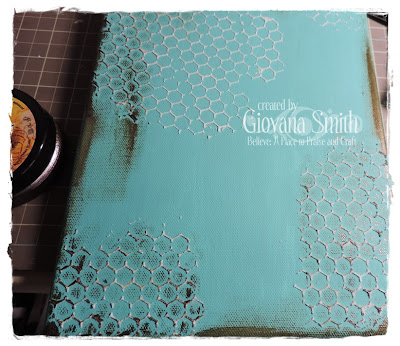
I added some Embossing paste using the Mini Chicken Wire reversed Stencil, but honestly I didn't like it, I removed it immediately with a baby wipe, but it left a really cool impression, ha! The things you discover from your mistakes. Then added few dabs using Snow Cap Acrylic Paint Dabber


 I used an old stencil (no longer available, sorry) and White embossing paste in random places.


Then added White Gelatos in the center and a little bit around the edges,
 
 
Added Black Gelatos around the edges of the whole piece.


Then I took my Remant Rubs - Word (Tim Holtz), cut few pieces and added them on my piece.
 
 
Looks like this :) 


And this is the final piece, without the blue tape, the picture doesn't show how shimmery this piece is, it's really beautiful!! I think I will put it in a picture frame to decorate my craft room :)
 
 
I hope you like it!!
Have a wonderful day.

Giovana

Thursday, January 23, 2014

Hope Canvas

Hello friends! Hope you are having a fantastic day, today it's my turn, Giovana here, to share a project with you. I decided to create a fun and simple "yes, believe me" canvas project. I am joining the eP Team Picks Challenge ~ HOPE. My canvas started as a freedom and hope, I just wish I could have wings and fly to Peru, I HOPE I can go there soon and visit my family, nothing like a warm hug from the ones you love.

Here are the details (Sorry, I forgot to take few pictures)
 
  •  Paint all the circles with Ginger Peach Twinkling H2O, set aside to dry, it will take few minutes. (Ohhh, I love this color!)
 
 
  • Add your circles, leaves, stems to your canvas with seal glue. Take your Faber Castell Black Big Brush pen and define all edges, then add a button to each center flower, Iwent ahead and wrote "hope" with my black marker.
 
 
This is final product!  I added Gold 3D Stamp Paint to some of the borders, I used my finger since I wanted a rough look. 

 
I HOPE you like my canvas and get inspired and come play with our eP Team Picks Challenge ~ HOPE.  You can win a $15 gift certificate to the eP store!!!
 

Saturday, September 28, 2013

Mixed Media Scrapbook Layout

Andiepants here and  WOW am I excited to be posting my first blog post for the eP design team!!! eP has some absolutely fantastic products. There is so much that you can do with this stuff. AND I LOVE STUFF!!!! 

I don't know about you but personally...I feel that I have too much stuff.
*GASP*

Yes, I said it. So with that in mind, I have decided it's time to stop holding on to that stuff and to start using up the old stuff. Of course it can be refreshed and renewed with the aid of some new eP stuff;)


I used some of my old paper stash to create this:


So much fun and color! I pulled the paper for the brown but imagine my surprise when I realized that it also contains all my fav go to color combos...teal and lime green...teal and orange...orange and lime green...well...you get the picture. I used the Dylusions spray through my new tiny circles stencil.


I love how you can give your page so much dimension with this idea-ology film strip


Of course my bird cages! Where would I be without them!! This Claudine Helmuth stencil is my new absolute fav. I used liquitex modeling paste which pulls the color from beneath it. I wish I had some Wendi Vecchi white embossing paste. hmmmmmmmm ;)  I colored the cages with the Splash of color silks glazes. It actually worked out fantastic because you could see the teal pulling from beneath. I know right?!


Here is a list of eP products I used to complete this LO. I hope I inspired you to grab some mixed media from eP and use that stash!

{{hugs}}
Andiepants