Photobucket Photobucket Photobucket Photobucket Photobucket Photobucket
Showing posts with label tattered angels. Show all posts

Saturday, May 10, 2014

12x12 Life

What can I say...I'm a 12x12 kinda gal. 

When things are not going right or I'm feeling like I need some crafty time...I reach for 12x12. 

I think we all have our own comfort zones and that is mine. 

So imagine how ecstatic I was when Kim started carrying different 12x12 papers in the store! We have Authentique and Fancypants and 7Dots and Tim Hotlz...

and I really could go on but you want to see some GORGEOUS crafty goodies don't you;)

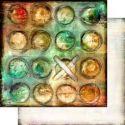
If you have seen my work you know that I am over the top...lots of mixed media...more flowers than a gal can handle. But when I saw the Fancypants Nautical line, I was so inspired to do something clean and simple. I purchased some 12x12 in a couple of the patterns and went to town!! They were so much fun to create with!


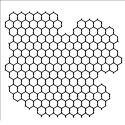
I also used my new Tim Holtz Honeycomb die to create some layers behind the photo grouping. The tag is from the clearance section and is Fancypants as well but from a different line. I just adore the Junkyard Findings Street Signs and this one was perfect...because he is my 1st born!! Get it? 
*slaps her knee*
I liked the orange with the navy blue and teal (yes that is blue not black) so I grabbed a piece of orange paper from my stash to make my accents. 


I decided to stamp a tiny date stamp to document the time that this photo was taken. We don't have many every day type photos and this was just a spur of the moment "kids...get in the car...mamma wants pics" kinda deal. 

So needless to say my teenager was glad I was inspired to NOT use flowers this time.  


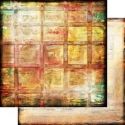
This LO was the inspiration for the one above:


Hard to believe this is the same child isn't it? Thus the title for the previous LO of "All Growed Up"

This was using the Authentique elegant line. Little bit of chip board photo frames
and some Prima masking...a little bling...some stamping...this was seriously a fun layout to create.

Here is a close up of the tissue tape and stamping.


And of course the BLING!!!! Oh so yummy!! And just adorable with the Prima Metal Door Sign


Don't forget our ePlay challenge is still going on this month with STENCILS!!!


You can check out all the details for these tags on my blog at www.scrappygoddess.blogspot.com.

Don't forget to enter for your chance to win.

{{hugs}}
Andiepants


Wednesday, March 19, 2014

Baby

Hi everyone Simply Monica here and today I am sharing another mixed media piece, using 7 Dots Studio, some gesso, paints and anything else that seemed to go together! 

I added some ribbon and flowers and stencils


   Then I used various colors of glimmer mist and paint.  I know not your typical Baby piece, but I am giving this to my friend who is pregnant who is as you could say eclectic so she will love this.  Who says it as to pink and blue right?!

Thanks for stopping by everyone
Supplies Used:
7 Dots Studio - Domestic Goddess 12x12" Paper - Ah, Whatever Liquitex Acrylic Gesso  Chalkboard Glimmer Mist - "Mauve"lous
Liquitex - Glass Beads Texture Gel

Wednesday, March 5, 2014

Flutter

Hi everyone Monica here today is my first project as a Guest Designer for Eclectic Paperie.  I am super excited to be here for the month of March.  For my 1st project I created an altered purse.  I used several different mixed media products to give it a eclectic look

This is what the purse looked liked after I covered it with 7 Dots Studio patterned papers...


I used some Gesso by Liquitex and rubbed it all over the papers using a paper towel to wipe off excess

 I sprayed it with glimmer mist by Tattered Angels and used a chicken wire piece from Crafters Workshop as decor on different spots
I sprayed a chipboard scroll piece by Fancy Pants and used it as the front latch for the purse and just inked and sprayed all over the purse and used my embossing gun to dry - I am a bit impatient

 I also used Dylusion stamp set and outlined certain parts with a white gel pen


Thanks for stopping by everyone and be sure to check back next Wednesday for project number 2!!

Eclectic Paperie Supplies Used:


Thursday, February 27, 2014

The Bag Lady

Hi there ePers!  Today I (Erin) am showing you my bag that I made for the eP Picks Challenge hosted by the always lovely Ms. Toni!

When I first learned about this challenge, I was racking my brain on what medium to use!  Paper? Seed sack?  Lace handkerchiefs?  Redecorate a gift bag?  Use a brown lunch bag?
I decided to use up some of my seed sacks that I bought from my cousin's yard sale last summer!  She wanted to get rid of them, and I knew that I could find something useful to do with them sometime!  Well, that time came now!

Seed sacks are kind of like the old laundry bags from college, but without a flat bottom.  If that makes any sense!  It's tough, hard, stiff canvas.


Throughout this whole process, I did not measure.  I eyeballed all of the sides, and roughly eyeballed the handles.

I went through and cut the sides into actual panels, and prepped them all with gesso.  Once that was dry, it was ready to paint!  I used my Acrylic Glaze paints mainly because I wanted something vibrant and I wanted it to stand out.  I don't have too many other options in the paint department, so the Acrylics worked beautifully!  (I think so anyway!  ;D)

The first panel was my face.  Which, it's not MY face!  My 4 yr. old daughter and I had a discussion about this face!  She asked who it was a picture of and I responded no one.  She said, "No Mom, really, who is it?"  I replied again, now a bit agitated, "It's no one, ok?!"  She came back with, "Jeez Mom, you don't have to be mean about it!"  LOL!
So, the face just kind of drew itself.  I used black gesso and a paint brush.

To create the background, I just used different stencils and more Acrylic Paint colors and more gesso!

I pretty much did the same thing for all of the sides.

The difference for the back/front panel w/ the words 'My Craft Bag', are that those are sprays with different stencils and black gesso for the tiny circles stencil.

The difference for the rose panel is that I used white embossing paste, which I mixed a color into and using the edge/end of my palette knife, laid down the paste in the form of a rose.

I did have help on this, in the sewing it together portion!  I only sew on paper!  I NEVER sew fabric!  Hey, I'd actually have to measure something!  YIKES!

Anyway, I did the handles, and was successful at attaching 2 panels together, and then my sewing machine decided not to work right.  So, I handed my project over to my mother to sew the rest of it together.  I had strict instructions on how I wanted it done.  And she is such a darling and finished it for me so that I could post it here on my day!


I hope that you have been inspired by my bag and want to try out for our challenge!  This is a perfect opportunity to think outside the box!!!!

Erin

Links:
white & black gesso
white embossing paste
Antique Bronze Distress Paint
Faber-Castell Big Brush Pen (black and white)
Stencils: Mini Reverse Chicken Wire, Mini Tiny Circles, Distressed Honeycomb, Bubbly
Silks Acrylic Glazes Honey Amber, Pink Anthurium, Bolivian Blue, Love Struck, Olive Vine,
                                    Apricot Nectar

Dylusions: Pure Sunshine, Funky Fuschia, London Blue, Cut Grass, & Melted Chocolate

Thursday, December 12, 2013

Mixed Media Canvas with Wendy Vecchi Embossing Paste

Day 4 of the 12 days of Christmas and today we have Wendy Vecchi embossing paste for you 2 for $16.99!! That's right...only 24 hours so grab yours fast.
Use code 12DAYS4 when checking out.


Can I just say how much I adore this stuff?! It has so many uses and give any project that added touch of texture. 

Here is a canvas I made for my brother for Christmas using the white embossing paste. 

Some techniques in addition to the stenciling include stamping with various Prima and Donna Downey stamps, the tree is a Fab scraps piece, Most of the texture is drywall mesh tape, the zipper flowers are Melissa Frances, the paper underneath is Prima's Finnabair Vintage line and the tissue paper is Timmy's tissue paper. Soooooooo much is going on here...don't you love it?!

So this past weekend I had the privilege of chaperoning electronics weekend for my 2 oldest boys' scout troop. Because it's already so cold out we don't have much to do so a few of the other parents and I decided that we would turn it into a mini scrappy getaway. I decided to work on my canvas for Christmas but imagine my shock when I realized I had forgotten my stencils!


Luckily I found this little dollar store rose stencil tucked away in my tool caddy!!! Who's a savvy Andie now;)


Don't you love the way the ink soaks into the embossing paste?! Just lovely.


And here is a photo of some freehand paste that I added to the top of the canvas.

Now remember...I said we were camping sooooo...I wasn't able to take a video of this canvas. But...being Christmas I have a lot of other gifts to make so I shot a quick video of another canvas that I have started using the same techniques.


If you can't view the video try the smaller version here:


Run over to the eP store and purchase your own Wendy embossing paste today!!

Merry Christmas y'all!!!!
{{hugs}}

Andiepants