Photobucket Photobucket Photobucket Photobucket Photobucket Photobucket
Showing posts with label Prima doll stamps. Show all posts

Wednesday, February 12, 2014

Valentine Memory Box---"Smitten"


It's Paulette, eP's guest design team member for February, back with another project.  This week I chose to embellish a memory box.  I am a Valentine fanatic and decided to decorate a box to store all my treasured Valentines.

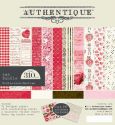
I found this box on sale at  a local craft store for $1.66.  The box has a white cover and is printed with pink doilies and the hanging red foil hearts motif.  The sides are covered in a red paper and continue the hanging hearts motif.  To complement this pre-printed design I chose a 6x6" paper pad by Authentique called "Smitten."  I used this pad for the doll's dress, the Valentine themed playing cards and the pink rose sticker.

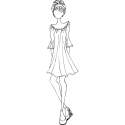
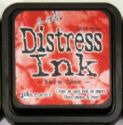
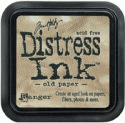
I chose a red lace trim and white ribbon with red hearts as a strip across the bottom to anchor my design. I used one of Julie Nutting's doll stamps by Prima.  Some of the dolls have girl's names, this one is just called the Peasant Doll.  Since she's my Valentine doll, I'm going to name her Philomena---meaning "powerful love." Her dress and headband were paper-pieced with a paper from the "Smitten" paper pack.  I used some narrow Scor-Tape to add some lace trim to the neckline, sleeves and hem of the dress.  The double-stick tape makes gathering the lace and attaching it to the paper dress a cinch.  In her video Julie suggests always distressing the edges of the doll with ink.  I used an Inkssentials Foam Replacement pad and Old Paper TH Distress Ink on the edges.  I also used a black Pitt pen to outline the cut edges of the doll and dress.  I cut some tiny white silk flowers off the edges of some ribbon to adorn Philomena's hair and dress.  A red metallic gel pen was used to color the tiny flower centers.
Two metallic paper doilies---one red, one silver---form the base of the collage on the right side of the box cover. I cut five tiny Valentine themed playing cards cut from the "Smitten" paper and arranged them on top of the doilies.  Paper flowers with pearl or red rhinestone centers were used in the collage.  The "Smitten" pack also contains an assortment of stickers.  I used the pink rose scalloped sticker after first distressing the edges with TH Barn Door Red Distress Ink.

Here's a side view of my memory box:


Thanks for checking out my blog post.  Hope your mailbox will be filled with some lovely cards on Valentine's Day.................................................Paulette

Here are the links to the eP store for some of the products used above:

Monday, November 11, 2013

Follow your dreams Canvas

Hello friends! Giovana here today, I want to show you the canvas I made few days ago, I used different mediums for this project and I hope you like it.

I started my project with an 8" x 8" Stretched Canvas, covered it with Gesso a couple of times. Then I added Lettuce and Pool Acrylic Paint, and set to dry. While my canvas was drying I stamped the pretty Prima stamp Riley Doll to a piece of Watercolor Paper in Jet Black Archival Ink, colored it with Inktense Pencils and cut it out.

After my canvas got dried, I added embossing paste over my Summer Garden stencil, then I added more Lettuce Paint to add some color, I color the flowers with Red pepper Acrylic paint, but at the end I covered one with the pretty Petallo's  flowers, I added a bit of color to the edges with Red pepper paint as well.

Then I took the Mini Chicken wire stencil and Metallic Copper paint and added it in random spots. Finally I took my favorite stencil (for now) Rays by Tim Holtz and Amber Gold Ferro Paint and added it to the left corner. The doll was added after the paint dried.


This is the final look, I worte the sentiment with a black marker.
 
Hope you like it!
Have a great day.

Tuesday, September 24, 2013

New Goodies = Playtime!!!

I just got a pile of new goodies from 
and couldn't wait to try them out!
I was excited to try out every single thing I got so I just ripped out a piece of ledger paper from my Great Aunt Sandy's grade- keeping book from the class she taught in 1958 and got started!
(click on photos to enhance and enlarge)

Here's a picture of the new products:
And I know you are all jealous of my ledger paper so here are a couple of pictures of that too! -Yes, 1958!!

I tried out every color of the new Wendy Vecchi line of Ranger Archival inks - they're so yummy! Her new background stamps "Vintage Mesh" and "Reverse Dots" are fabulous too! Of course I had to use my favorite Unity Stamp Co. "She Script" stamp as well! The Prima "Riley" Stamp is precious, her hair is colored with various Faber Castell India Ink Markers topped off with Silks Acrylic Glaze in "Ginger Peach". Her dress is stamped with the "Reverse Dots" stamp in "Cornflower Blue" topped off with Silks Acrylic Glaze in "Sky Blue". The gorgeous Silks glazes add just the right amount of sheer shimmer - so pretty.
Stencils used are: Balzer Bits "Number Bits", Wendy Vecchi Stencils for Art "3 Flourishes", The Crafters Workshop "Mini Climbing Vine". On the top right corner I used Wendy Vecchi Gold Metallic Embossing Paste through the Christy Tomlinson "Vintage Lace Mask". The ferns at the bottom are White Embossing Paste applied through The Crafters Workshop "Mini Four Ferns" stencil.
Rub-ons used are Christy Tomlinson "Doodle Flowers" and Idea-ology Remnant Rubs "Words" and "Numbers".  I'm just kicking myself because I was going to use white doodle flower rub-ons under the black words in the center of the piece and I forgot - believe me, it looks cool when you do this so try it out! 
 I'm not sure what will become of this piece but  I sure had fun trying out my new stuff!

I hope you are inspired to get inky - if you don't have Wendy Vecchi's new line of Ranger Archival inks, you NEED them (just sayin')! 
Thanks for stopping by today,
I appreciate your comments!

Saturday, August 24, 2013

You Are Simply Amazing Journal Page

Hi, folks.  It's Broni here today to show you one of my journal pages.

I've just gotten this awesome new Prima Strapless Doll stamp in my last eP order and just HAD to use her!  Also, Kim had sent some great old book pages too, so I wanted to use a piece of the dictionary page as well.

Here's what I ended up with after playing and having fun and getting very inky:


I adhered the dictionary page to my journal page with Studio Matte Multi-Medium and when it was dry I spritzed it with a few Dylusions ink sprays (bubblegum pink, fresh lime, and pure sunshine).  Then I used some melted chocolate spray along with my Dylusions Dotted Flowers stencil in the bottom right corner.


 Next I spritzed with some white linen spray and then stamped my Strapless Doll in Archival Jet Black ink.


Then, using a brush and some watered down Gesso, I painted everything but the doll with 2 coats, allowing them to dry in between.  I just wanted a hint of the color and print to show through on the background, but more so on her dress.  I also painted her skin using some Gesso and a tiny bit of the Modern Red paint.  This photo shows the page before the second coat of background Gesso.


 Now, here is where the creative juices took over and I was having so much fun that I forgot to take step-by-step photos!  Sorry!  I can, however, tell you what I did.

  • I used a mini punchinello stencil and some melted chocolate spray, and added shadows with a black watercolor pencil.
  • I used the Tiny Circles stencil (totally inspired by Kim's love of it!) and Tumbled Glass, Mowed Lawn, Mustard Seed, and Black Soot inks.
  • I drew an outline with a black watercolor pencil around the page, and then used the black pencil and  a teal one to shadow down the left side of the doll.
  • I also used the black watercolor pencil to color in one row of the mini chevrons stencil.
  • I colored her sash with some bubblegum pink ink and a brush, and used my silver leafing pen to color her crown.
  • I added the stars with the punchinello stencil and some Studio 490 embossing paste.  I think it's neat how the yellow soaked into them from the underlying journal page.
  • Lastly, I stamped the sentiment from the WPlus9 Quite Like You stamp set and stamped my date on the bottom of the page.
Here's one more look at the full journal page:

I hope you like my page and that you enjoyed seeing and hearing about the process.  I sure had a good time creating it!

Thanks for stopping in to have a look today!

Until next time~