Photobucket Photobucket Photobucket Photobucket Photobucket Photobucket
Showing posts with label Petaloo. Show all posts

Saturday, September 20, 2014

Graphic 45 Halloween Decor

This year for Autumn my new neighbor bought an adorable wreath to hang on their front door! Of course being the crafty goddess that I am, I thought to myself...I should make something for my front door!

I immediately started digging for inspiration, but when my new G45 paper showed up from the eP store...I KNEW that's what I was using.


First I started with a 12x12 sheet. Use your favorite punch or deco scissors for the top 2 edges. Crease the bottom corner so it rolls and use score tape along the edge that will be on the outside.


Roll your paper using the inside edge as your working side and slowly roll it into the exposed score tape. Make the roll as tight or as loose as you want. Cut 2 squares of 8x8 from a coordinating paper for the 2 smaller cones along each side and repeat the process. NOTE: I would punch holes and insert my hanging ribbon NOW. I did mine after it was embellished and it was a pain.


Use an Archival ink to add color to resin pieces. Resin is non porous so distress ink and pigment ink will wash right off. Wendy Vecchi archival ink is perfect for this but since I don't have orange I used my StazOn.

I used Archival ink in Potting Soil to accent the piece and highlight. 


Fussy cut a pice for frame and a few pieces for the cones themselves. Add some dollar store raffia, some pheasant feathers from your hubby's last hunting trip, and embellish with loads of Petaloo!!!


I also used some glossy accents to add rusty hinge distress glitter randomly along the flowers and the paper pieces.


Here's a close up of the completed frame.


So get crafty this Halloween ePeers and make something spooky for your home!!

{{hugs}}

Andiepants

Monday, September 1, 2014

Graphic45 Family Clipboard

Hi everyone, Steph Ackerman here today.

I found a 12" x 12" wood clipboard some time ago and I picked it up knowing that I'd figure out what to do with it at some point!  When I saw these awesome Graphic 45 papers, I knew exactly what I wanted to do with the clipboard.

I started by inking the clipboard in ColorBox Wisteria Chalk Ink.  Then I added  Art Anthology's Velvet paint in Orchid on top to get a nice mix of color.


I chose several patterned papers from the Graphic 45 Sweet Sentiments collection.  This paper is double sided so I was able to use both sides for some nice contract.  I know it's a lot of flowers, but follow along and see what I was able to create.


I added cardstock between the flowers layers for some dimension and contrast.   Because the paper is so busy, I added several cardstock mats in coordinating colors on top for the photos.  Since I'm giving this as a gift, I've left room for the recipient to add the photos.


The title was cut with my Cricut and I added Petaloo flowers to the "i" in Family as well as  around the large photo mat. 


I think the Petaloo flowers provide a nice pop and 3-d effect.  What do you think?
 
Thanks for stopping by today.
 
Steph
 

Saturday, August 30, 2014

Embossing with Dimensional Paint

Happy Place

To say I was inspired by one of our entries to the eP embossing challenges would be an understatement!! 

When i saw Judith's adorable card I was inspired to try a new technique with some of the Art Anthology dimensional paint. 
I wondered what would it look like if I painted the background and then used the paint through a Prima stencil?


The paint is a little more loose than embossing paste so you don't develop a super crisp image but I love the subtle embossed image again the background. 


I also loved the way the mist puddled on the dried paint and created highlights in the indentations.


I used an old TA mist for the subtle yellow and Dylusions sprays in Calypso Teal and Dirty Martini for the splatters and green accents.  I used some Petaloo color me crazy flowers and Prima Cartographer flowers. The Key hole and resin pieces are Prima as well. 

Loved this fun pic of aubrey Sue for this super fun bright layout. Hope you enjoyed my take on embossing!

{{hugs}}
Andiepants

Thursday, April 3, 2014

Mojo Takes a Hike

Everyone has a creative slump sometimes, that's just part of life. 
Being part of a design team doesn't change that fact, and little miss pants here has been in quite the slump lately. I don't even want to enter into contests to win scrappy stuff right now because...I just don't care.

*GASP*

I'll give you a moment to regroup...

This is completely normal. Sometimes you can walk away and come back when you are ready. The last time I did that I didn't step foot in my room for 5 months. Obviously this tactic is not going to work when you have scrappy commitments and obligations. (birthday cards for family members, DT obligations, Christmas gifts planned, etc.) You have to be gentle with your mojo and coax it back into existence. 

Here are some tips to try to get your mojo flowing:

  1.  Keep a decorative bowl or jar in your room with some creative prompts
  2.  Is there a particular music that seems to get your mojo flowing? Queue that up and just enjoy being surrounded by your space and your tunes.
  3. Is your space a mess and just overwhelming? Clean it up one spot at a time. Do this slowly and walk away frequently. Maybe pick up your space over the course of a week doing just a little each day. The important thing is to make sure you don't overwhelm yourself because that will just make your mojo run away even more.
  4. Put together page kits. Either with photos or without. Once you have a manageable kit in front of you, you may find yourself inspired. 
  5. Peruse Pinterest for ideas. Don't just search "scrapbooking" but go beyond. Look into color palettes or beautiful photos that inspire you. Do you like the color of a particular door in an artistic photo? Or a beautiful mandala? Did someone pin some refinished furniture that you just love the distressed look of? Could you maybe try to recreate that finish on some chippy pieces or wood pieces?
  6. Keep an art journal and just make a mess. Grab your art journal and just start throwing paint and stamps and what-not at a page without thinking.
  7. Fussy cut some images. Trust me....sounds strange...just go with it
  8. Watch an inspirational movie. I love the imagery in Memoirs of a Geisha...just visually stunning as a movie. I adore the art studio and house in The Time Traveler's wife. These are things I pull from, movies that just speak to me. 
For the last month my mojo has been on a serious hiatus. I just have no interest in anything scrappy related. I sat at my desk petting all my semi-recently purchased pretties for an hour...and got nothing. Granted, I didn't have time to clean my room and that was probably not helping but still...what was I going to inspire all my eP gals with?!

I started by perusing Pinterest (which I've already done numerous times) and found myself focusing on color palettes. I decided I wanted to do something with yellow (but I kept clicking on green stuff...don't ask just go with it).

Deciding on yellow I then turned to my pictures in iphoto. There was already a group of photos up from a 2011 vacation so I decided not to overcomplicate things and just pick one. I waited for one to speak to me and then dropped it into Elements and antiqued it to make it more neutral (easier to work with considering the lacking mojo). 

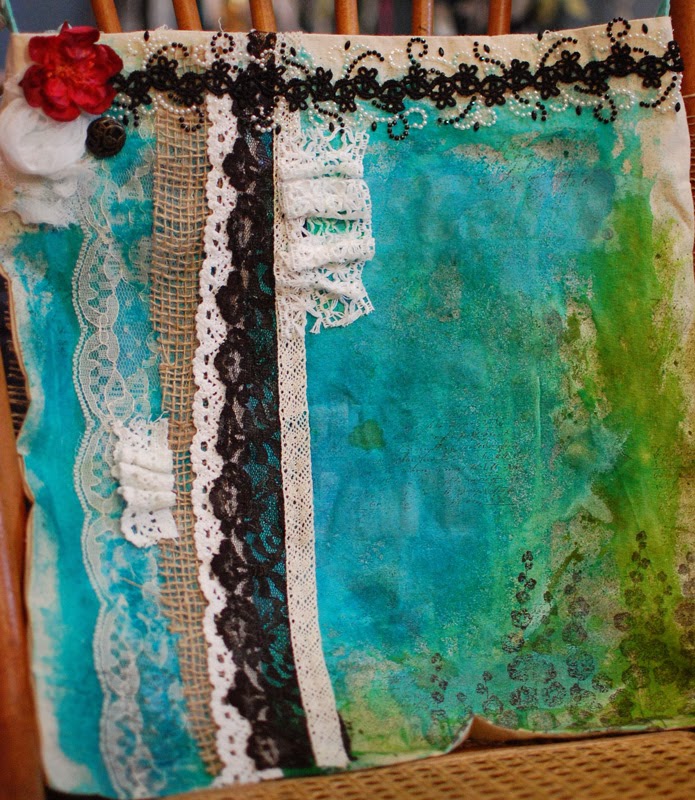
While my photo printing I turned my attention to my desk. 

EGADS!!!!!

I started by moving some stuff to another table. I would only focus on one item at a time and slowly I began to see the top of my desk. When I got to my eP goodies I chose a piece of paper, some scraps of leftovers and put the rest away. I chose a mask and took some bits and pieces of leftover embellies and created a pile. I didn't even have to go to my stash...there was plenty there. I grabbed a couple of mists to coordinate and boom:


I now had a manageable coordinating pile of stuff to work with. Still no mojo...but I didn't have to "wait" on inspiration now to give me direction.

The best thing to do at this point is just not think. I know I wanted the smaller papers and border strips layered under the photo and I wanted to use a lot of my mists and masks so I know those have to be first. Therefore I laid down my photo and the pieces of paper in a generic order. Considering the lack of mojo...it didn't have to be fancy. At every step I just "went with it".


I decided with those little scraps of border I wanted to cut ribbon ends.

Once I had a general idea I traced where my cluster was so my mixed media would pop out around


I used 7DOTS Domestic Goddess for the background sheet, and Authentique-Natural for the mustard yellow background sheet. Remember I said I wanted to do yellow;)

I then added my mixed media starting with a chicken wire stamp, then a holly hock stamp, and finally my Tim Holtz splatters mask. I used Vintage photo and Forest Moss for my stamping. (remember I said I kept clicking on green palettes?) 


Next I added my Wendy Vecchi embossing paste in black through my new Prima stencil for the splatters and the title. I added some Prima wood pieces from the Stationer's Desk collection and flowers from the Petaloo Color me Crazy collection. Some of the Prima flowers are from the new Something Blue collection as well. I finished off the final page with some random dots in Vintage Photo Distress Stickles.


And here is my final page...Completely mojo-less. I actually don't think it's too bad.

So when your mojo takes a hike take heart, you can still create, it will return. Try some tactics but most of all...just let go. 


{{hugs}}
Andiepants


Friday, March 14, 2014

Prima in the store!

I'm so excited I could almost pee!!!!

But I won't.

We have Prima in the store!!!!


Prima!!!

So what have I created with all these shabby goodies?! Why a scrapbook page of course silly.


But wait...there's more! 
(sounds like an infomercial right?)


I used Petaloo


I started with the 7Dots Dreamer paper-Sweet Dreams. I loved the new Prima Maps mask and used the Art Anthology red velvet dimensional paint in the mask. I used lots of my old stamps over the entire background with Distress ink in Walnut Stain and Gathered Twigs. Of course my Silks glaze in Guatemalan Green and Dylusions sprays in Lemon Zest and Black Marble. My title was done with the Idea-ology label letters. Honestly I used to be such a sticker snob but now....I love letter stickers!


Here's some closeups of my lower cluster. 


Jump in the store and grab some Prima. Give it a try! They are some of my mostest favoritest products ever.

Til next time...

{{hugs}}
Andiepants


Wednesday, February 26, 2014

Harbingers of Spring


The Sweet Sentiments Paper Pad by Graphic 45 has some great Valentine and Easter/Spring designs.  As soon as I saw it, I just knew I had the perfect use for the images in the pad.  I had this pair of crib shoes that I picked up several years ago at a thrift store.


I photographed the unaltered shoe on pieces of the beautiful G45 paper pad to show you my inspiration for my colors and embellishments.  


Above is a close-up of embellishments I added to images from the paper pad.  The 2-ply butterflies were cut with a die from the set of Spellbinders Circle Butterflies.  The tiny purple flowers were cut from vellum with a Punch Bunch flower punch.  To add dimension I cupped the flowers by using an embossing stylus and a mousepad.  I added centers to the flowers with a metallic gold gel pen.  The large pink flower was punched and formed in the same way.  A bit of rose colored organza ribbon was also added to her hat.  These G45 elements were all fussy cut with my go-to favorite Cutter Bee Scissors.  All the edges of these pieces were distressed with an Inkssentials Blending Foam Replacement Pad and Tim Holtz Distress Ink---Old Paper.  The 3 images on the slipper on the right were matted on coral paper to tie in with the color of the girl's dress in the slipper on the left and also with the large paper butterflies.


The ivory colored flower sprigs that form the background and act as anchors for the G45 elements are from the Botanica Collection by Petaloo.  I attached the G45 elements to the sprigs with Mini-Glue Dots.  The paper butterflies are from the Petaloo Printed Darjeeling series in a color called "paprika."  They were also attached with the Glue Dots.  The flowers nestled inside the slippers are a mixture of floral bridal embellishments and paper roses from my stash.

It has been fun being guest eP designer for the month of February.  As the month of February ends, I hope that just like the robin, my project this week is a Harbinger of Spring!

Thanks for stopping by, Paulette Akagi


Saturday, February 22, 2014

Altered bag with Andiepants


Andiepants in the house! 
I figured I would give you more inspiration for Toni's "Do something with a bag". Well...I did something.

Altering a bag? hmmmmmm....I've done this before. Didn't turn out so well, so here was my chance for redemption.

First, I dug out this Master Cam bag that my hubby brought home from a machinist trade show about a decade ago. 


I decided I didn't want 2 handles so I started by using my seam ripper to remove the handles that were sewn on.


To color the handles I soaked them with water first. This allows the mist to spread more evenly over the fabric. Next I sprayed my Dylusions mist in Vibrant Turquoise generously over the handles so they were well covered. You may want to use gloves. I did not :(

In order to cover that gawd awful picture I decided I would cover the thing in gesso. Remember when working with fabric to place a piece of cardboard in between your layers to avoid bleeding and soak through. Here I just used an insert from a 12x12 Prima mask.


Cover generously with gesso. If you feel you need more coats make sure you dry thoroughly in between coats. Honestly I remove the handles and covered in gesso before dying the handles in order to give my bag some additional air-dry time.


Once covered to my liking I then used Distress paint in Broken China to color the background. after that was dry I sprayed some Vibrant Turqoise in order to allow some congruency to the piece. I did this to both sides of the bag.


You will want to do the handle next since you need to reattach it to the bag. Make sure your sewing needle is a large enough gauge to handle the material of the bag. I sewed my to pieces together to make one long handle, sewed a piece of trim down the middle, and then sewed each end to the seams in the bag.


You can see here where I attached it on the inside.

The rest is just like scrapbooking! For the front I adhered a piece of burlap using gloss gel medium in various areas. I adhered the large lace at the top using the same method and allowed that to dry. Arrange your clusters and take photos so that you know where to put them when you're ready.


Next I used Wendy Vecchi embossing paste in black through a Martha Stewart silk screen to attain the large black shape (Above) and the smaller one coming out of the bottom of my cluster. I then adhered the flowers with fabric glue in my hot glue gun and I sewed the small blue Prima baubles  on by hand in the bottom cluster, top cluster and across the lace.


For the back side, I gave a good coating of water and then added more Dylusions in Calypso Teal and Dirty Martini. 


I first added all the lace piece using the gloss gel medium and let them dry. You can add dimension with your lace as I have and the gel medium will allow it to dry stiff and hold it's shape. Next I used the Hollyhocks stamp with Stazon jet black ink


and added a script stamp in Stazon Timber Brown. Notice that I even stamped on the lace. It's subtle but a nice touch.


I used a leftover scrap of cheese cloth to make a rosette with a slight tail, added an altered flower that was leftover on my desk, a random button that was sitting there, and finally added the Prima border. Again I used gloss gel to adhere the Prima border so that it was sure to stay.


I definitely think I've redeemed my prior shame of altering a bag. I quite like this one.

I hope you play along for a chance to win!!

{{hugs}}
Andiepants