Photobucket Photobucket Photobucket Photobucket Photobucket Photobucket

Thursday, September 20, 2012

Framed!

Hi there and welcome to the eP Blog today!  Michelle here and I'm your hostess for today.  I've been working on this piece off and on for a few days and I decided that it needed to be framed.  I'm kind of liking it.  It's my service project for this week and will be found by an unsuspecting friend on her doorstep when she gets home from work.  Just a little bouquet of flowers to brighten her day. 
 
I took an 11x14" canvas board and covered it with with pieces from an old 1901 Boston Morning Journal newspaper. 

Then I used a cream colored paint mixed with some modeling paste for texture.  I used Love Me from My Mind's Eye for the flowers and did some fussy cutting.
The edges of the flowers are trimmed with Claudine Hellmuth Black Paint.  I LOVE using her paints in the mini bottles.  Super easy to use and with way less mess.
 
 
For the centers of the flowers I used a sewing pattern and just twirled it until it created a circular pattern.  I used  Inksentias Glue N' Seal in Gloss on the flowers and the vase to have them pop off the canvas and kept the background in the matte.  I took a deep breath and then did an all over stain using Tim Holz Distress Stain in Brushed Coururoy.
 
 
 Thanks for stopping in today.  I'm off to deliver my friend's bouquet of flowers!


Wednesday, September 19, 2012

Explore!


Hi everyone! This post is brought to you by yours truly, Kim T :) Because we are heading into fall, I wanted to hang onto summer a little bit longer because my family and I are avid campers, but we do it RV style ;) What better way to showcase one of our loves that to create this scene using the Gone Camping set by Market Street Stamps. I'm not sure if you can tell or not but there is a pretty thick coating of Glossy Accents on the trailer to give it more of a metal feel and I added a mini brad for the door knob :)


I Sponged the sky in with Ranger Distress Weathered Wood and Broken China and then attacked my grass and handmade trees with Ranger Distress Forest Moss and hit up the gravel with Ranger Distress Pumice Stone. I used two different inks on the tree trunks - Ranger Distress Vintage Photo and Rusty Hinge.


I thought that I would try something a little different and cut out the campfire from the curly cue smoke and added it to my scene, replacing the stamped "smoke" with some Mini Rhinestone Swirls "smoke" :) I then finished off the card with a little stamp tag and anchored it down with some Caribbean Twine :D

Card Recipe:

Stamps: Market St. Stamps - Gone Camping
Paper: Gina K, Black, Water Colour, Olive, Artichoke, Suede, Cocoa
Ink: Versafine Onyx Black, Ranger Distress: Vintage Photo, Weathered Wood, Broken China, Forest Moss, Pumice Stone, Rusty Hinge
Accessories: Sewing Machine, Cuttlebug and Die, MFT Grass Die-namics, Tombow Dual Brush Pens, Brad, Glossy Accents, Tombow Multi, Chalk Pencil, Water Brush, Caribbean Twine,Mini Rhinestone Swirls , Scotch Foam Mounting Tape

Tuesday, September 18, 2012

Product Spotlight - BasicGrey


BasicGrey has long been one of my favorite paper compaines.  Their designs are so unique and varied...so much crafting you can do with BasicGrey papers and embellishments!  This week I'm happy to announce that we have their new line, Soleil, in stock as well as the coordinating buttons and brads.  Here's a bit more about BasicGrey, as told by the company...(I love their description of their products!)  You can see samples of projects created by our design team, using BasicGrey products, here and here.

Deliciously different. Ambitiously diverse. Remarkably distinct. That’s BasicGrey.

Originality is the backbone of every item we design, every product we manufacture, and every angle in which we approach a new project. We strive to set the standard, not follow the trend. We’re the bar to be measured by and the company to watch because we’re one-of-a-kind. BasicGrey remains true to its popular avant-garde style, offering artists exceptionally innovative designs and products.

We live art—on the edge, in uncommon ways.


And this week only...save over 50% on BasicGrey embellishments!  Purchase a BasicGrey paper pad and receive buttons or brads for only $2.00 more!  Use code BG912 when checking out!  Note that this offer is only good on one bundle per order.  Coupon expires on 9/25/12 or when supplies run out!

Enjoy!

Monday, September 17, 2012

To a Tea!

Good Morning eP fans!!  It's my turn (Julie) to post a little crafty inspiration for you today. I had a bit of fun with some stamps from Sweet Stamp Shop.  This sweet set is called Afternoon Delight.


Now that the weather is getting chillier I've been enjoying my favorite Earl Grey tea several times a day, yum! This teapot just screamed at me to be paper pieced. I used some beautiful My Mind's Eye paper from the Blue Bell 6x6 pad.

What was also fun is the fact that MME's had coordinating washi tape for this paper called Smile. See the top and bottom scalloped accents? Washi tape!! So fun and easy to use, have you tried it yet?


The finishing touch on my card today was adding the pretty Black Rhinestone Swirls from Prima - so delicate and just what my card needed!

I hope you've enjoyed today's card!  Check back tomorrow for this week's Product Focus.  Have a great day!


Saturday, September 15, 2012

Back to School


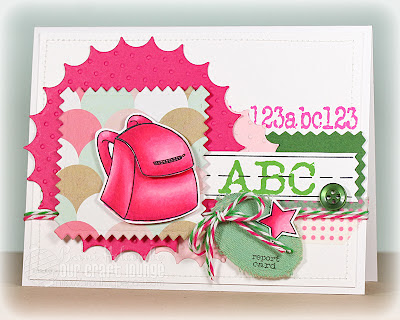
Good Saturday morning to you all!  It's Broni here and today I have a scrappy little card to celebrate "Back to School".  It's definitely in full swing now and I decided to make a card to celebrate!

I stamped my little book bag and star on white cardstock using Memento tuxedo black ink, colored them with my Copic markers, and cut them out.  I used my new WPlus9 Pinking Squares die to cut the Everyday Eclectic patterned paper (Echo Park) for the panel behind the book bag.  The Pink Sorbet and Peapod twines are tied through the eyelet of the Mini Tag Canvas Piece which was painted with a Juniper Adirondack Acrylic paint dabber.

The other layers were cut with either Spellbinders dies or my pinking shears, and the letters and numbers were stamped using the new Ranger Distress Summer Seasonal inks.  I LOVE these colors!  I also added some paper tape and a cute little Kiwi Fruit button, and I stitched around the large white layer before adding all my pieces using either Scor-Tape or Scotch foam mounting tape.

I hope you enjoyed seeing my scrappy card for today!  Thanks so much for dropping in!


~ ~

Friday, September 14, 2012

Just a Note


Hi, everyone! Barbara here with a sweet little card for you today. This card is using some gorgeous papers—Basic Grey’s Plumeria. I chose a neutral pattern for my background and I’m not sure if you can tell or not (click on the photo for a closer view), but after I stitched the background paper to my dark gray layer, I sanded the edges with my Idea-ology Sanding Grip Block loaded with Idea-ology Sanding Grip Refill. I use this little gadget all the time—love it for distressing edges as well as for smoothing rough card stock edges. After I sanded, I sponged the edges with my Inkssentials Foam Blending Tool and Antique Linen Distress Ink

 I then added some colorful die cut strips, adhering them with some Dot N’ Go -  Mini Glue Dots, then I added a sentiment stamped with Memento Tuxedo Black ink and popped up on Scotch Foam Mounting Tape. Finally, I made a flower using a brad from Plumeria – Mixed Brads for the center. 

And that's it for me today! Thanks so much for stopping by! Be sure to check back in tomorrow when my girl Broni will, I'm sure, have something to WOW you! 


Thursday, September 13, 2012

Wishing You Happiness

Hey look...it's my turn to post on the blog!  Yeah, so excited to share!! 

So...did I tell you that I was recently added to the CAS (Clean and Simple) design team on Splitcoast?  Oh my, what a tremendous honor!  Seriously excited to have made the team after trying out a number of times.  You know that old saying, "if at first you don't succeed, try, try again." 

I'm a real layered kind of girl when it comes to cardmaking; if it costs extra in postage to mail a card because of it's weight...perfect!  So creating CAS cards is a real challenge for me, it is not something that comes easily or naturally; I have to work at it.  I think that makes being selected for the team even more sweet.  Don't give up on those dreams, even if they're small ones, the reward might be just around the bend. :-)

Alrighty then...On to the card!!  This week's challenge was to create a card using the color blocking technique.  Are you familiar with this technique?  It's been years since I've used it on a card but typically, color blocking is just that...creating blocks of color on a neutral background.  You can also use cardstock or designer paper to create the color blocks and I've even seen designers use color blocking to create a die cut image.

I opted for using cardstock for my color blocking and use the Tim Holtz Kraft Core Core-dinations cardstock.  This is the cardstock that matches the Distress Ink colors...beautiful!  And I love the kraft core, it's the perfect accent to any card.  And the laterns?  From the new Graphic 45 stamp sets...love 'em!!
I simply stamped the latern on white cardstock and colored the images with Copic Markers, colors used shown above (please forgive my messy markers...they get used...a lot!).  Then I cut out the laterns, attached them with foam tape to my card, and then added silver cording.  The sentiment is from a Sweet 'n Sassy stamp set.  And there you have my CAS-inspired card!!

Thank you so much for visiting today!  If you haven't already, we'd love to have you as a blog, Facebook, and Pinterest follower!  We post on the blog almost daily and I confess that I'm a huge Facebook page so you'll see me often on our page with product or project photos...oh...and maybe a photo or two of Simon, our cat.

Enjoy friends and thank you for hanging with eP today!