


Hello again eP blog friends! Starla here with my last (sniff, sniff) project for my stint as April's guest DT. I have so enjoyed having this opportunity to get my creative gears turning again!! Thanks so much to Kim and the eP Team for making my visit such a fun one!!
Today's project was created totally on the fly!! I usually have a couple of ideas floating in the ol' noggin', but this week, time was not my friend!! Tuesday (yesterday!) morning I found myself rummaging through all my craft "goodies" looking for some type of inspiration. I kept having visions of the journal pages that Micki has created and the wonderful journal page that Broni created for the eTeam Picks Flower Challenge and decided that I would do another journal page but try to go outside my usual box and play around with adding more layers of interest.
Welllll.......I ended up staying true to my more CAS (clean and simple) style, but baby steps, lol!!
I started out with a journal page and ended up doing a canvas instead! LOL! That is sooo me!! I start out with an idea, then as I keep playing, I deviate to a new path!

Let me just say that I am amused beyond words that I titled this board "Be Yourself" and I used PINK!!! BWHAHAA!! I am so NOT a pink type of gal but when I went to get my colors, pink just called out me!
The canvas board was first "primed" with water. I pulled out an "old" idea-ology mask (remember those?! They were the "hot" ticket before stencils became the "hot" new thing!!) Flourish and placed it on my canvas. Distress Stains in Peeled Paint, Spun Sugar and Victorian Velvet were then randomly applied and spread out with a wet water color brush.

As I was drying the canvas with my heat gun, I splattered water droplets on the canvas to create more texture. I then used Distress Inks (same colors as the stains) to fill in some of the gaps on the original flourish and to add very faint hints along the rest of the canvas.
I could not find a flower in my dies or stamps that appealed to me so I drew my own onto a piece of Clearly for Art modeling film and traced it again, to give me two layers.

I combined Claudine Hellmuth's acrylic paints in Dash of Red and Blank Canvas to paint one layer of my flower.

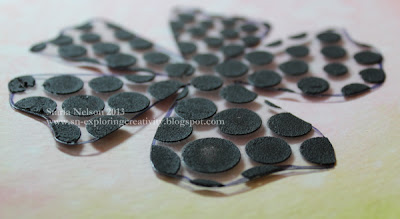
Next I did a little bit of experimenting with Wendy Vecchi's black embossing paste on the Clearly for Art modeling film. Using TCW Mini Circle Explosion stencil I applied the embossing paste to the second flower.

A helpful hint: After a couple of different attempts at applying the paste, the easiest way I found to apply the paste without smudges was to leave the flower uncut from the film and tape down the stencil securely with removable tape. After the embossing paste was applied, I slowly and carefully lifted the stencil. Set aside the piece to dry while you go clean your stencil and palate knife. I left the embossed flower to dry longer yet while I worked on other areas of the board. Before I cut out the flower, I carefully heated the paste just a little bit to make sure the paste was dry. The embossing paste holds well, BUT, you can scrape it off with a sharp object. It's fine to the touch, and really, if someone goes to scrape off the paste they deserve their hands smacked!
The flower layers were heated and shaped and adhered together with an idea-ology curio knob.

The stem of the flower is an Art Part. The leaves are Clearly for Art Whiteout that were hand drawn, covered in tissue tape and inked with Distress stains Peeled Paint, Forrest Moss and Distress Ink Peeled Paint.
The butterfly was cut and embossed using a Spellbinder's die from TenSecond Studio's Kiss Me Pink and Rock Star Black metal. The pink metal blended in too well with the canvas background so I used more of the Dash of Red paint and a VERY little paint brush to paint along the outside of the embossed center. The words are some Alpha Parts that I have had in my stash for a while.

I drew some squiggle lines to ground everything and called 'er done!!

Once again, I so appreciated my visit "home" to the eP blog/team and all your comments on my projects this past month!!
Thank you Kim and eTeam for the fun creative month!!
11 comments:
Squeal! This is so darn cute, Starla! I love it!! The embossing paste on the flower is awesome! Great stuff! Thank you so much for playing with us this month...it's been a delight to have you!
I LOVE it!
Whoop..whoop...Starla,stunning journal page,flower is AMAZING...texture...Deeelish..and the squiggles finish the whole thing beautifully!
You won't get rid of us ..we'll just stalk yoy,lol.
Hugs
Tracy
Xxx
Starla,
This is stunning! It so amazes me the different things I learn here every day. Thanks for all the inspiration.
Love the way you've made the flower fabulous technique yippeee! Even more reasons to get out the stencils and embossing paste! Thank you Starla x
Embossing paste and modeling film? Who have thought! Really cool idea. Love how it turned out.
A month of great projects, Starla, and what a finale - fantastic!
Alison xx
This is SO beautiful and creative! x
What a beautiful piece!!
wow and I love the tip about the paste. Seriously beautiful. :-)
Starla, this is so awesome! I LOVE that canvas and the beautiful flower!! And you used pink!! LOL! I love it!!
Post a Comment