Photobucket Photobucket Photobucket Photobucket Photobucket Photobucket
Showing posts with label inksessentials. Show all posts

Thursday, May 30, 2013

Father's Day

Hi eP fans, it's Mary-Ann here with you today to share some of my very simple, fast Father's day cards. I need to make several cards for this holiday and I was determined after being late for Mother's Day, that I would NOT let that happen again. (shhhh, I still have two mother's day cards to be mailed!)

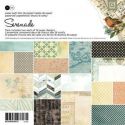
I LOVED the Strong collection from Authentique.  Here I used the 6x6 paper pad and embellishments. The papers in this collection allowed me to create three different cards that look like they are three different lines but they still all coordinate beautifully.


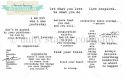
For the first card,  I layered several patterned papers and a couple Stamp Blocks and Circles.  I inked all my edges with Distress Ink Pad - Vintage Photo.  This helps soften the edges.  I added a FarmHouse Paper Company key and May Arts ribbon.  See that great big delicious brown button?  That gem came from an antique store in Maine.  I just love how rich it is.  Of course, I added some Scotch Foam Mounting Tape behind some elements to bring dimension to my card.


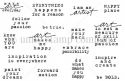
For my second card, I layered some of the beautiful blue papers.  Again, very simple but the layering makes it look richer and more detailed.  I added a couple tags and twine that I had on hand.   I again used foam tape for added volume. 


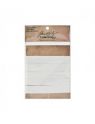
I needed this tag to add to my dad's present.  I used an Inkssentials Surface #5 Black tag an covered it with the newsprint paper.  Added a strip of the GORGEOUS woodgrain.  I added punched circles that but thought it needed something more.  I dug out my Idea-ology - Tim Holtz - Remnant Rubs chopped them up and added small pieces in different locations that helped embellish my tag, still keeping it simple.   Adding ribbon, Black Shine twine from The Twinery and foam tape finished off my tag.


With just a simple, gorgeous pad of paper, I made three completely different cards.  I hope you are inspired to start your cards a bit early.


Friday, March 29, 2013

You are Loved

Good morning, its Mary-Ann here with a little mini project honoring bright cheery colors!  My tulips have broken ground but there is still snow everywhere.  I needed these bright colors to get me out of my slump!  I was inspired by the trendy palette and gorgeous floral patterns from the Collectible collection of My Mind's Eye - Notable.  I mixed it with bright colored ribbon, twine, and a few pins.  Scotch foam tape  helped with stability and dimension.  I applied Tim Holtz distress ink to the edges of my papers. I also added a few Inkssentials tags to the album to create more pages for memories.


Check out all this foam tape I used!


Here are a couple pictures of the inside.


Hope hope your neck of the woods is warmer than mine.  Thanks for looking!  I believe you will be able to purchase this mini in the e-kit section of the website very soon!


Monday, March 18, 2013

A little bit of inspiration

Hello all, Alison here... Very happy to be back at eclectic Paperie to share another project with you.


This one is a very simple little ATC book (I seem to have a thing about handmade books), with lots of little pockets - brilliant for using up paper scraps when you really want to make the most of every last little bit of your favourite papers!


It's a tiny book of uplifting and thought-provoking words and phrases, so that you can turn to it for a little bit of inspiration when in need.  And of course you can add more phrases, or other memorabilia, pictures and ephemera as time goes on... plenty of room in those pockets.


I started with six of the Inkssentials natural canvas ATCs.  One of the great things about these is that they are sticky-backed, so you get all the great canvas texture and you can apply it really easily to cardstock or chipboard to create a really sturdy, dimensional ATC.


I adhered my six ATCs to some kraft cardstock, and then started juggling with my papers.  These are from the Basic Grey Serenade set.  I worked out I had enough to do a couple of ATC-sized pages and a couple of "pockets" out of each of my selected papers.


I wanted to leave plenty of the canvas on display, and also to keep things pretty minimalist, so I kept my pockets nice and simple: a plain rectangle, alternating (mostly) between vertical and horizontal positioning.


And I gave the canvas a good going over with the Vintage Photo Distress Ink to really highlight all that lovely texture.


I thought about doing some stamping on the canvas, which I always love the look of, but I was quite enjoying the clean lines of the whole thing (couldn't bear to leave out the distressing though!)... it's probably the nearest I'll ever get to a CAS project!


All the sentiments - from the fabulous Donna Downey sets, Empowered Words and Art and Possibility - are also stamped onto paper scraps, so they look pretty cute either way up, and they've also had a touch of the Vintage Photo DI of course.


On each facing page, the design paper side, I've added one of the larger sentiments, stamped on plain white cardstock and inked to tone in with the rest of the look.


I particularly love this Picasso quote... and I've tried to match the quotes in the pockets with my "main" quotes each time - I've tried to create satisfying groupings that "speak" to each other.


Another sentiment stamp serves as the title on the front cover (in the picture at the top of the post), and I've stamped some of the Hero Arts Serenade Music Background to surround the title, and all over the back cover.  This stamp is designed to coordinate with the Serenade music paper that I've used on the inside, so it fits in with the overall look beautifully.  (Sorry, I think it may now be sold out at eP!)


Finally I added the little corner pieces cut with the ATC and Corners die by Tim Holtz onto the front and back covers.  I love the "finished" look it gives.


The binding is incredibly simple too (seriously, you can knock up a whole little album in well under an hour) - just some crinkle ribbon dyed with Vintage Photo Distress Stain, and tied through the punched holes to give a pretty bow at the front.


I had to do a little bit of retying to get the tension right, so that the pages would turn easily without the whole thing flopping about uncontrollably, but that was about the hardest thing in the whole project - and, really, what's so hard about tying a bow a couple of times!?


Thanks so much for stopping by today.  I do hope my ATC inspiration album has given you a little bit of inspiration to go off and create something yourself.  See you again soon...

Alison xx
Words and Pictures

Ingredients (click on the link to go straight to the product):

Saturday, January 26, 2013

You & Me against the world

You & Me against the world.  Hey there, it is Mary-Ann here, this is the perfect title in my house this week.  Ever have those times when you just have to pull together are count your blessings?  May times, they are right beside you.  I think this little sentiment will be encouraging to my husband Monday.  I am going to close it into his laptop and when he opens it, it will be a pleasant surprise!  It's better than jumping out of a cake!!!

The color pallet is soft and inviting.  It can be given today, or to your valentine.  There are endless possibilities to these nesting hearts.  I believe they will be holding glow sticks for Valentine's Day at school in a couple weeks!  The nesting hearts and sentiment are both from Wplus9 which can be purchased by clicking here.  Yes, they are perfect for Valentine's Day, but I can see them on a thinking of you card, a note to a friend, a card of encouragement or even on a scrapbook layout.  

I hope this card encourages you to send a note to someone important in your life today.


Thursday, January 3, 2013

Get Altered Challenge - Using Canvas

 
Welcome to eclectic Paperie’s Get Altered Challenge!  The Get Altered Challenge is held on the first Thursday of each month and each challenge is an opportunity for you to be inspired by one of our eTeam’s creations, and to be entered into our challenge prize drawing!
This week's challenge is to use canvas in your project.  It doesn't have to be a canvas, like I used, you just need to use canvas in your project.
The Get Altered Challenge is about exploring your creative journey, about stepping outside of your comfort zone, experimenting with new products, and creating altered and mixed media art.  Share a unique card, a scrapbook or journal page, a canvas, or any other project where you’ve used any supplies, such as paint, ink, paper, and/or embellishments.  We want to see your work and hear about your inspiration!  All of those who play along with our challenge will be entered into a prize drawing for a $15.00 gift certificate to the eclectic Paperie store.

So grab your supplies and play along!  Here are a few things to keep in mind for this challenge…
-You do not have to use products sold in the eP store…but we do love it when you do!
-Share a direct link to your creation, not just your blog, using the Linky Tools feature at the end of this post.  If, for any reason, the Linky Tools doesn’t cooperate, please add a link in the Comments section of the blog.
-When uploading to any online galleries, please use any of the following keywords; eP, eclectic Paperie or Get Altered Challenge.  Link your creations to the eP blog (http://eclecticpaperie.blogspot.com).
-If you’d like to be considered as one of our featured projects and be entered into our prize drawing, please be sure to add your link no later than 6:00 pm EST on Wednesday, January 16.  I’ll announce the winner/featured project right before the eTeam Picks Challenge.

Oh my goodness...so excited about our first challenge and about creating my canvas!  My project took so many twists and turns and it turns out completely different than I intended but I was still happy with the end result.  It's really all about the process and the journey of creating, laying, trying new techniques and products.  So much fun!  I even made a video to document my creative process.  You can see it here in the eClassroom.
I used so many products to create this canvas, and I talk about all of them in the video, so I'm going to just give you a quick breakdown here on the blog...

Canvas from Canvas Corp.
Bold Butterfly stamp from Unity (Donna Downey design)
Be Brave stamp from Unity (Melody Ross design)
Claudine Hellmuth paint
Stencils from Dylusions and The Crafters Workshop
Sticky back canvas from Inkssentials

And my favorite thing about this canvas?  The crinkly paper, covered with paint and a text stamp...sigh...love that. :-)

I hope you enjoyed today's project and please play along with us...You have almost two weeks to enter your project!

Tuesday, November 27, 2012

Product Spotlight - Inkssentials

Today I'm all about celebrating the wonderful products offered by Inkssentials!  I am a huge fan of Inkssentials products and use them regularly in all of my craft projects.  (I'm sharing two older projects with you today to showcase some of the great products offered by Inkssentials!)
 
Here are some of my favorite products (must I only pick a few?)
 
Metal Foil Sheets - I love the foil sheets...they are seriously so much fun!  My card above is showing off one of my favorite things to do with foil sheets...emboss!  Slide a piece of metal foil sheet into an embossing folder and you've got a masterpiece on your hands!  Add acrylic ink and things get even better! 
 
White Gel Pen - I love my white gel pens so much I have about four of them sitting on my desk (just in case one gets lost, which always seems to happen when one lives with two little boys).  I use my gel pen for faux stitching, in my art journal, for adding highlights, for creating doodle accents, and for every other thing in between!
 
 
Tags - I'm a huge fan of tags and love that Inkssentials now offers every size and color of tag you can imagine.  Manila, kraft, black, small, large, and even extra large!  Tim has made tags fashionable for every ocassion; use them on gifts, cards, scrapbook pages, art journals, or heck...frame them and put them on your wall!  The possibilities are endless!  You can even purchase packages of ATCs in the same three great surfaces!
 
Glossy Accents - It used to be that I only used Glossy Accents for areas that I wanted..well..glossy.  Now I use Glossy Accents primarily as a glue!  Did you know it's an amazing glue!  It works perfectly with metal objects, fabric, paper flowers, and more!  And, oh yeah, it makes things shiney too.
 

Sticky Back Canvas - Another all time favorite product and one that I use frequently.  (I especially like the ATC size, shown above, as it's perfect for cards!)  You can use canvas with stamps, paints, stains, and inks.  You can emboss it, color on it, distress ink, and stamp on it.  I love the texture and look of canvas...so pretty!
 
That's just a few of my favs...but there is so much more to choose from!  Check out our entire Inkssentials line and this week receive 10% off of your Inkssentials order!  Use code INK10 when checking out and enjoy!

Thursday, November 1, 2012

Halloween Album - Guest Designer Shannon Sawyer

**EDITED**  This is a slight re-post of yesterday's project, with a few more photos and links. :-)  Enjoy!

Hi everyone!  It's Shannon back with my final guest designer post for October!  I had a great time playing with the eTeam this month and am excited to show you my Halloween-inspired album that I created using a Graphic 45 Black Policy Envelope spiral book.  This is such an awesome book to play with and all the pockets that are in it that you can fill, it's great!

I of course had to use the Charcoal and Mandarin Orange twine from The Twinery to go along with my album and I used that to decorate the front flap of the album.  On the front cover I also used the wings from the "Adornments-Regal" from the Tim Holtz Idea-ology line, which were behind the Wendy Vecchi Studio 490 Art Parts "Pocket Watches".  I love the Art Parts, isn't this a fun way to use the Pocket Watch...as a spooky adornment!!

One of the newer stamp sets from Stampers Anonymous/Tim Holtz is "Artful Silhouettes". There is so much more you can do with these stamps aside from just having the silhouettes in the middle of the frame. As you can see from my project, I used one of the women silhouettes and since it was a Halloween project I extended her nose and chin with a black marker....genius, right?   (**Hint**  On another Halloween project I recently made I used one of the men silhouettes and I gave him fangs!) If you don't already have this stamp set, I encourage you to get it. Not only is it fun but as I said there's so, so much you can do with it.
 Here's a glimpse at the inside pages/pockets of the album...
I used Authentique "Enchanted" 6x6 Paper Pad to decorate the pages.

I also used Claudine Hellmuth Studio Paints in Orange and Charcoal Black, the Inkssentials Black & White Enamel Accents and the Inkssentials Surfaces #8 Kraft Tags....Love those tags!
Thanks so much for visiting the eP blog today and checking out my project!  There are more photos on my blog so feel free to come on over for a visit!  Thanks again to the eP team for letting me share in their creative journey this month!