Photobucket Photobucket Photobucket Photobucket Photobucket Photobucket
Showing posts with label flossie. Show all posts

Tuesday, April 1, 2014

Multiplicity


Let’s face it, we’ve all had days where we wish we could multiply ourselves, right?  I had several of “those” days!  Being pulled in so many directions, sometimes I wish I had a (rubber) room where I could put a canvas and just sling paint.  I mean really sling paint!  Instead, I decided to relieve some stress by “spritzing” inks.


I started out with Dylusions Ink Sprays, randomly spraying the pages, misting with water and using a paper towel roll to mop up excess inks.  Then I got an idea, and decided to play chemist.  I had some old spray bottles which were (I believe) originally fabric paint spray bottles.  I got them at the local thrift store, brought them home, cleaned them and put them away until now.  Well,  I just played by mixing gesso with a little Dylusions ink.  I also added several slivers of Faber-Castell Gelatos, staying with the same color.  I didn’t capture my chemistry experiment on pictures because I wasn’t prepared for it to turn out kind of cool, lo!  The cool thing wasn’t so much the mixed inks, it was those thrift store find spray bottles.  The spray comes out in a circle.  At first I was a little dismayed but then the longer I looked at it the more I liked it.
Ok, NOW I grabbed the camera….. since my mind was still wishfully thinking of multiplying myself, I pulled out Flossie, Casey and Sally stencils and stared “spritzing”. 


That’s how it turned out and honestly, I could have left it like that.  I really liked all the girls.  Kind of reminds me of those psychedelic James Bond movie trailer.

I probably should have left it as it, but I needed to do some journaling, which I did in a black water proof  ink pen, which I also used to doodle around each figure.  I just got TCW – Mini Stripes Explosion stencil in my last package from Kim and wanted to use it.  So I used part of it to give her skirt some pizzazz.

Next I spritzed my Dylusions Ink Sprays onto my craft sheet, spritzed some water over them and using a brush, filled in the girls.  I had used a Sharpie paint marker on a couple of girls but didn’t like how flat the color looked.  I just brushed the ink right over the Sharpie paint.

Texture was added by randomly stamping Unity Stamp Co. Plump Polka DotsShe Art Print Texture stamps and Stampington & Co. Create with Abandon cling stamp.  I also added some Idea-ology Remnant Rubs rub-ons and used up my white gesso left on the craft sheet by dabbing a spray bottle cap into it and randomly stamping circles around the page.
Idea-ology Alpha Parts Signmaker was used to add the title and I called it quits.  I could have added a border, added faces, which I tried and ended up having to cover it up with gesso. 


I have to say that I enjoyed not worrying about “coloring” inside the lines (as you can see).  I loved using the inks like watercolors and love that I was able to “just let go” and not worry so much about how it’s going to look.  Seriously, just sling that paint and ink and feel the stress leave!
I hope you enjoyed my “stress relief” art therapy and more importantly, I hope you were inspired to get inky!


Supplies Used:

Friday, June 21, 2013

For the First Time

When was the last time you tried something for the very first time?  It's probably not often that we try new things, as it's far too easy to get in to a regular routine (and I confess that I'm a sucker for routine) but I find that when we break out that doing the same 'ol thing, we're sometimes pleasantly surprised and that is something to get excited about! 

Surprise is what the mixed media journey has been for me.  I am not a painter, not someone who can draw, not someone who naturally likes things messy or off center and yet here I am...totally enthralled with all of the messiness of painting with my hands, of experimenting with different techniques, of trying new products, and of just having an absolute blast with all of these new toys!
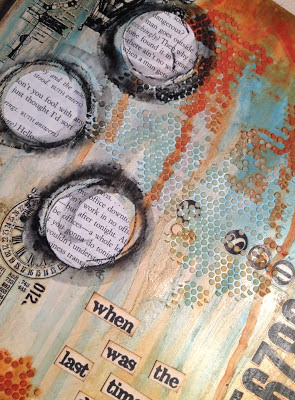
This two-page journal spread is a serious nod to trying a bunch of new techniques and products and just having fun!  That's what I adore about the Dylusions Art Journal...it's full of experiments...some good, some not so good, and some that I adore and can't even believe that I made something with paint and stencils!  It's all sooo good!
These two pages actually started out as something completely different and I didn't like the look at all so...gesso to the rescue!  Gesso really does cover a multitude of mistakes! LOL!  Once I applied gesso to both pages I applied a whole bunch of Remnant Rubs and some Distress Stains.  Now...as I found out...Distress Stains don't do well with gesso as the stains need something to soak in to.  However, I just kept adding some color, drying, etc. and I found that I was able to achieve some serious drippage (love that term from Donna Downey!) and more of a watercolor effect.

Once the stains were dried (and I needed a heat tool and some fixative...aka hair spray), I used the Tiny Circles stencil (my all time favorite) and some white embossing paste.  Then came some watered down acrylic paint, to highlight that juicy little circles and to get more drippage!
Once all my paint was dry I punched out a bunch of circles, from a book, randomly glued them to my pages and went around them with a magic pencil (it's not really called that but that was Dina's pet name for this cool pencil and yes, these are coming to the shop very soon!) and hit the pencil with a waterbrush to get that great watercolor effect.

Then a fun silhouette stencil and black paint, followed my messy outlining and journaling (another Dina technique).  My two journal spots say, "practice makes perfect" and "if one refuses to try, then one will never get better"...nice reminders for me!  My last step was to add the date (I love this idea from Donna because it helps you really keep track of your progress and what you products or ideas you were playing with at a certain time) and this great sentiment.

So that's the journey of how these two pages came together...tell me, what will you create today?

Supplies:
Dylusions Art Journal
Distress Stains
Remnant Rubs
Adirondack Paint (Terra Cotta and Pitch Black)
Flossie Stencil
White Gel Pen
Tiny Circles Stencil
Way with Words Stamp Set

Friday, March 8, 2013

Breathe

Breathe...It's something I frequently need to tell myself.  I tend to be a fast mover...I talk too fast, work on far too many projects all at once, and have a hard time slowing down.  My husband once told me that I wouldn't be happy if I wasn't taking on more work than I can handle.  Those traits can be good for someone who needs to multi-task, especially mamas who also work, but I also have a habit of not paying enough attention to the things that really matter in life.  Take me to the Grand Canyon and I'd take a quick look and then ask what's next on the list...Cleary, I have issues...LOL!

So when I had a couple of free hours at home this past weekend I decided to forget about what I needed to do (clean my poor house) and instead do what I wanted to do...create with my kiddies!  We all got seriously inky and tried out the new Dylusions Ink Sprays and a few Distress Paints on every piece of paper that wasn't already committed to a project!  I think it took us three days to fully remove all of the paint!

I started my two-page journal spread by misting a few Dylusions Ink Sprays over the paper (start by misting your pages with water first).  I used After Midnight, Dirty Martini, and Squeezed Orange on my pages.  Once they were dry I grabbed the 12x12 Turkish Grunge stencil by Donna Downey (yes, having a craft store in your house can come in handy!) and the new White Linen Ink Spray and oh, the results...In love!  The White Linen is just perfect for that hint of color..kind of like a watermark.  Crafty perfection!

Next came a TCW Chevron stencil, which BTW may be discontinued in the 6x6 size...acckk...waiting to confirm that bit of news...and the Squeezed Orange to add a bit more color.

Then..it was...**cough, cough**...time to grab the Flossie stencil from Dylusions, which we are now more than fully stocked with, to add a girl to the left side of my journal pages.  I used Pitch Black paint to fill in the stencil image and then used the Picket Fence Distress Paint to add some swirly text to the body.  I liked the look of the white text so much I added more around both pages.  I then outlined by silhouette with a white gel pen.

You can see the text on this page...isn't it great how soft the images are...you can just barely see it, I love that!  I then grabbed one of my fav Papertreyink stamps and added the leaves all around both pages and added a few highlights with the gel pen.  I also used up a few of my rub ons, you can see the text on the first picture, next to the silhouette (you can click on the photo to enlarge)...along with the words "Life is Good."  A reminder to keep in my wee head... :-)
And then I needed to add a quote...and I need to invest in some big 'ol alpha stickers!  Until then I grabbed a Black Soot re-inker and that worked just perfectly!  I left myself with a reminder to slow down, breathe, and learn to pay more attention to all the little things (that are usually more important!) in life!

I hope you enjoyed today's pages...This is still a learning process for me and I'm not always sure where to stop or what to add but I'm having a blast experimenting!  And if the house never gets fully cleaned but I get more fun times with the kids...that's a-ok with me!