Photobucket Photobucket Photobucket Photobucket Photobucket Photobucket
Showing posts with label Altered Art. Show all posts

Friday, June 20, 2014

Why, I declare...ePlay challenge project


Hello everyone! It's Bonnie here with my response to the June ePlay Fabric Challenge. I had a copy of a lovely old photo which I purchased from Vectoria Designs and I was excited to create something worn, tattered, and vintage where she could be the star. Doesn't she look like she is saying "Why, I declare" in a lovely southern accent? I printed the image on white cardstock and then further distressed and aged it with Vintage Photo Distress ink. Everything else was built around her as the starting point.


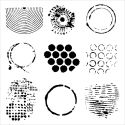
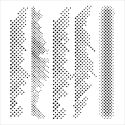
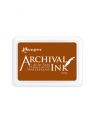
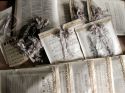
I chose a scrap of designer paper which had a collaged look to it and cut it to size. I knew that I wanted to do some sewing so I didn't adhere it to the chipboard substrate until near the end. Using Sepia Archival ink, some flourishes were stamped randomly around the edges of the background. I selected a lovely aged and yellowed page from the Sears Roebuck catalogue which was in my Michelle Hill Ephemera Pack and tore three sections from it to layer over the designer paper. Once that was adhered, pattern was transferred with white gesso on a brush through the Dylusions Blocks stencil. Pale Ochre Archival ink was applied through the Dina Wakley Plastic Canvas stencil using a makeup sponge.


For the fabric bits, I had some remnants of burlap including a heart which I had cut to use somewhere and didn't. I also had some torn canvas fabric strips to which I wanted to add soft colour. I sprayed my craft mat with water and then Dylusions Melted Chocolate ink spray and dragged the strips through the puddles. The colour was very intense in some places so I rinsed the strips in the sink and came away with this brownish pink hue which I loved. I spritzed a little Vibrant Turquoise ink spray in a few places and rinsed that out as well. Then I hung them on the clothesline to dry, causing the neighbours to shake their heads and mutter... what else is new...LOL. I took one of the longer strips to the sewing machine and sewed as I folded in some pleats.

Next it was a case of playing with layering bits and scraps which were on my desk from previous projects until I came up with a composition that pleased my eye.The brown under the image had been embossed with the Diamond Plate folder and then not used for another project. The blue circle was punched, faux stitched and popped up on foam. The teal strips were offcuts from a Bingo card. also from the ephemera pack which I had sprayed with Studio Blue and Lark Art Anthology sprays for a previous project. I tend to save little scraps if I like what was done to alter them. They work well in larger projects and altered playing cards.


Once I liked the arrangement , I returned to my sewing machine to add some stitching to the right side, bottom edge, and through the short piece of canvas and heart. Love the texture and shabby chic effect.


 A length of lace was added to the bottom layers, as well as a mulberry flower and three threaded buttons. A layered kraft butterfly with a bead center was affixed to the top left corner of the image and an Idea-ology metal Word plate was attached with a brad over the pleated fabric.


The final embellishment was the key hole plate which I backed with black cardstock to allow the shape of the hole to stand out. Vintage Photo Distress ink was applied fairly liberally around the outside edges followed by Walnut Brown Big Brush pen before the entire layer was glued to the chipboard substrate.

Thanks for visiting today. I hope you gained a little inspiration and are keen to join us for our Fabric ePlay Challenge hosted by our very own Andiepants. Can't wait to see what you create!

Bonnie

Here are links to most of the products I used:

Thursday, May 22, 2014

Altered Playing Cards


Hi everyone! It's Bonnie here today to share a trio of altered playing cards with you. This is often where I go when my mojo has gone for a walkabout. I'm not sure if it's the smaller size, the freedom of the background, or just that they are so fun to create but it seems to be a great place to start when I'm in a creative slump. I start out with sanded and gessoed backgrounds which I've added basic colour to using Neocolor II crayons, gelatos, and big brush pen. Stencilling and stamping are then done on a whole bunch at once with no idea of what image I'll be adding. Bits of scrap papers, scrap die cuts, and leftover embossed scraps are added randomly, again with no thought as to the outcome. Finally, I go through my little bin of precut images, often from Deviant Scrap, to match up images with backgrounds. I usually audition several at once (sometimes up to 10 cards and images) and switch them out until I am pleased with the results. Then I go looking for appropriate (or inappropriate...lol) sayings. Occasionally I will start with the saying and then look for an image that suits it.

The card above started with the same process emphasizing the colour around the card with gelatos, stampimg with Jet Black Archival ink, and stencilling with TCW's Mini Punchinella and white gesso. The saying was chosen first and then the image paired with it because the couple look like they are full of joy (kidding). That unexpected or unusual pairing makes me laugh. After doodling and black Big Brush pen around the outside, some punched black stars which happened to be sitting on my table were added.


The second card followed the same process but used TCW's Mini Halftone Borders stencil with white gesso. Black gesso bottle top rings were added to the background before the images. I generally mat the wording with black cardstock and in this case, I did the same with the image to make her more visible against the busy background. The sun was popped up on foam tape to add dimension and that great shadow behind him.


The third card's background looked like a sunset and the torn papers looked like mountains in the horizon so I thought this image of the couple looking off into the distance suited it. The background stencilling is white gesso through TCW's Well Rounded stencil. Again, black gesso rings were added with bottle top stamping. More stamping was done with a TH zigzag stitching stamp and also with my dotty stamp and Coffee Archival ink. The scallop border was a punched remnant edged with Walnut Brown Big Brush pen. The threaded black buttons are from my stash.

The great thing about a project like this is that it can be accomplished over several shorter sittings. Maybe one day. I'll print and fussy cut images, another I'll prep backgrounds, another I'll add colour and so on. It allows me to continue to create at the level that suits my mood and seems to entice my mojo to return one small step at a time. What do you do when your mojo goes into hibernation? I'd love to hear.

Thanks for visiting today. I appreciate that!
Bonnie

These are some of the products from the eclectic Paperie shop that I used on these cards:


Thursday, April 17, 2014

A House is...


Hello everyone. It's Bonnie here today to show you another project I made in response to this month's ePlay Challenge, Wood. I love houses...real ones, images, art projects...houses. A little while ago, I ordered some of Wendy Vecchi's Blossom Bucket embellies, several of them with the idea of creating 3D houses. They became my inspiration for today's project.


I started with two discarded chunks of wood from the garage: a triangular one and a rectangular one. They were both about 1.25 ' thick. Both pieces were gessoed as I wasn't quite sure what I would do to them. In the same eP order, I received one of Michelle Hill's fabulous vintage paper ephemera bundles...oh my word...love! There is so much goodness in one of these packs that I was in Mixed Media Heaven. I used some of the lovely old sheet music to cover the front and back of the triangular piece, using Matte Medium to adhere it. I used a page from an old S&H stamp book, complete with  a row of stamps to wrap around both sides and the back.


I spritzed an old bingo card from the bundle with Studio Blue and Lark Art Anthology sprays plus a little water and adhered it to the front of the house. Stamping was done all sides of the blocks with Forget-Me-Not Archival ink and a text stamp. Stencilling was done with TCW's Tiny Circles stencil and gesso as well as with TCW's Mini Chevron stencil and Coffee Archival ink. Vintage Photo Distress ink and then Black Big Brush pen were used around all of the edges of both pieces as well as here and there to age them. Lemon gelato scuffs were also applied and spread with a dry finger. White gesso rings were added with watered down gesso and a bottle lid. A torn piece of an old receipt from the kit was inked with Peeled Paint Distress ink and adhered to the base of the house for grass.


A stamped and embossed saying from Wendy Vecchi's Art Comforts stamp set was added to the peak of the house front. Vintage Photo DI was used to grunge it up and darken the torn edges.


The eye peering from the Blossom Parts Front Door was stamped with another WV stamp, An Eye For Art, and then coloured with Prismacolor pencils. A bead was adhered to the door for a knob. The star on the Blossom Part Roof above the door was darkened with a Pitt pen. The resin windows from my stash are backed with more paper from the ephemera bundle which was colourized with Scattered Straw and Wild Honey Distress ink.


The back and sides were stamped with the greenery from the same Art Comforts stamp set using Fern Green Archival ink. The sentiment, from the same set, was embossed in black, torn around and inked with Vintage Photo. The clock in the peak of the house is a wooden piece from my stash.


To complete the house, small vintage wooden dominoes, a thrift shop find, were adhered to the roof and a long wooden bead filled in the gap at the peak. A border was cut (it's actually a rolled daisy die) from black cardstock and adhered to hide the joint between the two pieces of wood.

I had so much fun playing with this house project, with the ephemera from Michelle's  bundle, and with all of these wonderful Wendy Vecchi products. There's still lots of time to enter the ePlay wood challenge. We'd love to see what you create.

Thanks for visiting.
Bonnie

Here are links to the eclectic Paperie store for products used above: