Photobucket Photobucket Photobucket Photobucket Photobucket Photobucket
Showing posts with label Maya Road. Show all posts

Friday, October 10, 2014

Layered Bee Sympathy Card

Hello eP land!

There has been a LOT going on in my new office with my new co workers, multiple family members passing away and one co worker left. 

Of course in craft-land this means we make cards. Today I would like to share one of the sympathy cards that I made for my co worker whose uncle passed away. This co worker ahs been paramount in making me feel welcome, so when I found out that he lost someone very close to him I definitely wanted to let him know how sorry I was for his loss.


When I saw this bee, all I could think of were the french bees with the crowns. However, my first project with it turned out nothing like that. Although I used papersoft for the main part of my yellow, I inked a majority of the edge in wild honey and then stenciled my images in ripe persimmon and rusty hinge. I then used my water spritzer to splatter some water on the card and react with the Distress Ink. Then I stamped my brown images using various Stampers Anonymous stamps and a new set of Wendy Vecchi stamps.


I used Distress Glitter in Antique Linen on the wings of the bee to give the card just a touch of glam even though it is for a male. I love the embossing folder on this bee. The brown corrugated piece is from my 7gypsies scrap pack. I ran a nail file over it to distress it a bit. I love the texture with the canvas from the banner. Those Maya Road banners are adorable. 

Hope you enjoyed my masculine sympathy card today. Love my bee. If you haven't tried one of the new Bigz dies with the embossing folder I would DEFINITELY recommend it. 

{{hugs}}
Andiepants


Saturday, May 10, 2014

12x12 Life

What can I say...I'm a 12x12 kinda gal. 

When things are not going right or I'm feeling like I need some crafty time...I reach for 12x12. 

I think we all have our own comfort zones and that is mine. 

So imagine how ecstatic I was when Kim started carrying different 12x12 papers in the store! We have Authentique and Fancypants and 7Dots and Tim Hotlz...

and I really could go on but you want to see some GORGEOUS crafty goodies don't you;)

If you have seen my work you know that I am over the top...lots of mixed media...more flowers than a gal can handle. But when I saw the Fancypants Nautical line, I was so inspired to do something clean and simple. I purchased some 12x12 in a couple of the patterns and went to town!! They were so much fun to create with!


I also used my new Tim Holtz Honeycomb die to create some layers behind the photo grouping. The tag is from the clearance section and is Fancypants as well but from a different line. I just adore the Junkyard Findings Street Signs and this one was perfect...because he is my 1st born!! Get it? 
*slaps her knee*
I liked the orange with the navy blue and teal (yes that is blue not black) so I grabbed a piece of orange paper from my stash to make my accents. 


I decided to stamp a tiny date stamp to document the time that this photo was taken. We don't have many every day type photos and this was just a spur of the moment "kids...get in the car...mamma wants pics" kinda deal. 

So needless to say my teenager was glad I was inspired to NOT use flowers this time.  


This LO was the inspiration for the one above:


Hard to believe this is the same child isn't it? Thus the title for the previous LO of "All Growed Up"

This was using the Authentique elegant line. Little bit of chip board photo frames
and some Prima masking...a little bling...some stamping...this was seriously a fun layout to create.

Here is a close up of the tissue tape and stamping.


And of course the BLING!!!! Oh so yummy!! And just adorable with the Prima Metal Door Sign


Don't forget our ePlay challenge is still going on this month with STENCILS!!!


You can check out all the details for these tags on my blog at www.scrappygoddess.blogspot.com.

Don't forget to enter for your chance to win.

{{hugs}}
Andiepants


Saturday, March 1, 2014

Family

Mary-Ann here.....It in the midst of all the hustle and bustle of Thanksgiving last year, my mom, my sister and I were together.  It wasn't until last minute, when the sun had already gone down that we decide to capture a picture.  With the wrong lens (cause the right one was 4 hrs way!) I had my friend snap a few.  Even dark and dimly lit, you can tell that we were happy to be together.  I thank God daily for blessing me with two of my best friends.  

I created this layout with the amazingly beautiful Botanical Tea by Graphic 45.  You can probably tell by now, that something like Graphic 45 most often intimidates me.  This line, however, has got to be the best they have ever made.  It is stunning.  You have to see it to believe it.  Of course it is for sale in the shop!!


You can see here where I added a little gelato with water to create a small pink watercolor effect.  I also colored my Maya Road Butterfly with green gelato and water.  The stamps that you cut from the paper, are just delicious, back with foam tape for embellishment.


I added a few leftover Fancy Pants Resin Flowers and metal trinkets from Farmhouse Paper Company that I had in my stash.  A few drops of paint and my layout was complete.  

Below is what you need to replicate this super easy layout.  (I did start with 2 12x12 sheets of the Botanical Tea paper.)


Friday, October 18, 2013

Get altered...tissue box cozy

Ok...so when I hear the word cozy...I get a little gaggy. Isn't that something that your grandmother crocheted for every kitchen appliance she had? Don't forget the crocheted flowers too ;)

So when I saw a cozy and the words "that's a great idea" came out of my mouth...I felt like perhaps I had been possessed. (this is the part where my head spins around)

Wait...let me explain. I love pinterest (don't we all) and I was just sitting there when this cozy came across my feed. This lady had created the cutest (but a little plain) tissue box cozy that looked like a nice neat stack of books. What a great present for my twins' teacher!

Now I KNOW that I could do something like that Andiepants style so I found another image of altered stacked boxes/drawers that looked like random stacked books with lots of shabby and lots of chic. 

BAM! 
Inspiration

I was going to make a tissue box cozy that looked like random stacked books. I was going to take the main idea from each and combine them to make...an altered box!!!!

VOILA!!!


*pausing for applause*

OK...so how did I make this adorably shabby piece of art?!

First I started with poster board. Cut a strip that is about 7" tall x 21.5" long. Starting at one end score at every 5.25" inches. This should leave a 1/2" strip at the end. *Crafty Andie's hot tip: Instead of 7" tall you can make it a tad shorter which will allow you to cover the box using one piece of 12x12 cut in half. Just measure your tissue box.

1. Along each score line measure 1/2" down from the top. Use a ruler/yard stick to connect the bottoms fo these 1/2" lines and then score along this line.  Cut down on each 1/2" line. These you will fold in to make the top of the box.

2. Fold your box together and apply glue to the 1/2" flap. Fold each one of the small 1/2" flaps and glue them to one another. You should now have a box that will cover a tissue box.

3. Decide what sizes you would like your "books". I chose 7"x5.75", 7"x8", and 8x8.5" *Crafty Andie's hot tip! Don't make the top book too small. I ended up with a very small edge to work with which made it very difficult. Next time I would make it a little larger.

4.Once you have figured your sizes, go ahead and cut 2 pieces of posterboard for each size. One piece for the top and one piece for the bottom. You can use a thicker chipboard for this step if you wish your "books" to be a tad sturdier.

5. Organize your "books" starting with the largest on the bottom. figure how you would like them skewed (or lined up straight). Place your tissue box on top to make sure that 1. the "books" will fit around the tissue box and 2. nothing is hanging off the edge. Use a pencil and trace the tissue box on the top book, trace the top book onto the center, and trace the center book onto the last book. *hot tip: because the posterboard bowed outward on the box, I used the box to mark my corners then used a ruler, measured the actual length of the box, and use my ruler and measurements to draw out the shape on the top "book".


6. Use reposition-able adhesive and adhere your book tops to the bottoms. (so when you cut out the square they won't wiggle)

7. Use an exacto knife and cut out the hole for each book set.

8. Now it's time to cover your books. I only had 1 piece of each paper so I had to try to cover both sides of my book. GET 2 SHEETS OF EACH PAPER!!! Trust me on this one.


10. Once all the pieces of your books have been covered, edge them with ink for a semi-distresssed look.


11. Use Mod Podge or Matte medium to wrap your tissue box.


12. Cut the pieces for your book bindings. I did 3 inches for the large one and 2" each for the smaller. Make sure you add an inch overlay for each cover. Therefore...my binding for my big book would be 8.5" long by 5" wide. Punch the corners for a decorative look.


13. Adhere the bindings with the 1" overlap. If the binding pieces overlap into the hole for the box, use and exacto knife to cut them out. 

14. Slide your finished books onto your box and adhere them bottom to top. Then them to the edges of the tissue box. Use a bullet level to make sure they are straight.


15. Adhere your top 


16. Embellish with gorgeous eP embellishments and you're done!!!


Papers are by Jillibean soup. You can get some adorable Jillibean embellies from the eP store!


I hope you enjoyed this little tutorial and I hope you decide to try one for yourself.

{{hugs}}
Andiepants


Thursday, October 10, 2013

October Get Altered Challenge


Hi everyone, Micki here with a new Get Altered with eclectic Paperie challenge and my challenge to you is to Alter a Box!  Easy - peasy and with the holidays right around the corner, this fun challenge could be your springboard for your homemade Christmas presents.  Before I share my altered project, here are the details:
The Get Altered Challenge is about exploring your creative journey, about stepping outside of your comfort zone, experimenting with new products, and creating altered and mixed media art. We want to see your work and hear about your inspiration!  
All of those who play along with our challenge will be entered into a prize drawing for a $15.00 gift certificate to the eclectic Paperie store.
So grab your supplies and play along!  Here are a few things to keep in mind for this challenge…
  • You do not have to use products sold in the eP store…but we do love it when you do!
  • Share a direct link to your creation, not just your blog, using the Linky Tools feature at the end of this post.  If, for any reason, the Linky Tools doesn’t cooperate, please add a link in the Comments section of the blog.
  • When uploading to any online galleries, please use any of the following keywords; eP, eclectic Paperie or Get Altered Challenge. Link your creations to the eP blog.
  • If you’d like to be considered as one of our featured projects and be entered into our prize drawing, please be sure to add your link before Midnight, Wednesday, October 23rd!
The winner will be announced right before the eTeam Picks Challenge. Now to my project.

My project started out with one of those wooden art kits from Michaels:
The inside of the box had pull out trays, which were really kind of flimsy.
I had my husband take it apart and decided to use the inner box tray for my project.  First order of business....gesso.


Well, then I changed my mind (imagine that) about using the outside of the box.  Instead I opted to use the inside of the box because I wanted to try creating a piece using all kinds of ephemera like Anna Dabrowska (aka Finnabair).  I love her steampunk-grunge style and love how she uses anything and everything. So why not just go for it, right?  Which led to second order of business - more gesso, this time I used Claudine Hellmuth Studio Black Gesso and covered the inside of the box.
You can see that I wasn't too worried about getting the glue string off, instead just painting right over it.


While that was drying I got out all my ephemera, embellishments, left over die-cut flowers and also rummaged through hubby's garage to get my box of Vagabond parts.  My first Vagabond broke so I had hubby take it apart and saved all the little parts.
After the gesso was dry, I glued my first layer of papers. Corrugated paper, torn book paper, doilies - basically anything that was in my "left-over-from-previous-projects" box.  I used Matte Inkssentials Glue N Seal to adhere all my flat objects. Then I started getting out all those dimensional objects I had gathered; hardware like nuts, bolts and wire, dominos, beads, Maya Road wooden embellishments as well as Idea-ology findings, etc.  I used Beacon 3-In-1 Advanced Craft Glue to glue these items down.

And yes, those Vagabond parts were the first industrial parts I glued down.  
I had so much fun, I kept adding more and more stuff.  Not that this is wrong, but (can you guess where I'm going with this?) after I had glued about as much one could into the tray, it dawned on me that I left no room for a picture.  Nor did the ensemble of "parts" follow a cohesive "flow".  


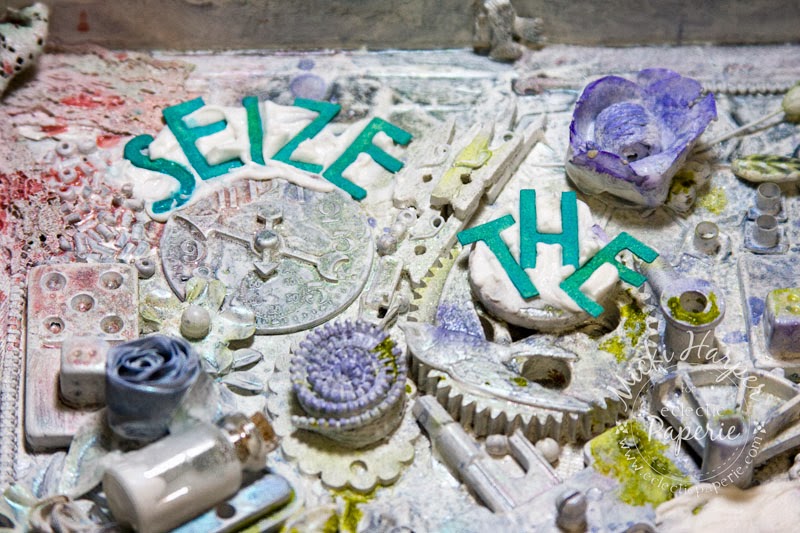
Well, "Seize the Day" I said to myself.  Just own it and don't stop now. First I gave the whole thing a coat of Dylusions White Linen Spray Ink, dabs of Picket Fence Distress Paint and mists of water:  

Next I grabbed the gesso and brush and gave everything a good coat:


I also need to add that I would use my finger to add paint between mists of water. To help mop up some of the (by now) excess moisture, I used a paper towel lightly dabbing it across the piece.  But you know what really helped, was sprinkling Clear Rock Candy Distress Stickles Dry Glitter (which you can't really see in the picture below - but it adds a wonderful little dazzle.)  At this point I honestly thought about doing another project because my husband came in, looked at it and asked "What is it?"

Not letting hubby deter me, I added several layers of Ranger Perfect Pearl Mists, adding several layers randomly.  I wanted a little pop of color, so I would alternate spritzes of water with my Mini Mister and Splash of Color Silks Acrylic Glazes, which were applied with a very wet brush.  Next I would dab a bit of the Silk Glaze onto my Non-Stick Craft Sheet, misting it with water to get a very watered down version which I picked up with my brush and flicked randomly over the box to give me those loveable splatters.


Now I had to face my earlier problem of what or how to add a sentiment.  I wanted to use the Fancy Pants Quote/Adventure 3x8 stencil set, in particular the "Seize The Day" phrase because every time I looked at this project, that phrase kept popping into my head. After much deliberation, I came up with the idea to use Studio 490 Embossing Paste and encase the die cut letters into it. 
With my palette knife I added the embossing paste and pushed the ink covered die cut letters into it using the Tonic's retractable craft pick (this tool is a must, lo):

Next step after the embossing paste was dry was to use my blending tool and Walnut Stain Distress Ink, to add a little definition and age things a bit by running the tool over the objects.  I also used Tsukineko Fantastix Brush which gets into the little crevices nicely.  After a final coat of more Ranger Perfect Pearl Mists, which made the letters bleed, I decided that it was time to stop.  I did go back and try to fix the letters by brushing Splash of Color Silks directly onto the letters.  Not sure if I like that but all in all I had a blast and I did what I set out to do...... Seized the Day or in my case the project :).

Oh and I added little eyescrews and a repurposed necklace chain:


All in all, I will definitely do this again, although next time I will give it a little more thought to the end result so that I can leave room for pictures or sentiments.  Now, let's see what you Altered Box you come up with!  I can't wait to see.

Remember - you have until midnight, October 23rd!  Don't forget to check out the rest of the eTeam's projects!


Supplies Used: