Photobucket Photobucket Photobucket Photobucket Photobucket Photobucket
Showing posts with label Ranger embossing powder. Show all posts

Tuesday, October 28, 2014

Thanks for the memories, Steph Ackerman

Hi everyone, Steph Ackerman here today.  By now you know that eclectic Paperie is closing it's doors.  That also means the end of the blog and the design team.

We have had a fabulous run as members of the eclectic Paperie Design Team and wish to thank you all for your interest and support over the years. With the eP blog coming to a close at the end of the month, we all wanted to do something special to celebrate the fabulous friendships, tons of inspiration from other team members, from Kim, and from all those who participated in our challenges. Each of the current DT members is taking a day to post some of her favorite makes from her time on the eclectic Paperie team. We hope you enjoy the look back.

While I've only been on the team a short while,  I have really enjoyed working with this team and have loved the wide variety of products available in the store.

This was the very first project I created for eP and I had so much fun creating it - the stencils, the stamps and assorted Art Anthology paints were so much fun to work with.


This canvas uses a large Prima stencil, some molding paste and Art Anthology paints.


And a fun use of the same stamp to create tags for all seasons with Gelatos.


I loved creating these cards with Art Anthology paints, a Gelli Plate and The Crafter's Workshop stencils. 


And I just wanted to shout out a big thank you to Kim for giving me the opportunity to work with her and this amazing design team.
 
Steph
 

Wednesday, May 28, 2014

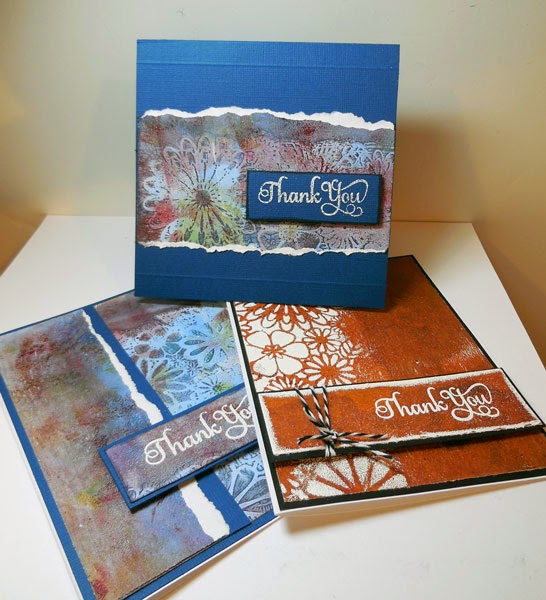
Thank You cards with Gelli Plate and Art Anthology

Hi everyone, Steph Ackerman here with my final post as the guest designed for eP for this month.  Big thanks to Kim and Bonnie for inviting me to participate. 

Today I've got some cards to share.

Have you played with the Gelli Plate yet?  Well, if you haven't, you should. It is so much fun.  I love mix'd media and I know so many people are using the Gelli Plate for mix'd media projects such as canvas and journals, but how about we switch it up a bit and create some mix'd media cards?  Oh so much fun!!!!


I began by placing Art Anthology paints on the Gelli Plate.  I used  Kenyon Copper Sorbet, for the first print, then placed The Crafter's Workshop Gathered Flowers stencil in the paint and placed a sheet of white paper on top.  For the second generation print, I added the Mini Chicken Wire Reverse Stencil.  This is the result.  It may not look like much, but read on.....


I cut the print to fit a 5" x 6 1/2" card, then wanted to add some other color.   I realigned the stencil back over the print.  I then inked it with VersaMark watermark ink then moved the stencil to get that missing spot on the left side. 


Then I poured Ranger Seafoam White Embossing Powder on top and heat set.  I wasn't sure what the outcome would be, but hey, that's what creating with mix'd media is all about, isn't it? 


I stamped the sentiment in VersaMark ink and embossed it with Seafoam Embossing Powder.  I also inked and embossed the edges for a little more dramatic effect before matting with black cardstock.  And the final card looks amazing!


Since I was having so much fun, I created another Gelli print using Kenyon Copper Sorbet with Velvet Aloha, and Honolulu Blue Sorbet.  I again placed the Garden Flowers stencil on the painted Gelli Plate and placed white cardstock on top.


After removing the white cardstock, I found the result wasn't very pretty at this stage.

 
But tear it up, mat it with some cardstock and a wonderful couple of cards are created.


Use the Scor-Pal to create the scored lines above and below the Gelli printed paper.


Stamp the sentiment in VersaMark and emboss with Seafoam White Embossing Powder.

Don't they look amazing!  Why not pull out your Gelli Plate and get creating today!

Thanks for stopping by. 

Please visit my blog for more inspiration.

Steph


Wednesday, May 14, 2014

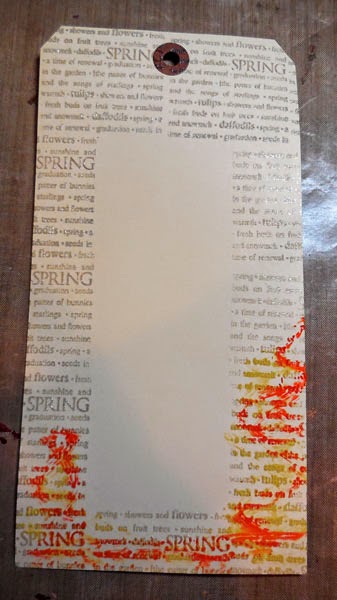
A Tag For All Seasons

Hi everyone, Steph Ackerman here with my second post as the guest designer for eP for the month of May. 

Today, I'm showcasing my tags for all seasons.  I used the same products for each tag, just changed up the colors for each season.


I used the new Prima Marketing stamp - Warm Wishes as the focal image.  She is dressed for winter, but change the colors and you can get away with using her for any season.  Each image was colored with assorted Copic Markers in keeping with the season.

To begin, I stamped each tag with an older Hero Arts stamp set I've had forever.  Using VersaMark Ink, I stamped one season repeatedly on each tag, then added Clear Embossing Powder and heat set each tag. 


Here are the details of each tag:

Spring Tag


I used Faber Castell Gelatos in Yellows, mixing the colors with water until I had the look I wanted. 


I added some Gold Metallic Gelatos around the edges and used a paper towel to remove some of the color.


Summer Tag


I used Faber Castell Gelatos in Reds, mixing the colors then removing some of the color.


Fall Tag


I used Faber Castell Gelatos in Neutrals and Metallics.  Loving the earthy feel of this tag.


Winter Tag


I used Faber Castell Gelatos in Blues and Metallics.  I love the included purples and how the metallic colors make the tag shine.


Once the tags dried, assorted twine from The Twinery - Charcoal, Gunmetal, Blossom, Strawberry, Cantaloupe, Honeydew, Buttercream, and Cappucchino was tied around each tag and through the hole.

Using assorted papers from 7 Dots Studio's Nature Walk - wonderful earth toned papers with imbedded images - I cut them into 3" x 6" panels.  Each panel was inked with the same Gelatos that were used on it's coordinating tag, then matted with black cardstock.

Using additional papers from Nature Walk, I die cut 2 sizes of ovals and placed them on the panels.    Glue Dots were placed behind the panels for dimension, allowing them to pop.

Each stamped image was fussy cut and added to the oval with Glue Dots for a little dimension.

Please stop by the eP Store and pick up all the wonderful products I used in this week's project.

Thanks for stopping by this week.
 

Steph


Monday, April 7, 2014

Golden Sunshine - Gesso Resist with water-color

Hello everyone!  It's Broni here and I wanted to share with you today how I made my Golden Sunshine card using the Gesso resist technique,  with water-coloring.


I started by taping my doily stencil to  the top of a piece of  watercolor paper.  I applied Gesso using a foam brush, let it dry, then applied another layer.  I also flipped the piece of watercolor paper around and did it at the opposite end.


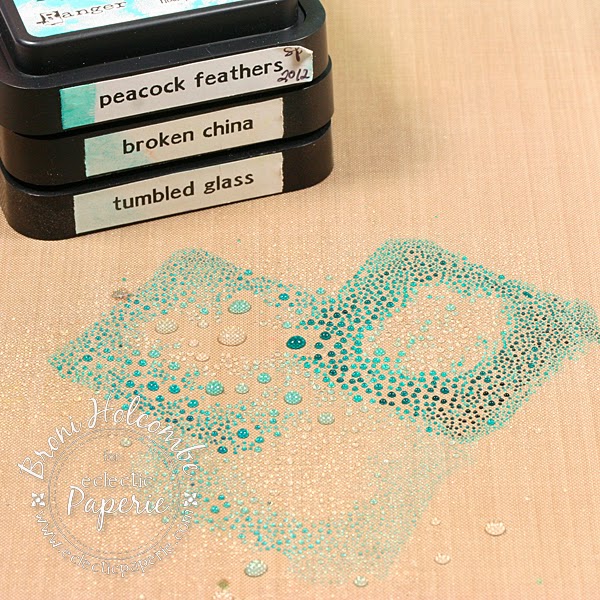
Next I smooshed (technical term) 3 colors of Distress inks onto my craft sheet - Peacock Feathers, Tumbled Glass, and Broken China.


I spritzed it with a lot of water then, when the Gesso was completely dry, I turned my watercolor paper face down into the ink.  I picked it up and dried it with my heat tool to keep the cool ink patterns.


I inked around the edges of the paper with some Peacock Feathers ink.


Next I spritzed it thoroughly with water.


I wiped it with a paper towel to give it a softer look and to remove the ink from the Gesso.


Then I stamped the sentiment in gold and also embossed it in gold.  I spritzed and dripped on some gold ink and added some gold bling.  It was added to a white card base using foam mounting tape.


And that's it for me today!  

Thanks so much for stopping in to visit!  I hope you have a very inky day, and we all hope you'll try to play along with us in this month's ePlay challenge - WOOD!