Photobucket Photobucket Photobucket Photobucket Photobucket Photobucket
Showing posts with label Distress Ink Reinkers. Show all posts

Friday, August 15, 2014

Art With Your Heart Out

Hi there eP land! Greetings from the deep south.

Wow has this been a whirlwind for me! I won't get into gory details but suffice to say that the pants have not settled yet. (Andiepants that is ;)

With all that is going on I decided a little art journal therapy was in order.


Remember the book I made for the fabric challenge?


Well this was my first page. It was just painty, inky, stenciley, good fun and some journal therapy thrown in for good measure. In fact, my friend Patty has a blog called "Art with your Heart out" so that's what I did...art with my heart out.

I started with some distress paint in Antique Linen

I covered both pages and a little on the backside of my small  insert piece.

Next I used some matte medium to add some Timmy tissue-Melange

I used my Ranger heat gun to dry in between each layer.

Next I sprayed both pages with water and added a couple of drops of reinker in walnut stain
Then I used my Prima mask and Distress ink pad in Wild Honey to add another layer.

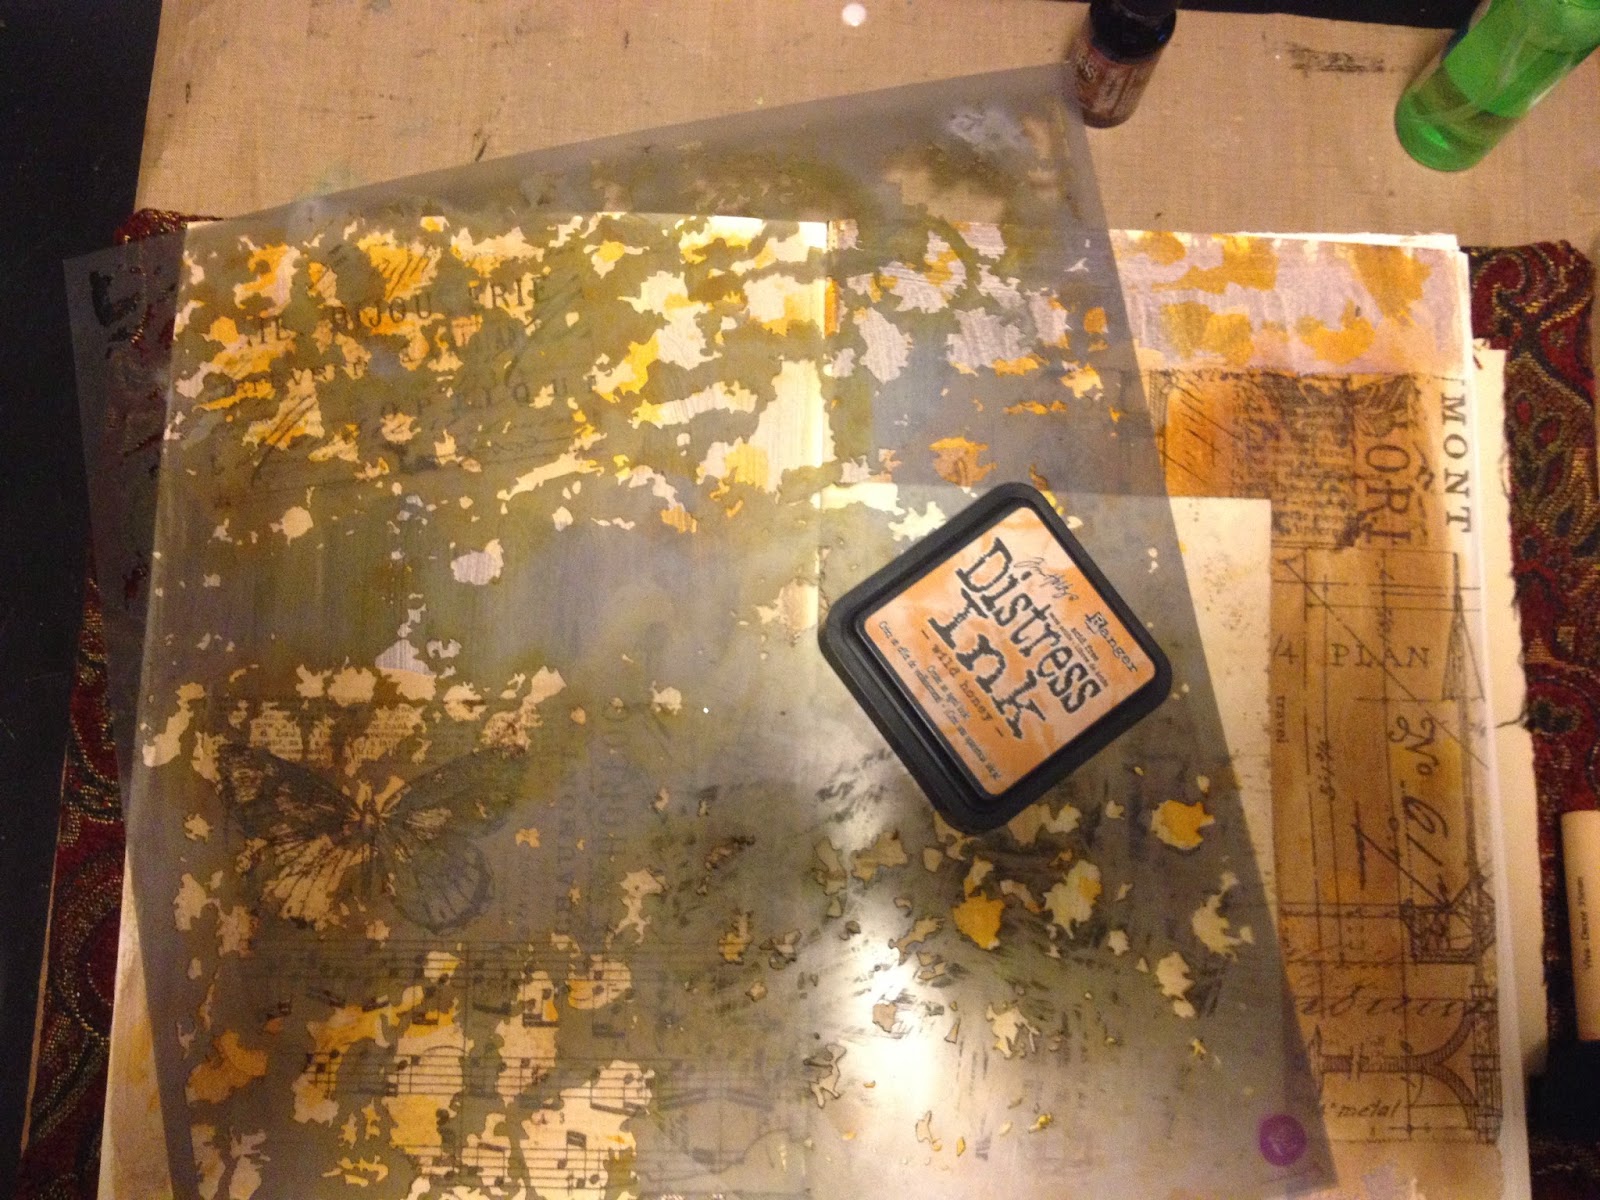
Then I played with my Wendy stencils. I used Flourishes and Fancy Flowers to add interest to the background. With the fancy flowers on the small insert I first used Rusty Hinge distress ink and then layered Ferro Metallic effect paint in Amber gold through the smaller flower on top to create a layered effect. I LOVE the way it turned out.

A simple Sharpie for the journaling and poof...I was done. The whole thing was so therapeutic. I started my journaling and realized how negative I was. So I finished getting all the negative out on the left side. When I went to the right side I focused on positives. What are all the positive things about our move. I named it New Adventures because my hubby has started a Facebook page titled New Adventures where he posts things that are all about Louisiana.


I hope you enjoyed my little adventure into arting with my heart out. Maybe try some art therapy of your own and see what happens.

Til next time
{{hugs}}
Andiepants


Friday, August 8, 2014

Esther's Garden!

Good morning!  Sherry here today and I have a 5x7 watercolor card to share with you.  I used the Art Gone Wild set, Esther’s Garden by Catherine Scanlon Designs.  I also embossed, which goes along with this month's ePlay Challenge - Embossing.

SCRedFlowersRight

The flower was stamped and embossed in gold on watercolor paper and then water colored with Distress Ink Refills (listed below in Project Supplies).

SCRedFlowersCloseUPBottomLeft

After the image dried, Snowcap Pigment Ink was stippled to the background using TCW 6x6 Stencil, Well Rounded.  In the photo above, you can see the stenciled design on the bottom left and in the photo below, you can see it on the top of the card.

SCRedFlowersCloseUPTop

The edges of the water colored image was sponged with Antique Linen Distress Ink, which made the Snowcap stenciling pop out.  The seam binding ribbon was dyed with Barn Red Distress Ink with a dab or two of Antique Linen.

SCRedFlowersLeft

As a final touch, the edges of both the image and background panels were edged in a gold leafing pen.  As an extra tip, it is very important that after you dye ribbon, to wipe away the excess on your craft sheet.  I failed to do so!  When I was adding the foam adhesive to the back of the panels, they picked up some of the red ink from the craft sheet.  I actually kind of liked the look when it was all said and done, so I let it be part of the design.

That’s it for me today . . . thanks for stopping by!

SHERRY SIGNATURE


Project Supplies:


Thursday, July 10, 2014

Shabby Altered Umbrella


Hello eP land. By the time y'all read this I will be on my way to the deep south!

As a parting homage to Michigan I decided to do an OTP (off the page) umbrella. We get LOTS of rain in Mi. Even if it's not raining, it looks like it's going to rain. And if it's cold enough...it's snowing instead.

Of course I have lots of stuff hanging around my room to alter but instead I decided to take a cue from my previous co-designer Miranda Edny and make my own 3D object to alter. 


 Any coordinating paper line would be adorable for this but I chose to use Olivia's Sweetshop from my stash. I loved the green and teal combo with the splash of pink thrown in for good measure. The cupcakes are just adorable. 

The blue flowers is by Prima and you can find LOTS of Prima flowers in the eP store for all your lovely projects! 

I started by cutting a pattern over and over and over using my Silhouette. Echo Park umbrella. (I only paid $0.75 for it)

Then I scored each one down the middle and used my bone folder to get a real nice crease. I lined up the edges and stacked them all together and used a distressing tool to distress all the edges and underneath.


For the straw I watered down some Antique linen distress ink and made a wash to tone down the colors. I used embossing paste to add the flowers so they had a nice sturdy base to anchor them down and then covered them with splotches of gesso here and there. I used bakers twine to hang the piece a voila!!! A gorgeous shabby umbrella. 


I hope I have inspired you to make your own OTP! Until next time...
{{HUGS}}

Andiepants


Thursday, June 19, 2014

Gelato Canvas and Wendy Vecchi products

Well it is official. Andiepants is becoming a southern bell!!! We will be moving to the lovely state of Louisiana very soon!

With all of our friends and family up here in Michigan it is very difficult to say goodbye, so one of the things that I like to do is to leave a little something with my friends and family as a token of my love. 

My friend from church, Delores, had a bit of spell and is currently in a rehabilitation facility re-learning how to use her arm. She misses her friends and her church very much. She is such an inspiration to me. Back in her hay-day she rode through the entire continental U.S. on the back of a Harley, all except for Alaska. As a hobby she paints these GORGEOUS china pieces and alters children's bouncy horses into carousel horses.

So for Delores I decided to make her a canvas. Something she could hang on her wall


This is actually a canvas I began a long time ago with the background stamping. It was just sitting in my cubby waiting for the right moment. So I doused it with water and used my gelatos, blending with my fingers.


I started with just blues and then decided it made a pretty sky and I wanted a scene of some sort.

Next I covered all the edges with Tea Dye distress ink. I used my finger to smudge in and over the white areas to give it an antique look.


Then I bust out my Wendy Vecchi crackle paste. This stuff ROCKS!!!


I used the crackle to make the "clouds" of my scene.

I forgot to take pictures of the next step. For this part I sprayed some water on my craft mat and added some drops from a Distress Stain re-inker in Antique linen. Then I used this wash to cover the entire canvas. This helped the gelatos to blend better and highlighted the cracks in my crackle clouds while giving the whole thing an antique appearance.


Then I bust out my stamp it stencil it by Wendy Vecchi. I used her archival inks to color it in  and went back over the base of the stem with gelatos to help highlight the grass. I ADORE how this turned out. I went with red in honor of Donna Downey. I love her:)


I then used gesso and water to create a water white paint and flicked the paint onto the bottom of the canvas to mimic flowers growing in the grass. 

Using my Tim Holtz layering stencils, I took a phrase from some Stampers Anonymous stamps and I added my title with a smudge stick and black gelato 


and voila...


My parting gift is complete. I  hope it inspires her as much and she has inspired me.

Til next time...

{{hugs}}

Andiepants


Thursday, June 5, 2014

ePlay Challenge - Fabric!

Welcome to the June ePlay challenge!! This month we are inviting you to play with fabric!

If you are anything like me I have TONS of scrap fabric laying around. Everything from silk to denim to brocade. I was actually inspired by denim to create this challenge but when it came time to do the project I found this fabulous brocade scrap the my mother in law had recently given to me for my scrappy purposes and it was perfect. 

I have been wanting to have an art journal but I want one big enough to really play in. I decided I needed to make my own and this is what came of it.


The cover needed a little something so I used some Wendy Vecchi embossing paste in black through a Prima stencil and highlighted with some inka gold.


This is the silver metallic Wendy paste with quite a few drops of forrest moss Distress ink and a drop of peeled paint. I should have added more green as the green is very pale...but this was my first attempt at mixing so I learn.


Here is my step by step tutorial for creating my art journal (total cost $6.40):

1. Take a pad of Bristol or Water color paper and carefully remove all of the sheets. (I used a 40% off coupon and spent $6.40)


2.Add a few pieces of artistic paper, tags, smaller papers...anything you want for interest.


3. Gather no more than 4 pieces of paper together and fold in half. Crease with a bone folder. These are  called your signatures. Your book will be made up of multiple signatures.


4. Use a centering ruler to make marks at the center and one at each end...about 1/2 inch in from the edge. These will be for your holes.


5. Using an awl and a squishy pad (this is the technical term) punch holes in your signature at the marks. Make sure they are right along your creased fold.


6. Using a large needle (mine is a leather working needle) and waxed thread to sew, sew your individual signatures at the binding.


7. Then sew the signatures together and clip the book together.


(visual of clips)


8.Take your glue and paint a thick coat along the binding of the signatures.


9. While that dries, take your book covers (I repurposed an old dictionary that I bought at a flea market) and measure out the fabric leave enough room in between for your book innards. This will depend on how many signatures you have.


10. Use your glue and adhere the fabric to the flat surface first being sure to burnish as you go.


11. Adhere the edges around the inside of the covers.


12. Use a piece of your paper to attach the signatures to the cover. If you look close you can see the yellow...I used the cover to the paper pad. Adhere one side to the signature and the other side to the cover. Burnish well and leave something heavy overnight for the entire thing to dry. Do the same for the back cover. 


and voila! I wanted to keep it somewhat flat so it was easy to open so I didn't add a whole bunch to the front. Also, the fabric I chose is very busy too.


So what can you do with fabric? Let's see! Add your blog to the linky tool at the bottom and show us what you can do with fabric. You may just win a little something to spend in the eP store!!

Good luck!
{{hugs}}
Andiepants