Photobucket Photobucket Photobucket Photobucket Photobucket Photobucket

Friday, November 30, 2012

Heart of Christmas Joy

It's getting closer...... I stopped counting how many days are left before Christmas and decided to stop and remember what Christmas is all about.  I decided to continue with this thought in my Christmas card making!

You may not know this, but I am "Die Cut" handicapped - self confessed!  I love all the elegant projects with extensive, multiple die cuts yet I for some reason always have issues or hiccups which turns a project into a major ordeal.  Anyway, when I first saw the Seasonal Sentiments die set from Wplus9, I knew that even with my "handicap", I was going to get it.  And I am so glad I did.
The sentiment is from Wplus9 Design Studio - Pretty Patches: Christmas, stamped with Memento Tuxedo Black ink.  I used the Fiskar Stamp Press which allowed me to space the two sentiments apart to leave room for the die cut.  To add dimension to the die cuts, I cut the Scotch Foam Mounting Tape square into smaller pieces.  Found some snow glitter which was added to the heart die cut and left it at that.  
Simple, clean, no fuss card which truly was a joy to create.

Now, to mass create these and get them out into the mail before Christmas...... :-)


Supplies Used:


Thursday, November 29, 2012

Possibilities

Hello and thanks for seeing what we're up to.  Today I have an art journal page for you.  The quote pretty much sums it up just perfectly.

"Limitations are only in our minds.
But if we use our imaginations, our possibilities become limitless."
-Jamie Paolinetti

Well now, isn't that the truth?  This art journal is filled with pages about my own art journey I've been taking this year.  I'm learning so much along the way.  Not only about art journaling but also about myself as a person.


I started off by mixing a bit of Claudine Hellmuth paints in white and black to get various shades of greys.  I also cut out some hexagons (enabeler alert...it's on sale!!!) using the Sweet Pieces set.  The paper is the Tangerine 6x6 paper pad from My Mind's Eye.  I was able to simply outline then with a little white paint using the coordinating Sweet Stamp Shop stamp set.  I also used a warm grey Copic for some detail shading and the script quote along with the Distress Marker in Picket Fence.  The wings are a collage sheet I found here.  Lastly I grabbed some black paint and did a little splatter effect.


Hope I was able to inspire you a bit today.  Don't forget Kim has some of the Sweet Shop Stamps at almost 50% off so be sure to pick them up before they are all gone.  You can do that here.  


Wednesday, November 28, 2012

You are my Sunshine with Angela Thomas

It's Angela here and I can't believe another month of 2012 has flown by.   With another month coming to an end, that also means that my time as the Guest Designer here at Eclectic Paperie is also coming to an end.
For my card today, I went clean and relatively simple using the current Sweet Sunday Sketch challenge. I used two different stamp sets on my card today - one being my fave set I've used this month from Market Street Stamps called "Growth" and the other being a Wplus9 set called "The Birds and the Bees". I stamped one of the leave images from the Growth set in Versamark and then embossed it with Ranger Superfine clear embossing powder. The sentiment was stamped in Memento Tuxedo Black. The DP I've used is from Basic Grey and is called Plumeria and the buttons are also Basic Grey Plumeria Vintage Buttons.  I've attached some Twinery "Shore" twine to the button. 
 
 hank you to Kim for having me on board this month!!! I've loved my time as Guest Designer :-)

Tuesday, November 27, 2012

Product Spotlight - Inkssentials

Today I'm all about celebrating the wonderful products offered by Inkssentials!  I am a huge fan of Inkssentials products and use them regularly in all of my craft projects.  (I'm sharing two older projects with you today to showcase some of the great products offered by Inkssentials!)
 
Here are some of my favorite products (must I only pick a few?)
 
Metal Foil Sheets - I love the foil sheets...they are seriously so much fun!  My card above is showing off one of my favorite things to do with foil sheets...emboss!  Slide a piece of metal foil sheet into an embossing folder and you've got a masterpiece on your hands!  Add acrylic ink and things get even better! 
 
White Gel Pen - I love my white gel pens so much I have about four of them sitting on my desk (just in case one gets lost, which always seems to happen when one lives with two little boys).  I use my gel pen for faux stitching, in my art journal, for adding highlights, for creating doodle accents, and for every other thing in between!
 
 
Tags - I'm a huge fan of tags and love that Inkssentials now offers every size and color of tag you can imagine.  Manila, kraft, black, small, large, and even extra large!  Tim has made tags fashionable for every ocassion; use them on gifts, cards, scrapbook pages, art journals, or heck...frame them and put them on your wall!  The possibilities are endless!  You can even purchase packages of ATCs in the same three great surfaces!
 
Glossy Accents - It used to be that I only used Glossy Accents for areas that I wanted..well..glossy.  Now I use Glossy Accents primarily as a glue!  Did you know it's an amazing glue!  It works perfectly with metal objects, fabric, paper flowers, and more!  And, oh yeah, it makes things shiney too.
 

Sticky Back Canvas - Another all time favorite product and one that I use frequently.  (I especially like the ATC size, shown above, as it's perfect for cards!)  You can use canvas with stamps, paints, stains, and inks.  You can emboss it, color on it, distress ink, and stamp on it.  I love the texture and look of canvas...so pretty!
 
That's just a few of my favs...but there is so much more to choose from!  Check out our entire Inkssentials line and this week receive 10% off of your Inkssentials order!  Use code INK10 when checking out and enjoy!

Monday, November 26, 2012

The Peace and Joy of Christmas


Hi everyone! It Kim Teasdale with today's post and 'tis the season to start making up some Christmas cards... or so the Christmas carols that are already playing in some stores tell me anyway ;) I thought that I would start by coating myself in a lot of glitter and hope that some actually landed on my card to for a little of the Christmas spirit ;)

For the base of this card, I used some of my Authentique Peaceful paper because it has the beautiful snowflakes to start the design off with. I wanted to have a few very sparkly snowflakes so I stamped my Nutcracker set from Graphic 45 (just the snowflakes) in my glue pad and then onto the paper. I quickly added some Glitter Ritz Warm White translucent glitter for some fantastic sparkle. It was kind of hard to capture how sparkly these turned out but you can kind of see in the picture below.


I then distressed the edges of the paper with my Ranger Distress Antique Linen and Vintage Photo inks with my Inkssentials Foam Blender :D After that all that was left to do was to stitched around the perimeter of the card with my sewing machine and start adding some embellishments!


I added some gorgeous Prima Gems that reminded me of gusts of wind and then some vintage seam binding and sheer ribbon. I tied my die cut (MFT Snowflake Die) kraft and vellum snowflakes to the ribbon and finished it off with a black button to keep with the kraft and black matting. The cherry on top of this beautiful Christmas card was the Maya Rd Vintage Pearl Trinket Pins! I completely adore how this card turned out and I hope that you like it too as this card may require some mass producing for the upcoming holiday season ;)


Saturday, November 24, 2012

Merry Merry!

Hello eP'ers!!  I know it's over and done but still I'd like to say Happy Thanksgiving to our U.S. friends. I am so thankful for all of you, U.S. and abroad, friends and customers! Knowing that we even inspire you a little bit is wonderful and you should know that you inspire us too!! Seeing all your great ideas and projects is really so fun!

I felt in a bit of a Christmas mood yesterday but sadly I didn't have any of the new holiday stamps from eclectic Paperie - like this one from Here Arts, Aspen Frost Festive Ornaments, or one of these, Folk Art Flurries  or Iconic Christmas both from Wplus 9.  So I looked at what I did have an got creative!


Can you tell what I used?  I used Fresh Picked from Wplus9!! That's right! I took the single leaf stamp and used it repeatedly to create my "fir bough" using Evergreen Bough Distress Ink.  I just layered them on top to give them plenty of needles!  Next I used the blueberry stamp and the coordinating Fresh Picked die to make stamp the berries in Festive Berries Distress Ink.


I fussy cut the "bough" and layered 2 together for a fuller look.  The berries also got a coating of Glossy Accents to make them nice and shiney!

I'm off for a nice relaxing day, including some stamping I hope!! Hope you have a wonderful weekend!

Friday, November 23, 2012

A Moment of Magic


Hello, everyone!  Its Broni here.  I hope you all had a most wonderful Thanksgiving yesterday.  I know I’m still stuffed!

Today I’d like to show you a card with a background I created using Distress inks and the Dylusions Dotted Flowers stencil.


I used several sponge daubers (I keep one for each color) and some Distress inks in Broken China, Frayed Burlap, and Walnut Stain to ink through my Dylusions Dotted Flowers stencil onto some light blue cardstock. I sponged the flower on the edge as well as randomly spacing the dots over the background.  I also sponged around the edges with Frayed Burlap after distressing it with my Tonic scissors.

I used my Frayed Burlap Distress Stain to darken the edges of my kraft colored mat layer.  I like that I can get a distinct line of color using it.

The tree from the WPlus9 Woodgrain Silhouette stamp set was inked in Walnut Stain and stamped onto some kraft cardstock, then sponged on the edges with Frayed Burlap as well.  I stamped the butterfly from the same stamp set in blue ink onto white cardstock and cut it out, then added Star Dust Stickles to make it super sparkly!  It’s popped up on Scotch foam mounting tape.

My sentiment is from the Dylusions The Right Words stamp set.  I love that you can stamp them and use them together or cut them apart, as I did, and use them however you want!

Thanks for stopping by today!  Have a wonderful weekend!


Wednesday, November 21, 2012

Growth with Angela Thomas

It's Angela here and I've been having so much fun this month as the Guest Designer here at Eclectic Paperie and this week is no exception. I often am inspired by designer paper which would explain my addiction... err... obsession with it. LOL!!! If you only knew how many 6x6 paper pads I have. My Mind's Eye always comes out with fabulous designer paper and when I saw "The Sweetest Thing: Honey" I knew I had to snatch it up. I absolutely love the color combos in this pad.
I decided to make two projects for this week with this fantastic paper.
I enjoy making journals to give as gifts and thought that this paper combined with the Market Street Stamps set called "Growth" would be a perfect fit. I used a sketch (for the life of me, I can't remember where it is from) that I thought would highlight each aspect. I stamped the sentiment in Memento Tuxedo Black. The flower is from Maya Road and is called Vintage Gauze Blossoms. I thought about using re-inkers to change the color of it but I chickened out.
Here is my second project that I created using the same stamp set as well as the same papers.
I love how different each project looks. I don't often create clean and simple cards but I think this DP called for it. The button I've used comes from the Basic Grey Plumeria Vintage buttons. For this card, I used Memento Rich Cocoa ink.
Thanks for popping by today :-)

Tuesday, November 20, 2012

Product Spotlight - Spellbinders D'Lites


Raise your hand if you love Spellbinders Dies!  Ohh, I do, I do!  I believe that I purchased one of the very first Spellbinder die sets and I've been adding to my collection regularly (don't tell my husband).  Well I am super excited about their new product offering...D'Lites!

No doubt that Spellbinders is always striving to bring customers the very best in product innovation and this year has been no exception!

The new Spellbinders Shapeabilities® Die D-Lites™ collection combine form and function, offering every look from elegant to whimsical. What makes Die D-Lites special are their smaller sizes, perfect for cards, tags and ATCs (Artist Trading Cards) to name a few.

Mix and match within the collection or use them as accents and embellishments to your favorite Spellbinders dies. So many designing options! Cut, emboss and stencil all your craft projects with these unique die templates.

I can't wait to get my hands on these new dies and I am happy to report that my order is in with Spellbinders and we expect the arrival of the dies within the next few weeks.

And I'm excited to pass along a Spellbinders D'Lites special to eP's customers.  Purchase one Spellbinders D'Lite dies and receive a second die for 25% off of the retail price of $12.99.  (Also note that our other Spellbinders dies retail for $20.99!)

To receive this special pricing offer, please enter code SPELL25 when checking out.

Lastly, since there is a delay with shipping these dies, as we wait for them to arrive from Spellbinders, any additional products on your order will be shipped immediately.  D'Lites dies will be shipped, free of charge, as soon as they arrive from the factory.

Enjoy!!


Monday, November 19, 2012

Holiday Hugs

Hello eP fans, it’s my turn today to post here on the eclectic Paperie blog and I have a sweet Christmas card to share with you!

MFTWSC98

I pulled out some new Lily Bee Designs Christmas Cheer 6x6 paper for my card, and paired it with this Holiday Hugs Snowman stamp set from My Favorite Things.  I stamped my image with Memento Tuxedo Black ink and colored with Copic markers from the eP store.  I embellished my card with a few buttons, some Maraschino Red twine, and some silver Kaisercraft rhinestones.

And here’s a little close-up of my uber glittery snowflake…

MFTWSC98 close-up

Sending YOU holiday hugs, and many thanks for stopping by today!

eP Signature - Tammy Hershberger

Saturday, November 17, 2012

Journaling Page Snippets

Hi there and happy Saturday!  Excited that it's the weekend and hoping I can find some time to play in my Dylusions journal!  I am in love with my journal and I shared a bit more about my journey into free form creating on my blog yesterday.  Check it out for specific details on the page below.  Today I wanted to share some of the pages I've been working on and a bit more about the products that I am LOVING!

To start....Embossing Paste from Wendy Vecchi.  If you don't have it...your life won't be complete until you get it!  I tried the white out for the first time last night (see the page above) and talk about fun!  Oh my...Great texture and dimension!  I plan to add a bunch more to the page but had to just share what the plain white paste looks like.  I also used Wendy's Large Heart stencil and the Chevron stencil from The Crafters Workshop.  Speaking of stencils, I'm enjoying using Dyan's collection for my borders (the Letter Jumble stencil was used on the edges of the pages above) and Wendy's for larger spots (the heart) and The Crafters Workshop for everything in between!
 Now let's talk Dylusions Ink Sprays...They are amazing and so much fun!  I've been playing with different color combos, different designs, and have spent some time just inking the journaling pages and leaving them for further decoration later.  Speaking of the journal...get it.  No, I'm serious.  If you love this kind of work, the journal is perfect.  Great size, really heavy duty pages, a ton of pages, and a great heavy duty cover.

Want to give altered journaling a try?  Anyone can do it and it can be any style of design that you love!  Here are my recommended products to get started:
Dylusions Journal
Dylusions Ink Sprays
Stencils (Studio 490, Crafters Workshop, Dylusions)
A few stamp sets (look for one with great background images and sentiments)
Embossing Paste (white and/or black)

That's all you need to get crafting!  And then share your work with us on our Facebook page!  I would adore seeing you work and sharing in your creativity...

Enjoy!

Thursday, November 15, 2012

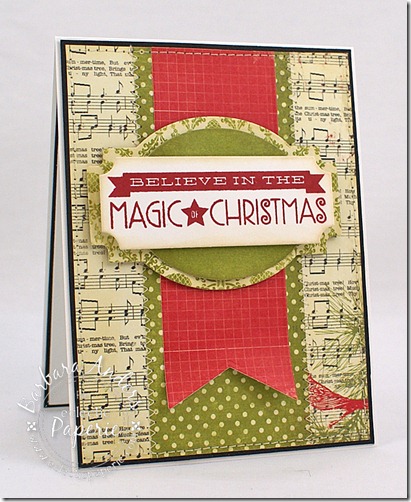
Christmas Magic

 believe_2012oct19

Happy Thursday, everyone! I’ve got a card for you today using some gorgeous Authentique papecalled Festive, and it is indeed festive :) 

This card's overall layout is almost CAS--just layered up die cut elements, for which you could use any dies or cut files you might have. Just mix up the layers to see what pleases you and go to town!
I used several patterns from the collection for my base card and the sentiment element. Since this paper is so vintage in appearance, I also sponged the edges with my Antique Linen Distress Ink and my Inkssentials Foam Blending Tool, and popped up all the layers with Scotch Foam Mounting Tape.
Short and sweet today—thank you so much for stopping by! 

Wednesday, November 14, 2012

Congrats on the new Job with Angela Thomas

Hi there everyone!!! It's Angela again with a fun card to share with you.  I don't often make masculine cards but as soon as I saw the Authentique Thankful paper pad, I knew I had to create something fun with it. 
 
The colors in this pad are perfect for any masculine card.  It has definitely inspired me :-).  What better to pair with this fantastic DP than the Sweet Stamp Shop set called "It's a Man's World" which I noticed is currently on sale at the store.  Who doesn't love a bargain? LOL!!! The briefcase was stamped twice and then popped up using Scotch Foam Mounting tape. The sentiment was stamped using the Memento Rich Cocoa Ink.  The layout for my card is from the current Sweet Sunday Sketch challenge.
 
Thanks for popping by!!! I'll be back next Wednesday with another fun project for you.