Photobucket Photobucket Photobucket Photobucket Photobucket Photobucket
Showing posts with label Giovana Smith. Show all posts

Tuesday, March 18, 2014

Happy Birthday!!

Hello friends!! Giovana here today sharing with you a fun Birthday card I made for my daughter, today is her birthday and she is turning 10!! She told me before going to bed, I will enjoy the last few minutes of being 9 until I wake up tomorrow, LOL. She is excited to be part of the two-digit age, what she hasn't figured out yet is that is going to last for long time, hehehe.

So, here are the details  for this project:


  • Your piece will look like this :)
 
  • Using a Mini Mister, mist your piece with water to give it a more watercolor look. 


Hope you like it!!
Have a great day!!

Friday, February 28, 2014

"Love" always and forever

Hello friends! Giovana here today bringing you a cute card, haven't made for eP in awhile, so I decided to make an elegant and simple one for you.

Here are the details:


Close-up of the embossed image, check out the pretty Sunflower Sparkle Mist.

Close-up of the rub-on.
 
 
Hope you like it!
Have a fantastic day.

Thursday, January 23, 2014

Hope Canvas

Hello friends! Hope you are having a fantastic day, today it's my turn, Giovana here, to share a project with you. I decided to create a fun and simple "yes, believe me" canvas project. I am joining the eP Team Picks Challenge ~ HOPE. My canvas started as a freedom and hope, I just wish I could have wings and fly to Peru, I HOPE I can go there soon and visit my family, nothing like a warm hug from the ones you love.

Here are the details (Sorry, I forgot to take few pictures)
 
  •  Paint all the circles with Ginger Peach Twinkling H2O, set aside to dry, it will take few minutes. (Ohhh, I love this color!)
 
 
  • Add your circles, leaves, stems to your canvas with seal glue. Take your Faber Castell Black Big Brush pen and define all edges, then add a button to each center flower, Iwent ahead and wrote "hope" with my black marker.
 
 
This is final product!  I added Gold 3D Stamp Paint to some of the borders, I used my finger since I wanted a rough look. 

 
I HOPE you like my canvas and get inspired and come play with our eP Team Picks Challenge ~ HOPE.  You can win a $15 gift certificate to the eP store!!!
 

Friday, October 4, 2013

Love Christmas Angel

Hello!! Giovana here with my very first post as an ep Design Team Member!! I am so very excited and I hope you like the project I have for you today. The wonderful ladies have been posting Halloween projects, so I decided to make a Christmas card this time around ;) Maybe you can start your Christmas projects using this wonderful image.
So, I prepared a picture tutorial for you, so, let's get started:

Step 1: Stamp Christmas Angel image on a piece of Ivory Cardstock in Gold Ink.

Step 2: Die-cut a Watercolor Cardstock piece using Rectangle dies.

Step 3: Paint all sides of Watercolor paper with Viva Décor Amber Gold Paint. Love the antique look you get.

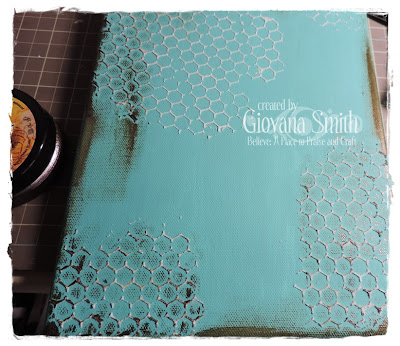
Step 4: Cut another piece of Watercolor cardstock (dimensions: 5" x 3.75"), position the Mini Chicken wire reverse stencil, add Viva Colour 3D Stamp Paint Gold

Step 5: Cut "Love" rub-on from Remmant Rubs idea-ology and adhere it to panel.

Step 6: Ink all edges of your panel with Walnut stain Distress Ink.

Step 7:  Mount image on die-cut gold piece (step 3) Tie-on ribbon and add panel to card base. Add image to card. Make a triple bow, add hemp and a Trinket pin.


This is the final shot.

I hope you like it!!
I would love to read your comments.
Have a fantastic day.