Photobucket Photobucket Photobucket Photobucket Photobucket Photobucket

Saturday, January 11, 2014

Bee


Hi Everyone. It's Bonnie Irvine here today with the first spread of my altered board book. Having just finished reading The Secret Life of Bees by Sue Monk Kidd (I know...where have I been?), a truly inspiring book, I found my theme for my next altered children's board book...Bees. I've always had a fascination with them, with their industriousness, sense of community, fabulous engineering abilities, and all of the good that they do in my garden. Besides that, as long as they don't sting me, they're cute!


Before I started this spread, I gessoed the entire book including the cover. For these two pages, I scribbled 5 yellow shades of Neocolor II crayon across both and spread the colour with a wet brush. Next I applied Butterscotch, Lemon, and Buttercream Gelatos randomly but especially used the Butterscotch all along the edges of the pages. I blended these with a damp finger. Finally I softened and further blended the colours by applying two colours of chalk paint plus some white gesso lightly over both pages with Cut n Dry Foam.


Once that was thoroughly dry, Vintage Photo Distress ink was applied through TCW's Honeycomb stencil and through Dylusions Number Jumble stencil. White Gesso was applied with a stencil brush through TH Measured Layering stencil and TCW's Halftone borders.A TH script stamp was rolled onto the page here and there inked with Vintage Photo. The big ol' splotches were added by spritzing Tattered Leather Glimmer Mist through TCW's Splats stencil...shimmer and splats all in one :)


The giant sunflower was fussy cut from a Tim Coffey designer paper and adhered to the background. The gorgeous bee was fussy cut and the wings which were matted with black were given a smear of Icicle Stickles. Then she was popped up on foam tape with a double layer under her head for greater dimension. Some of the images were purchased from Etsy and the little boy from Deviant Scrap.


Two flags of ribbon were added to give him and his honey bottle a base. The little black circle is actually twine coiled onto a circle scrap of Sticky Back Canvas and coloured with black gesso. A tiny brass bee was adhered to the coil.


Pieces of striped washi tape were glued to white paper and then to the background so they were no longer transparent. Bits of die cut border accented the bottom edges.The lettering of Bee is done with Doodlebug Tiles. The quote was created on the computer and comes from Ray Bradbury. Black matting and doodling gave the phrases more visual weight. Black Big Brush pen was applied around the page edges.
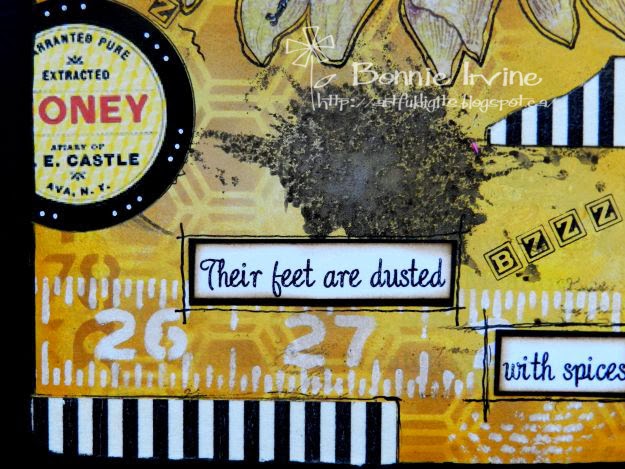

 Bzzz was stamped in a few places with Jet Black Archival ink using a Hampton Arts alpha set. Lots of doodling with a black pen and a white gel pen completed the pages.


That's it for my first spread in my altered thrift store board book. With five more double pages to go,including the cover, you can be sure that you will be seeing more bee-themed mixed media art from me...lol. Thanks for hanging out with me today.

Remember to check out the Pre-Order Bundle Sales Kim is offering in the store on new products from CHA . 
You won't want to miss them.

Bonnie

Here are links to the store for the products I used:
Friday, January 10, 2014

Happy Birthday !

Hello, it's Sue here and today I'm sharing a birthday card that I made for my 'mother in law'.


I started by making a frame using the Cabinet dies from thick cardboard. I then used the Wendy Vecchi Yikes Stripes stencil with white Embossing Paste (have you seen the new CHA releases from Wendy...gorgeous!)


I then painted the frame with green acrylic paint and used a darker shade around the edge.


I then blended Spiced Marigold Distress Ink over some white card and used the Dots and Stripes stencil with Orange Blossom Archival ink.


I then masked off the stencilled stripes and stamped the centre with the Vintage Tapestry background stamp again using Orange Blossom Archival ink. I then stencilled some numbers over the stripes using the Classic Words stencil and some script over the middle using Potting Soil Archival ink.


For the centre panel of the frame I've used the Daisy Art stamp set and stamped the flourishes with Fern Green Archival ink and the sentiment is from the Tim Holtz Simple Sayings stamp set.


The flower is also from the Daisy Art stamp set and I've stamped it several times with Watering Can Archival ink onto white card that's had green dots stamped on to it. I've painted the leaves using a Distress Marker and the flower has been covered with Festive Berries Distress Ink and then I've painted it with the Festive Berries Distress Marker. I've added a Type Charm, some lace and an ornate metal corner to finish.

Hope you've enjoyed today's project !
Sue
x

Thursday, January 9, 2014

Loved

Hi everyone! Micki here.
I hope everyone has been staying warm during this cold arctic blast.  I came down with the dreaded flu bug that is making the rounds and was not able to finish my planned project.  So I thought I’d share my altered heart which I created for eclectic Paperie’s first Get Altered Challenge of the new year. 
The deadline to enter is still a week away, plenty of time to join us in this challenge.  You can get all the details by clicking on the Get Altered Challenge button in the left sidebar.
Sue’s “Heart” challenge was the perfect opportunity for me to get out those hoarded wooden hearts which had been sitting in my closet collecting dust.
_MG_0002
I started out by brushing a coat of gesso onto the heart.  Once dry, it was followed by Tim Holtz Distress Paints which were dabbed all over, then spritzed with water.  My next layer was created with the new Prima  Elementals 12x12 Doily Stencil  and White Linen Dylusions Ink Spray.  I added some small hearts with a discontinued Hearts stencil from Heidi Swapp again using the White Linen ink spray. 
Next I added texture with Dylusions Basic Backgrounds and Unity’s She Art Print Texture stamps and Wendy Vecchi – Studio 490 Archival Ink.  I have to tell you, I absolutely LOVE her Watering Can archival ink.  Love that color, well, I love all of her colors, but that one is my ‘go-to’.  It’s still dark enough but it’s not “in your face” like black can be.
Then I added TCW’s 6x6 “Nancy”, by tracing around the template with a marks all pencil.  This was followed with a black Faber Castell Gelato which was smudged using a combination of my fingers and Tsukineko Fantastix (they work great for those areas where you finger is too big) and Tim Holtz Detailer water brush.
Because “hearts” is the theme, I added my heart with wings stencil with Studio 490 Black Embossing Paste using a palette knife.  Once dry, using a brush, it was filled in with Splash of Color Silks Acrylic Glazes.  A bit of doodle outlining with a black pen, followed by rubbing the edges with Faber Castell Gelato in black.  This time I used a combination of my finger and the broad Tim Holtz Water Brush.
_MG_0008
_MG_0007
_MG_0006
_MG_0005
_MG_0004
_MG_0003
I really love how this turned out, the glazes just shimmer wonderfully and the grunged up edges and the shadows around “Nancy” really make all the reds, pinks and yellow pop.   And as is so typical me, I had no idea what I was going to create.  I just knew I’d use the heart shaped wood but after that was a guess.  The end result is a wall hanging that reminds me that I am loved :).
Go check what’s in your closet, get it out and just start by applying paint, ink and sprays.  You never know what the end result can be……
Hope you were inspired and don’t forget to check out eP's Clearance section…… but you better hurry because at these prices, it’ll all be gone before you know it.


Supplies Used:

Wednesday, January 8, 2014

January Guest Designer Isha Gupta

Hello Everyone!!! It's Isha here today. I am guest designing for eclectic Paperie for the month of January. Thank you Kim and Bonnie for inviting me here.


So for today's card, I thought of creating a card using only pattern paper and no stamping :) Is that fun or what???
Well, I am normally a stamper but this is a good challenge to take. Actually you can find some sentiments in patter paper collection itself :) And there are plenty to choose from in the shop!
Here is my card:


I used this Gorgeous wood veneer frame which highlights the sentiment. Love the paper pack from Simple Stories "I {HEART}SUMMER" collection. I decided I could use the bicycle image as my focal point and then started building around it. I used Memento ink to ink the edge of the tag I created, so it gives slight definition.

All the supplies are available in the shop. Hope you will challenge yourself to create something without using any stamps and make the most of your pattern papers :) If you do, please leave a comment below, I would love to come and visit you.

Supplies: Cardstock: white; Pattern Paper: (I {HEART}SUMMER) Simple Stories; Laser cut wood icons: (Camera) Prima; Memento Tuxedo Black ink

Thank you for visiting.
Isha