Photobucket Photobucket Photobucket Photobucket Photobucket Photobucket

Saturday, December 8, 2012

Graphic 45 Place in Time Calendar

Hello! I'm Annette Green and I'm thrilled to be posting for my first time as a new Eclectic Paperie Design Team member. My project today is an 8 x 8 desktop calendar featuring the wonderful Graphic 45 Place in Time 12 x 12 paper pad and 8 x 8" easel album, with a mix of die cuts from Tim Holtz for embellishment.

Here's a quick look at the project...

You may be wondering why I chose to use 12 x 12 paper with the 8 x 8 easel album. After all, there is an 8 x 8 pad of the same paper, as well as a 12 x 12 easel album. So why mix them up? Mainly because the proportions of the images in the larger paper pad were more in tune with my project plan for an 8 x 8 easel album. 


Here's a look at how it came together, then be sure to check out all the images from each month below. (Lots of photos, so you might want to grab a cup of coffee and get comfy.)


This is the back side of the page which has the month's name on it. I liked this printed border so I just had to figure out how to get it smaller.


I created a template from chipboard measuring 7 x 7 3/4 inches, then sliced it down the middle diagonally to create these two pieces. Placed into this position on the paper for each month, I cut along the template with a craft knife and ruler to keep the lines nice and straight.


Then I pieced those two corner together using clear tape on the back side. It's not extremely perfect, but worked pretty well. This now becomes the base for each month's page.


Each page in the pad has this similar set-up. This shows how I began each month's cuts.


This shows where I flipped the paper over and used the back side. In some cases, I altered this a bit if I needed more contrast. For example, the upper right piece: I cut away the border along its bottom and cut another piece from the Christmas tree border below it. But in other cases, I left the border there because I liked it. (Make sense?)


I cut three of the four postage stamp images from the page and then trimmed around them with my very old pair of tiny scalloped scissors. It almost matches the stamp exactly! I inked the edges of each piece with Walnut Stain to fix any imperfections.


This is how each page starts out. The top banner backgrounds were cut with assorted border punches.
Each month's page has this same format. 


For easy embellishment that wasn't too bulky, I made die-cuts (all from Tim Holtz).
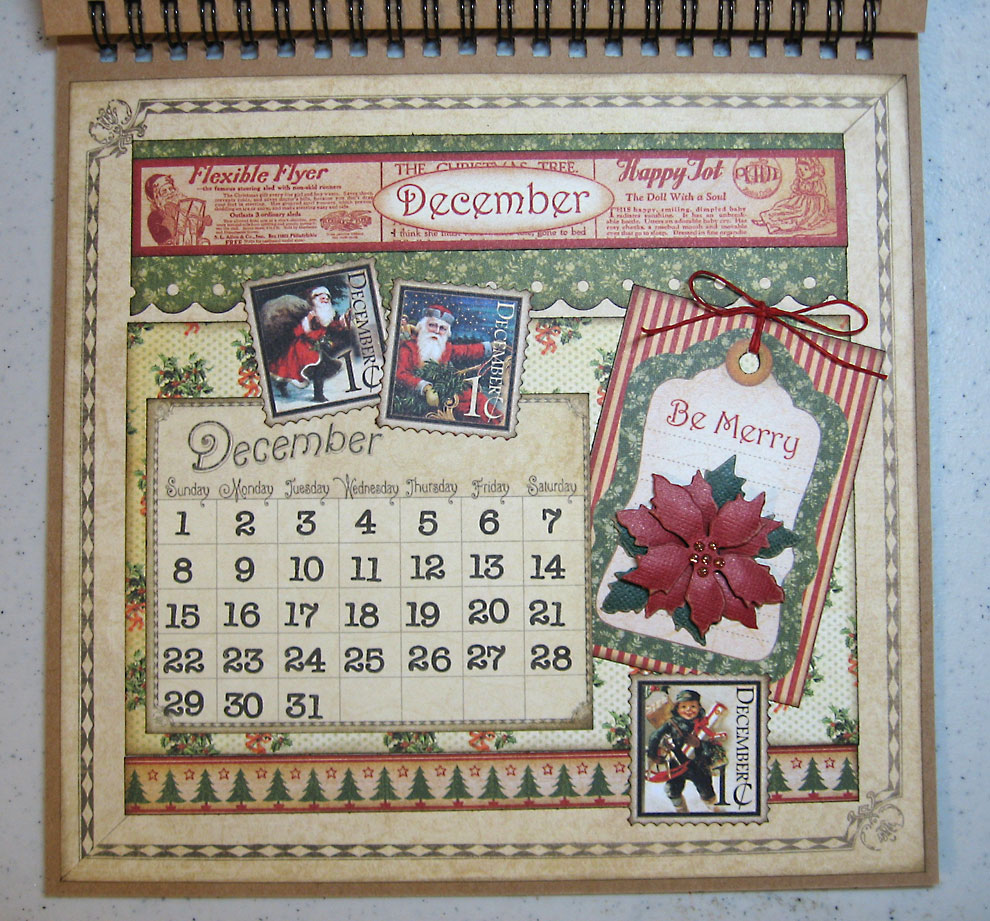


Each page also has three large tags to choose from. In this case "Be Merry."
The calendar portion with the dates was created by first cutting the page apart with all the months, inking the edges, then hand-stamping the numbers with black ink. This took a bit of time, but worth doing. (and I couldn't figure out an easier way to do it, honestly.)


Okay, now that you get how it all came together, here's a look at each month...


I'm a big BIG fan of Graphic 45 papers, but I have to say that the Place In Time papers are most definitely my all-time favorite so far. So with some of the beautiful leftover pieces, I just had to make a little something more. To check out my Bonus Project, visit my blog


Thanks for visiting the EP Blog today. Have a wonderful weekend!

Friday, December 7, 2012

The World of Imagination

 Happy Friday everyone!  I'm so excited to share my project for today...A canvas!  One that I created just for the holiday season and is now hanging right by our front door.  I had such a great time creating this project and it includes a boatload of techniques and products!  Yes, my kitchen table was covered with products for two days...Isn't that the best!?  Let's get started...
 I started with a 12x12 canvas that I had in my stash of crafty goodies, along with a few Claudine Hellmuth paints.  I took a Donna Downey class a few weeks ago and she did this very cool technique with paint, using liquid acrylics, and I wanted to see if I could re-create the look with the Claudine paints.  I'm happy to report that they worked perfectly!

First step (my canvas was already prepped with gesso but this would be your first step if the canvas wasn't prepped) was to apply a layer of Traditional Tan paint.  I then used my heat gun to gently dry the paint.  I then combined a blob (that's a technical term) of Sky Blue and Smidge of Blue paint on a piece of cardboard.  Using a wide brush, I loaded up my brush with paint and dragged the brush across the top edge of the canvas.  Then I got crazy with a water bottle...spraying the blue paint with water, allowing the paint to run down the front of the canvas.  LOVE!  The water also made the tan run a bit and I love the bits of white showing through along with the tan, light, and dark blue.  It has the look of an old plaster wall.
Once my paint layer was dry I grabbed a new stencil from Dylusions, Let is Snow, white embossing paste from Wendy Vecchi and my frosting knife (that's right...I used my cake frosting knife to spread the embossing paste...it works perfectly!) 

I added stars across the top of the canvas and then...I thought about what to do next.  Wendy had posted a project with a snowman last week and she used the paste to create snow banks so I decided to follow suit!  Once the paste was added, I sprinkled extra fine glitter all over the paste.  Fabulous result...super sparkly!

While the paste dried, I got to work on my snowman.  This is a snowman die, designed by Tim, from last year (or maybe two years ago now?) that I cut out from chipboard.  I made the snowman out of four layers of chipboard so he's weighty.  Out of the fifth snowman I cut out the snowman's nose, arms, and hat.  I colored the arms brown with Walnut Stain Distress Ink, the hat was painted with a Pitch Black paint dabber, and the nose was painted with a Sunset Orange paint dabber. 
 
These pieces were set aside to dry while I got to work on the snowman.  He's completely covered with torn pieces of tissue tape.  I used a few different designs on the snowman but you can use any design!  (I'm thinking washi tape could be fun too!)  Once the snowman was fully covered, I went over the entire snowman with the Picket Fence Distress Stain.  The stain helped to tone down the tape and adhere the tape to the chipboard. 
 
Once the paint was dry I glued the arms, hat, and nose onto the main snowman.  I added a few leaf die cuts and red stickles to the hat.  I also added three black (coal) buttons to the front of the snowman, using Enamel Accents.
 
Of course my snowman needed a scarf so I grabbed some Crinkle Ribbon (love that you can buy this in 10 yard packs now) and my Wild Honey Distress Ink pad.  I colored the ribbon with the ink, misted the ribbon with water, crinkled the ribbon, and dried the ribbon with my heat gun.  Love that pop of color on the snowman!  A metal brad finished off the look!
 Here's a closer shot of the sentiment I added, along with a faint swirl under the words.  Both of these stamps are from older Tim Holtz sets.  I love this saying...  And what about those snowflakes in the paste?  Aren't they amazing?  Love them!  Oh, and I added a year date to the edge of the canvas, surrounded by a metal ring.
 My last element was a die cut tree (also from Tim) and this showcases a technique that I learned from Tim during one of his 12 tags of Christmas postos.  The tree was covered with Distress Crackle paint, the trunk with Walnut Stain Distress Ink, and once the tree was dry I used Glossy Accents to add some snow (aka sparkly fluff) to the tree branches.  Then I just added some twine around the trunk and a metal star.

I had so much fun creating my canvas and it was great to just kind of "go with the flow," which isn't a way I typically create.  I'm looking forward to making another canvas (I have one more hidden in my stash!) and creating a video to share the process with you!

Enjoy and tell me...what will you create today?

Thursday, December 6, 2012

Great Gifts Blog Hop

Hi everyone and welcome to the Great Gifts Joint Blog Hop, featuring products and techniques from Sweet 'n Sassy Stamps, eclectic Paperie, and Technique Junkie Newsletter!  We're so excited to share our quick and easy projects with you today, featuring handmade gifts and packaging!

In addition to sharing a multitude of projects on today's hop, we're also giving alway a boatload of prizes!  Be sure to have a comment on the Sweet 'n Sassy, eP, and Technique Junkie blogs for an opportunity to win one of the following prizes:

eclectic Paperie: 25% discount on a future order
SNSS: $15 store credit
Technique Junkie Newsletter: Great Gifts CD or any TJN CD of winner's choice

The winners will be posted on each company's blog by Sunday, December 9thTo be included in the prize drawings, please comment by midnight Friday, December 7th.

For my project I chose to create the coffee mug gift package.  Isn't it the cutest thing ever?!  I started by following the directions in the lastest Technique Junkie Newsletter.  The directions were so easy to follow and assembling the mug was super easy!  Full color photos and step-by-step instructions are included for every project.

I used Winter Wishes design paper from Echo Park (love that purple) on both the mug and the card and the Snowflake Flourish stamp set from Sweet 'n Sassy. 
To create the center piece on the mug, I broke out the brand new Mini Snowflake Rosette die from Tim.  I first swiped Milled Lavendar across my cardstock and then stamped the snowflake in Seedless Preserves.  Once my snowflake was cut out, I assembled it and added it to the front of the mug.  Cute, right?
 
Ready for some more crafty fun?  Check out all of these amazing projects from members of all three design teams!  And don't forget to leave a comment to be entered into the prize drawing!  Also, please be sure to visit Sweet 'n Sassy and Technique Junkie when you have a chance.  There's a bit more about each company listed at the end of today's post.  Enjoy!


Technique Junkie Newsletter is a bi-monthly publication with step by step tutorials which encourage you to use your supplies in fun and creative ways. TJN also produces tutorial CDs with printable PDFs in a variety of themes. 

Sweet 'n Sassy Stamps is a small, family-owned, Christian company offering exclusive images and designs in both clear and digital stamps.  We also carry a small number of exclusive die designs, some of which coordinate with our stamps.

Simple Joy

Hey Y'all!!

It is Tenia from Jazzy Paper Designs!! I created this very CAS card using awesome eP product and it goes a lil somethin' like this......CHECK IT!!!

I used the Simple Joys stamp set from Market Street Stamps, I used DP from My Mind's Eye Tangerine line, and I also used the Vintage Gauze Blossoms from Maya Road. Thanks for stopping by and have a great day!!


Wednesday, December 5, 2012


Hi!  My name is Birgit Edblom and  I'm so happy to be the guest designer here at Eclectic Paperie for the month of December.  I felt so honoured when I got the request from Kim asking me to be the guest designer.  
I was so inspired by the box of goodies that Kim sent me and here is the result of this first week! :)

For the first card I used the fabulous Mini Canvas tag as a vase! Placed the beautiful Maya Road - Ruffle Blossoms  and the paper in the background is from Basic Grey - Serenade 6x6 Paper Pad, there´s lots of lovely paper in this pad!!


I love CAS, clean and simple, so for my second card I used one of the seals from this set, Hero Arts - Aspen Frost Believe Stamp Set and heat embossed with gold embossing powder.


This sweet girl and the snowflakes are from the sweet Graphic 45 - Nutcracker Sweet I Cling Stamp! I heat embossed the snowflakes and sponged with blue ink. Added a seal from this stamp set, Hero Arts - Aspen Frost Believe Stamp Set!


Thanks from a very cold Sweden! /Birgit

Monday, December 3, 2012

Peace on Earth

eP120312 close-up

Hello everyone!  I’m ushering in December here on the eP blog with this great wintery Christmas card today using this Aspen Trees 6x6 template from The Crafter’s Workshop.

eP120312 

I mixed up some Ranger Distress Inks to create this card today using some Inkssentials Mini-Mister spray bottles.  In one bottle I mixed a dropper full of Tumbled Glass ink and water, and in another mister I added a dropper full of Chipped Sapphire ink and water.  Then I taped the template down onto white cardstock and did some misting, using the darker Sapphire at the bottom and the lighter Tumbled Glass at the stop.  After everything dried I dotted on some glue from a Sakura Quickie Glue pen and sprinkled on some ultrafine glitter for snow.  Then I added an all-over iridescent mist from Perfect Pearls spray.  The sentiment comes from a Flourishes stamp set, and the little cardinal was cut out with my Silhouette using this digital file.

That’s all for today…. happy stamping!

eP Signature - Tammy Hershberger

Saturday, December 1, 2012

Spellbinders Die D-Lites Medallion One!

Good Morning!  Sherry here with you today and I have a quick little project to share with you using the Spellbinders™ Shapeabilities® Die D-Lites™ S2-014 Medallion One.  

SCheeverEnjoyTheMomentDec1

The paper used for the project is My Mind’s Eye Lavender.  A Ranger manila tag was covered with one of the designs from the paper pad, the edges sponged with Antique Linen Distress Ink and then stitched together.  

The medallion was die cut 3 separate times from other designs of the paper pad.  They were layered on top of one another, with the final center being trimmed out to match the panel under the medallion.
The panel under the medallion was die cut/embossed with S5-132 A2 Matting Basics B.  The edges were distressed, sponged with antique linen and then stitched to the tag along the left side.

The sentiment is from Market Street Stamps – Simply Joys.  It was stamped in Archival Coffee and then die cut/embossed with S4-367 Back to Basics Tags.  The center of the tag was sponged with Antique Linen.

The seam binding was dyed with a combination of Barn Red and Aged Mahogany Distress Ink.

Thanks for stopping by today!

eP Signature - Sherry Cheever

Project Supplies: