Photobucket Photobucket Photobucket Photobucket Photobucket Photobucket
Showing posts with label 7Dots. Show all posts

Thursday, May 29, 2014

Pinterest Inspiration

Today my post will be a tad bit different. Today my post is based on Pinterest inspiration.

"Whatchu talkin' bout Willis?"

Ok...so how much time do we spend on Pinterest? Ok now add 3 hours a day to make it in real time right? 

You in the back stop glaring like you don't know what I'm talking about.

We are constantly browsing through Pinterest for ideas and inspiration for whatever we do in our lives right? Where would we be without Pinterest?!
*ahead on housecleaning and caught up on laundry*
but seriously gals. This is a wonderful resource for numerous aspects of our lives...including...mixed media art. 

So as an example, today I'm going to show you how I took this image from Pinterest


as inspiration to alter some wood pieces I had lying around.


Here's a quick little video on how I made this lovely piece


I also wanted to share with you the new Cold Country Line from 7Dots


I just adore these papers!!! I also used flowers from the cartographer line and used my Tim Holtz stencil for some of the background. I adore the cool colors of this line and can't wait to use more.
  

Until next time...
{{hugs}}
Andiepants

Wednesday, May 14, 2014

A Tag For All Seasons

Hi everyone, Steph Ackerman here with my second post as the guest designer for eP for the month of May. 

Today, I'm showcasing my tags for all seasons.  I used the same products for each tag, just changed up the colors for each season.


I used the new Prima Marketing stamp - Warm Wishes as the focal image.  She is dressed for winter, but change the colors and you can get away with using her for any season.  Each image was colored with assorted Copic Markers in keeping with the season.

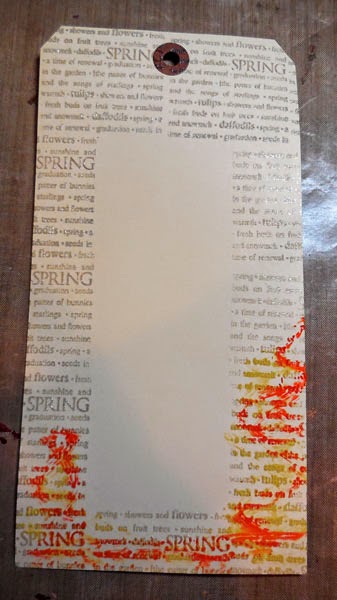
To begin, I stamped each tag with an older Hero Arts stamp set I've had forever.  Using VersaMark Ink, I stamped one season repeatedly on each tag, then added Clear Embossing Powder and heat set each tag. 


Here are the details of each tag:

Spring Tag


I used Faber Castell Gelatos in Yellows, mixing the colors with water until I had the look I wanted. 


I added some Gold Metallic Gelatos around the edges and used a paper towel to remove some of the color.


Summer Tag


I used Faber Castell Gelatos in Reds, mixing the colors then removing some of the color.


Fall Tag


I used Faber Castell Gelatos in Neutrals and Metallics.  Loving the earthy feel of this tag.


Winter Tag


I used Faber Castell Gelatos in Blues and Metallics.  I love the included purples and how the metallic colors make the tag shine.


Once the tags dried, assorted twine from The Twinery - Charcoal, Gunmetal, Blossom, Strawberry, Cantaloupe, Honeydew, Buttercream, and Cappucchino was tied around each tag and through the hole.

Using assorted papers from 7 Dots Studio's Nature Walk - wonderful earth toned papers with imbedded images - I cut them into 3" x 6" panels.  Each panel was inked with the same Gelatos that were used on it's coordinating tag, then matted with black cardstock.

Using additional papers from Nature Walk, I die cut 2 sizes of ovals and placed them on the panels.    Glue Dots were placed behind the panels for dimension, allowing them to pop.

Each stamped image was fussy cut and added to the oval with Glue Dots for a little dimension.

Please stop by the eP Store and pick up all the wonderful products I used in this week's project.

Thanks for stopping by this week.
 

Steph


Thursday, April 3, 2014

Mojo Takes a Hike

Everyone has a creative slump sometimes, that's just part of life. 
Being part of a design team doesn't change that fact, and little miss pants here has been in quite the slump lately. I don't even want to enter into contests to win scrappy stuff right now because...I just don't care.

*GASP*

I'll give you a moment to regroup...

This is completely normal. Sometimes you can walk away and come back when you are ready. The last time I did that I didn't step foot in my room for 5 months. Obviously this tactic is not going to work when you have scrappy commitments and obligations. (birthday cards for family members, DT obligations, Christmas gifts planned, etc.) You have to be gentle with your mojo and coax it back into existence. 

Here are some tips to try to get your mojo flowing:

  1.  Keep a decorative bowl or jar in your room with some creative prompts
  2.  Is there a particular music that seems to get your mojo flowing? Queue that up and just enjoy being surrounded by your space and your tunes.
  3. Is your space a mess and just overwhelming? Clean it up one spot at a time. Do this slowly and walk away frequently. Maybe pick up your space over the course of a week doing just a little each day. The important thing is to make sure you don't overwhelm yourself because that will just make your mojo run away even more.
  4. Put together page kits. Either with photos or without. Once you have a manageable kit in front of you, you may find yourself inspired. 
  5. Peruse Pinterest for ideas. Don't just search "scrapbooking" but go beyond. Look into color palettes or beautiful photos that inspire you. Do you like the color of a particular door in an artistic photo? Or a beautiful mandala? Did someone pin some refinished furniture that you just love the distressed look of? Could you maybe try to recreate that finish on some chippy pieces or wood pieces?
  6. Keep an art journal and just make a mess. Grab your art journal and just start throwing paint and stamps and what-not at a page without thinking.
  7. Fussy cut some images. Trust me....sounds strange...just go with it
  8. Watch an inspirational movie. I love the imagery in Memoirs of a Geisha...just visually stunning as a movie. I adore the art studio and house in The Time Traveler's wife. These are things I pull from, movies that just speak to me. 
For the last month my mojo has been on a serious hiatus. I just have no interest in anything scrappy related. I sat at my desk petting all my semi-recently purchased pretties for an hour...and got nothing. Granted, I didn't have time to clean my room and that was probably not helping but still...what was I going to inspire all my eP gals with?!

I started by perusing Pinterest (which I've already done numerous times) and found myself focusing on color palettes. I decided I wanted to do something with yellow (but I kept clicking on green stuff...don't ask just go with it).

Deciding on yellow I then turned to my pictures in iphoto. There was already a group of photos up from a 2011 vacation so I decided not to overcomplicate things and just pick one. I waited for one to speak to me and then dropped it into Elements and antiqued it to make it more neutral (easier to work with considering the lacking mojo). 

While my photo printing I turned my attention to my desk. 

EGADS!!!!!

I started by moving some stuff to another table. I would only focus on one item at a time and slowly I began to see the top of my desk. When I got to my eP goodies I chose a piece of paper, some scraps of leftovers and put the rest away. I chose a mask and took some bits and pieces of leftover embellies and created a pile. I didn't even have to go to my stash...there was plenty there. I grabbed a couple of mists to coordinate and boom:


I now had a manageable coordinating pile of stuff to work with. Still no mojo...but I didn't have to "wait" on inspiration now to give me direction.

The best thing to do at this point is just not think. I know I wanted the smaller papers and border strips layered under the photo and I wanted to use a lot of my mists and masks so I know those have to be first. Therefore I laid down my photo and the pieces of paper in a generic order. Considering the lack of mojo...it didn't have to be fancy. At every step I just "went with it".


I decided with those little scraps of border I wanted to cut ribbon ends.

Once I had a general idea I traced where my cluster was so my mixed media would pop out around


I used 7DOTS Domestic Goddess for the background sheet, and Authentique-Natural for the mustard yellow background sheet. Remember I said I wanted to do yellow;)

I then added my mixed media starting with a chicken wire stamp, then a holly hock stamp, and finally my Tim Holtz splatters mask. I used Vintage photo and Forest Moss for my stamping. (remember I said I kept clicking on green palettes?) 


Next I added my Wendy Vecchi embossing paste in black through my new Prima stencil for the splatters and the title. I added some Prima wood pieces from the Stationer's Desk collection and flowers from the Petaloo Color me Crazy collection. Some of the Prima flowers are from the new Something Blue collection as well. I finished off the final page with some random dots in Vintage Photo Distress Stickles.


And here is my final page...Completely mojo-less. I actually don't think it's too bad.

So when your mojo takes a hike take heart, you can still create, it will return. Try some tactics but most of all...just let go. 


{{hugs}}
Andiepants


Wednesday, March 19, 2014

Baby

Hi everyone Simply Monica here and today I am sharing another mixed media piece, using 7 Dots Studio, some gesso, paints and anything else that seemed to go together! 

I added some ribbon and flowers and stencils


   Then I used various colors of glimmer mist and paint.  I know not your typical Baby piece, but I am giving this to my friend who is pregnant who is as you could say eclectic so she will love this.  Who says it as to pink and blue right?!

Thanks for stopping by everyone
Supplies Used:
7 Dots Studio - Domestic Goddess 12x12" Paper - Ah, Whatever Liquitex Acrylic Gesso  Chalkboard Glimmer Mist - "Mauve"lous
Liquitex - Glass Beads Texture Gel

Friday, March 14, 2014

Prima in the store!

I'm so excited I could almost pee!!!!

But I won't.

We have Prima in the store!!!!


Prima!!!

So what have I created with all these shabby goodies?! Why a scrapbook page of course silly.


But wait...there's more! 
(sounds like an infomercial right?)


I used Petaloo


I started with the 7Dots Dreamer paper-Sweet Dreams. I loved the new Prima Maps mask and used the Art Anthology red velvet dimensional paint in the mask. I used lots of my old stamps over the entire background with Distress ink in Walnut Stain and Gathered Twigs. Of course my Silks glaze in Guatemalan Green and Dylusions sprays in Lemon Zest and Black Marble. My title was done with the Idea-ology label letters. Honestly I used to be such a sticker snob but now....I love letter stickers!


Here's some closeups of my lower cluster. 


Jump in the store and grab some Prima. Give it a try! They are some of my mostest favoritest products ever.

Til next time...

{{hugs}}
Andiepants


Wednesday, March 12, 2014

Smile

Hi everyone Monica here again with my next post as a Guest Designer for eclectic Paperie.  Today I am sharing a canvas piece I made with an older picture of my daughter and dog Jake.
I used some gesso, glimmer mist, molding paste and 7 Dots Studio papers to dress everything up


A closer look I stamped the chipboard piece and sprayed with a bunch of different colors.


Other:
Crafters Workshop Brick

Wednesday, March 5, 2014

Flutter

Hi everyone Monica here today is my first project as a Guest Designer for Eclectic Paperie.  I am super excited to be here for the month of March.  For my 1st project I created an altered purse.  I used several different mixed media products to give it a eclectic look

This is what the purse looked liked after I covered it with 7 Dots Studio patterned papers...


I used some Gesso by Liquitex and rubbed it all over the papers using a paper towel to wipe off excess

 I sprayed it with glimmer mist by Tattered Angels and used a chicken wire piece from Crafters Workshop as decor on different spots
I sprayed a chipboard scroll piece by Fancy Pants and used it as the front latch for the purse and just inked and sprayed all over the purse and used my embossing gun to dry - I am a bit impatient

 I also used Dylusion stamp set and outlined certain parts with a white gel pen


Thanks for stopping by everyone and be sure to check back next Wednesday for project number 2!!

Eclectic Paperie Supplies Used: