
I wanted to share some of what I've been getting up to with the Tim Holtz Distress Paints, so I'm offering up a step-by-step through the backgrounds of my set of tags "What We Hold On To", which you may have seen over at Words and Pictures. If you'd like to see more details of the finished pieces, you'll find them here.
Warning: it's a process post, so there are lots of pictures - maybe a cup of tea to help you through?!
First, here's a reminder of the finished trio of tags:

They all started from using the paints to do Tim's wrinkle-free distress technique, and all three are from one painty splurge on the craft mat. Here's the first one after the first swipe... just look at that marbleising (that's what Sir Tim calls it, so that's good enough for me!).

And here it is after several dabbings and daubings more. You have to dry between each layer to set the effect you've achieved. And, once dry, it's perfectly true: the paint doesn't react to moisture any longer, so you can do whatever you like over the top of it, without disturbing your work so far...

By the way, it's Seedless Preserves, Weathered Wood and Picket Fence I'm playing with here. Sorry, my lovely photo of the paint on the mat itself came out all blurry - I was photographing in the evening, so some of the pictures are slightly suspect, I'm afraid!
Once you've added water, the paint goes a long way, so I was able to get three progressively paler versions out of the delicious smooshy mess on the table!

Next step was to try out stamping with Archival ink on top of the paint: it works brilliantly! The dry surface is smooth, yet somehow toothy at the same time, and takes the ink beautifully for a really sharp image.

Next I had to try stamping with the paints themselves... I used a texture stamp (these are all Artistic Outpost stamps by the way) which is like tiny bubble wrap, and I love the effect of it bubbling all over the place like little clusters of grapes or wisteria!


Even though the paints are so fluid, you can still get great added texture when you stamp with them.

And of course you know if I'm anywhere near a tag, there's probably going to be some edging with Vintage Photo Distress Ink going on too... and wow, I love how this works. There's sort of a resist effect from the paints - so again, they hold their own - but they also respond really well to the ink, warming up, and gaining great depth from it.

And I really enjoyed the next stage too... playing with the Flourish Texture Fade embossing folder to add some texture.

Once embossed, I highlighted each of the flourishes with some Distress Paint, smoothed on with my fingertips - different colours for different tags.
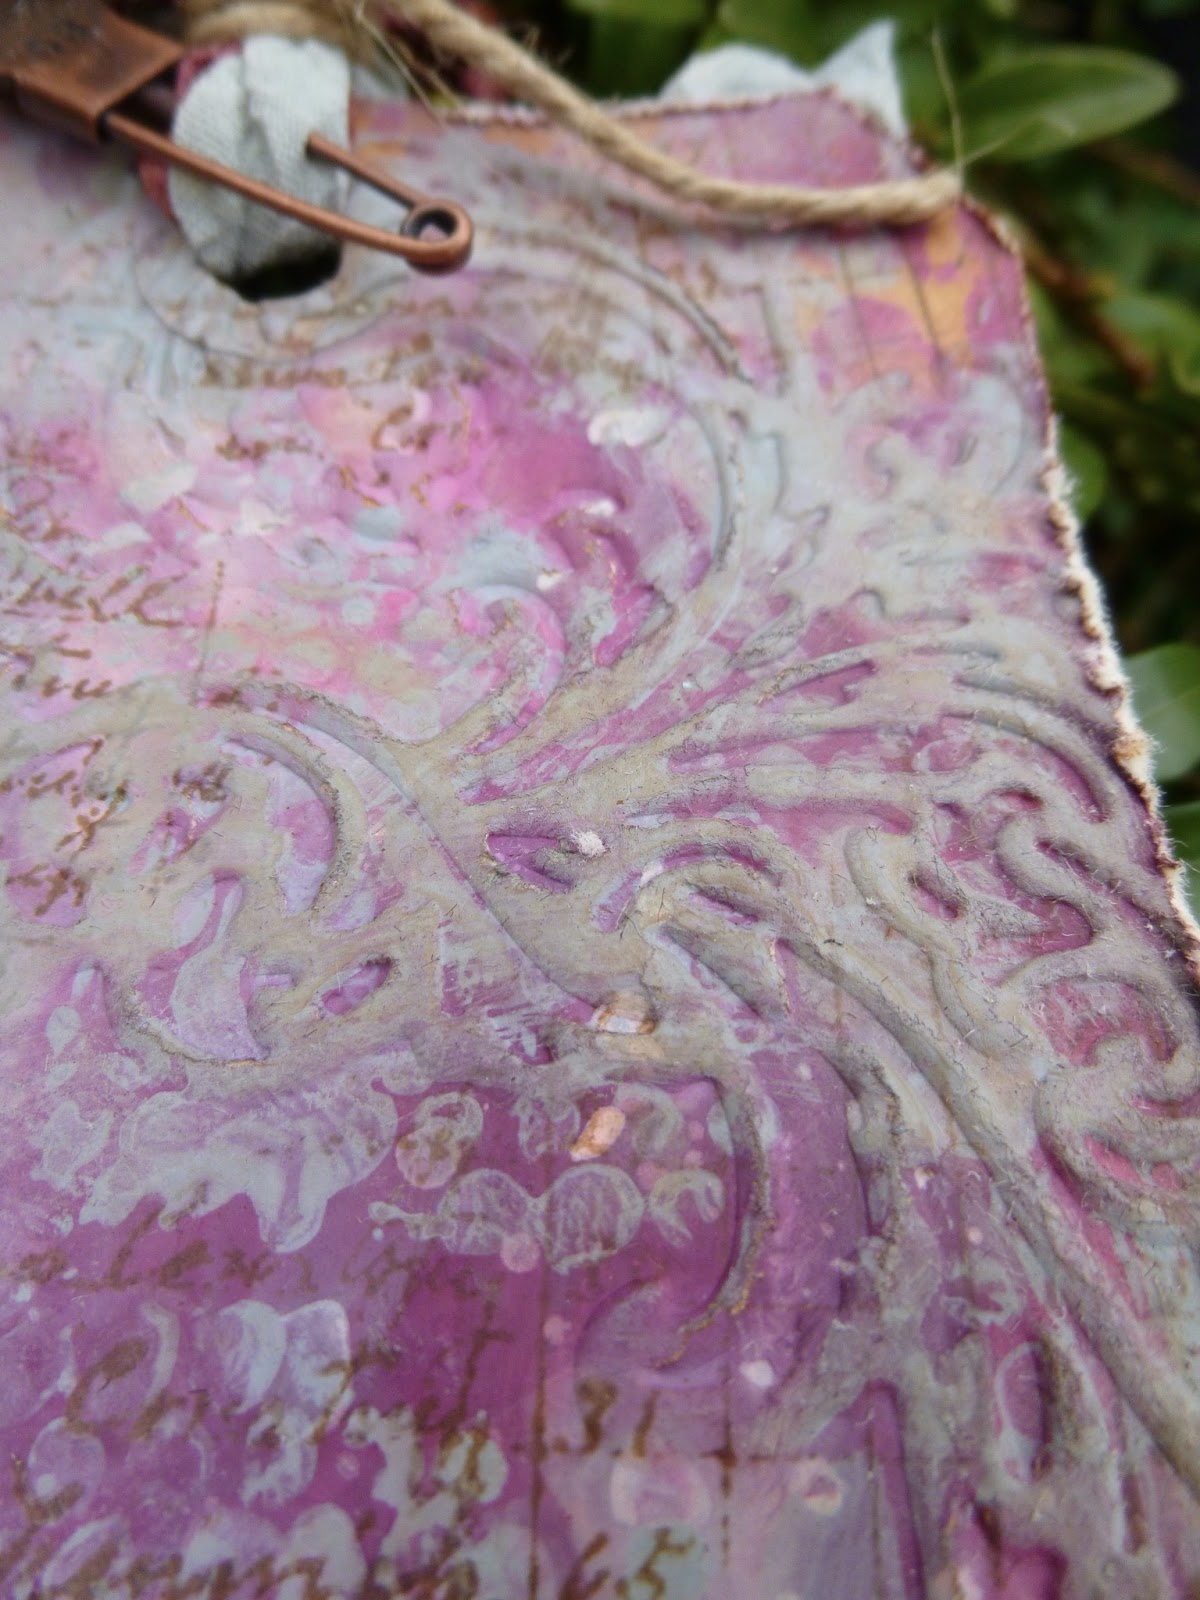
Then, what else but a bit more Vintage Photo DI for added oomph!

The photographs of these are being done outside in daylight now, so the colours are slightly truer than some of the stages.

By now, I really didn't want to cover up my beautiful backgrounds, so the composition of the tags was dictated by making sure as much as possible could still be seen!

I love that you still have that clarity of all the layers still visible.

But that's not all the Distress Paints were involved in on these tags. I also used the Weathered Wood to alter the embellishments - two Wendy Vecchi pieces, and a metal clock from my stash.

And they're also involved in dyeing the crinkle ribbon. If you use solely DPs on the ribbon you get a very matte, opaque look; fabulously shabby, but not quite what I wanted for these tags. So I had a little go at mixing Distress Paint and Distress Stains on the mat for the ribbons, and I love the result.

Some of the matte effect of the paints, plus some of the brilliant translucent colour of the stains: adds up to pretty cool ribbons, I reckon!
I've got lots more DP experiments to share with you, but I think that's more than enough for now... it'll just have to wait for another day!
Thanks so much for stopping by today, and I look forward to seeing you again soon, either here or elsewhere in Craftyblogland...
Designer: Alison Bomber
Click on the link to go straight to the product:
Fabulous tutorial Alison! Gorgeous tags filled with visual, textural interest. Have a great week!
ReplyDeleteThanks for this great step by step Alison, it's great to see the processes of how you have achieved those fabulous backgrounds and once embellished they are just stunning tags. Beautiful work.
ReplyDeletehugs {brenda} xox
Great textures and painty inky layers trace x
ReplyDeleteThank you for this fabulous tutorial Alison. It is always a treat to see how your mind works it's way through each creation - a lesson for us all on what to do. Hugs, Jenny x
ReplyDeleteBeautiful tags and a great informative post, love those colour combos x
ReplyDeleteThank you for explaining how you made them-it all sounds quite simple when you tell it and you have made stunning tags
ReplyDeleteLove Chrissie xxx
Thanks for the brilliant tutorial, Alison! :)
ReplyDeleteHugs,
Claudia x
just fantastic - thank you Alsion for sharing this!
ReplyDeleteWow..wow!!
ReplyDeleteAlison, your tutorial is amazing!
Beautiful colors ♥
Love it alot!
Thanks for sharing!
Hugs, Anne
Such beautiful colours and stamping and a great step by step!
ReplyDeletegorgeous tags.
ReplyDeleteGreat tags, Alison. I love all the beautiful depth and texture. Just makes me want to pull out my paints and make some tags today. So inspiring! Thanks for the step-by-step too.
ReplyDeleteOH MY!! Love the layer build up and the texturing! Thanks for sharing your step by step!
ReplyDeleteStunning, Alison! The colors and textures are amazing!
ReplyDeleteSuper Duper Cool!!
ReplyDeleteI am inspired!!!!
Great Tutorial :-)
Gorrrrrgeous Alison and woohoo a tutorial...brilliant!!!
ReplyDeleteHugs
Tracy
Xxx
These tags are all so beautiful. Vee xx
ReplyDeleteFabulous tutorial Alison ! Gorgeous colours and stamping ! Sue C x
ReplyDeleteThank you Alison for sharing... Fantastic!! Hugs May x x x
ReplyDeleteWow stunning effects, and the ribbon looks really vivid what a fantastic idea. :-) Kezzy xxx
ReplyDeleteThey're beautiful Alison and what a great tutuorial as well! Chris x
ReplyDeleteWonderful tutorial! I still have to get my hands on some of these paints and that is fast approaching! Hugs!
ReplyDeletegorgeous Alison! Awesome step outs and amazing colors, layers, and textures on your tags.
ReplyDeleteA beautiful group of tags- love the picture tutorials- love the texture and the color is so pretty!
ReplyDeleteLOVE your tags Alison! They are SO cool! Love how you created the backgrounds!
ReplyDelete