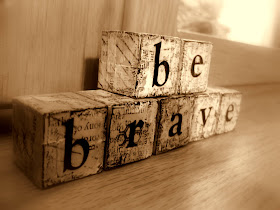
I tore up a bunch of vintage book pages and used Glue N’Seal
to decoupage them on all the sides of the blocks. Then I just did a quick little sanding on the
edges. For some added texture and
design, I stamped some of my favorite go to backgrounds here and there. I am in LOVE with Wplus9 Defining Words and BackgroundI. Because these blocks are smaller, I
also used Pattern Craze by Sweet Stamp Shop.
Then I took a bit of the Claudine Hellmuth White paint and
with my finger, smeared some paint on all side of each of the blocks.
I’m really into the blue/greens these days for my studio
décor because my walls are red. I mixed
a bit of the Claudine Hellmuth Sky and Landscape Green. Now why didn’t I use the Teal….well, that is
simple…I couldn’t find it! I must have
used it on another project and it’s in a bin but this still worked like a
charm. Next, I antiqued all the blocks
which warmed up all the colors with some Vintage Photo Distress Stain.
Then I added some letters from my stash to spell out “be
brave”. I thought it might be good to
just sharpen the edges a bit with Black Soot Distress Ink so each block would
stand out. The last step was the Gloss GlueN Seal which will help to keep my blocks protected but also make them easier to
dust!
So I’m hoping this little mantra in my studio will remind me
to be the brave girl that I am!


Love the layers of colors you used. Looks like you had a lot of fun and have made something you can cherish. I think we all need to remind ourselves of the need to be brave every now and again. Thanks for the great tutorial.
ReplyDeleteSuch a great idea! Very inspiring!
ReplyDeleteStunning Michelle and a wonderful tutorial of how you created your blocks. Great work!!
ReplyDeleteSerious love for those blocks <3
ReplyDeletelove love love :)
ReplyDeleteand thanks for all the new product tips on antiquing. VERY helpful!
LOVE it!!!!Great idea and I've got some of those blocks....somewhere :-)
ReplyDeleteLove them. I'll look forward to your thoughts on Glue N Seal compared to other products. Love how you use your fingers to paint. This would be cute with the girls names on it to match their room. You are BRAVE. Loved Friday's class, took my book to work to show everyone, everyone loved it. Had it sitting next to my "Happy House". I carry my Happy House to work each night to decorate my work station. If i forget to put it out, i get "where is the happy house". I have a few people who come to look for it when they are having a bad night.
ReplyDeleteI love the blocks so much and the saying has meaning for me too! Excellent instructions!
ReplyDeleteLove how Kim brings her Happy House to work and that people are enjoying it. Art makes people happy!
I love these!
ReplyDeleteI love these blocks - a really great idea for some inspirational home decor! Beautifully done, thanks for the inspiration...
ReplyDeleteAlison x